Changing The Panel Layout
This topic describes how to make some typical changes to the layout of a panel. These topics are included:
- Protection control characters
- How to add an extra work center resource schedule
- How to change date and time format
- Modifying panels while the system is running
- Other layout changes
Protection Control Characters
The protection control characters can be placed anywhere in the text background, and are always replaced with a space when displaying or printing the panel. The protection starts with a < and ends at the next > as in this example:
Operation_number~9___&
Single_machine___$183_________&
Operation_time__<¨20__:__:__&
Efficiency_______`27_.__&
Forced_start____ ^36____"36__&
Network_level____*130&>
To protect one or more fields these controlling characters are used:
| Control character | ASCII code | Description |
|---|---|---|
| < | 60 | Start protection. |
| > | 62 | End protection. |
How to Add an Extra Work Center Resource Schedule
To add an extra work center resource schedule (W/C schedule) make the following changes to the PMWSCH__.SKM file:
- Change the W/C schedule definition in the panel #1
- Change the dropdown menu definition in the panel #5
- Define 3 new panels to control the new W/C schedule
In the panel #1 you must define which panels are launched with the W/C schedules (which are defined in the drop-down menu in the panel #5). See the example below for more detail:
#01;1;-1;-2;-3;01;00;79;
						@@13;*01;51;*02;56;*03;61;*04;71;*05;81;*06;00;*07;00;*08;00;*09;00;*10;00;

						 ß

						Title
						@@13;*11;52;*12;57;*13;62;*14;72;*15;82;*16;00;*17;00;*18;00;*19;00;*20;00;

						 ß

						Listbox
						@@13;*21;50;*22;55;*23;60;*24;70;*25;80;*26;00;*27;00;*28;00;*29;00;*30;00;

						 ß

						Window
@@13;$1;_;$2;_;$3;_;$4;Q;$5;_;$6;_;$7;_;$8;_;$9;_;$10;_;
@@13;$11;_;$12;_;$13;_;$14;S;$15;_;$16;_;$17;_;$18;_;$19;_;$20;_;
- The first @@13 function contains the number of the W/C schedule. The next number indicates the panel where the title of the new W/C schedule is defined.
- The second @@13 function contains the number of the W/C schedule plus 10. The next number indicates the panel where the list box is defined.
- The third @@13 function contains the number of the W/C schedule plus 20. The next number indicates the panel where the window is defined.
The new W/C schedule is added to the drop-down definition in the panel #5. (See the example below for more detail.)
@@30;*254;0;7;?0;;;LZI;20;6;10;I;+;
Planner_report;+;
Operator_report;+;
Schedule_analysis;+;
Quantity_report;+;
New_report;+;
|;1;2;3;4;5;
(Refer to the section The @@ Function Toolbox, @@30 Combination Box Definition, for further information.)
The new W/C resource schedule panels must also be defined. This is panel #80, #81 and #82 in the example above. The new panel definitions are illustrated by this example:
#80;1;-1;-2;-3;01;00;79;
@@28;SWT;5;80;100;19;180;Work_Center_Resource_Schedule_-_New_Report;
@@30;$1;1;7;?0;;;DI;0;5;1000;C;SW;;
@@27;LBOX;HTE;?0;;;13;1000;0;;D+1;F2;
@@24;\Open...;1;7;?0;;;PD;F2;
@@24;\Status...;1;7;?0;-2;;PX;F5;
@@24;\View_now;0;7;?0;;;P;F4;
@@24;\Print...;1;7;?0;;;P;F9;
@@24;\Pullup...;1;7;?0;;;P;F6;
@@24;\Del.date;1;7;?0;-2;;PX;F17;
@@24;Del.date_ori\ginal;1;7;?0;-2;;PX;F18;
@@24;Cancel;1;7;?0;;;PNPF3;T;F3;
@@24;Help;1;7;?0;;;PH;
_Resourse.$1___________&____$\View_now___&
$LBOX____________________________________________________________________&
_
_
_
How to Change Date and Time Format
The standard panels in Infor M3 SWB use centihours to define and display time duration. All dates and times are displayed in YYMMDD, DDMMYY, MMDDYY or HHMM format. You can change the time format to decimals if you want dates to be shown as YYYY/MM/DD.
This section contains information about:
- Date Fields
- Time Fields
- Control Characters For Date and Time Fields
Date Fields
Dates can be shown in the date field in three different ways:
- ISO (YYYYMMDD)
- NORDIC (DDMMYYYY)
- US (MMDDYYYY)
The date format is defined in the PMINIT__.DAT file. If the panel field is not long enough to contain the entire date, the numbers are truncated beginning with the year. In the ISO format, the date has a field length of 6 characters. In this format the date January 27, 1999 would be displayed as 990127.
The date field can also have a separator character such as [/] between the year and month, and between the month and day. When a separator character is used, January 27, 1999 would be shown as 99/01/27. To include a separator character in your time format, you must include it in the panel definition.
Time Fields
When time is displayed in the time field it is represented as HHMMSS. (The letters H = hours, M = minutes and S = seconds.) The field is filled out from the left to the right to be certain that truncation occurs from right to left, that is where information is less important in terms of being correctly understood.
The time field can contain a separator character [:] that separates the hours from the minutes and the minutes from the seconds (HH:MM:SS). The separator character has to be included in the panel definition.
control Characters For Date and Time Fields
| Control Character | ASCII code | Description |
|---|---|---|
| ` | 239 | Start of a centihour field in decimal format: A 4-byte real field that ranges from 1.175494e-38 to 3.402823e38. |
| " | 34 | Start of a time field: hours, minutes, and seconds are displayed, for example, as HHMMSS. It can contain separator characters such as HH:MM:SS If the defined field is too small truncation is performed from the left to the right. |
| ^ | 94 | Start of a date field. Year, month, and day are displayed, for example, as YYMMDD. It can contain separator characters such as YY/MM/DD. If the defined field is too small, truncation is performed from the left to the right. |
| ¨ | 249 | Start of a centihour field. Hour, minutes, and seconds displayed, for example, as HHMMSS. It can contain separator characters such as HH:MM:SS. If the defined field is too small, truncation is performed from the left to the right. |
| / | 47 | Date delimiter. |
| : | 58 | Time delimiter. |
Panel Example
#500;1;-1;-2;-3;01;00;79;
@@28;SWT;3;80;100;17;200;Example;
@@24;\OK;0;7;?0;;;PD;F0;
_
_Centihours__________________`1___.__&
_Hours,minutes_and_seconds___¨1_:__:__&
_
_Date________________________^2_/__/__&
_Time________________________"2_:__&
_
_$\OK__&
Modifying Panels While the System is Running
Each time a new panel is displayed in Infor M3 PWB it is stored in the memory ring buffer. This makes it quicker to access next time it is used. When you open a panel the system will first scan the ring buffer to check for the panel. If the panel is in the buffer the memory version is used. If the panel is not in the buffer, the system will take it from the appropriate panel file. (For this reason, changes made to the panel file will not effect panels that have already been used.)
You can delete panels stored in the ring buffer so that changes to the panel file are used. To do this hold down the [ALT] and [Shift] keys before you specify a modified panel, specify the panel and release the keys after the panel is displayed. In this way, you can use the [ALT] and [Shift] keys to see changes to the panel layout even though the system is in active use.
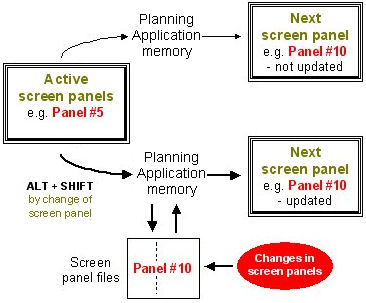
To the change the layout of a specific panel while the system is running you must know the panel number and file name. By pressing [ALT] + [Shift] keys, the current date, time, and active version number is displayed in the main title bar.
Other Layout Changes
Other ways to change the layout of a panel are listed below:
- You can change the field length by inserting underscores in the field, for example after the starting control character or after the field text or reference number.
- You can change the position of a field by changing its position in the panel or by changing its relative position using its @@ function.
- You can change the foreground and background color of a button by changing the color code on the @@24 function.
- You can change the number of visible lines in the list box and combination box through their @@ functions.
- You can add "hot keys" to your buttons by inserting a \ in the field text.
- You can change the pop-up position of the window by changing the @@ 28 function.
How to Change the List Box Report Layout
To add or remove information in a list box you must change the layout of the list box report. A list box report consists of:
- A main panel defining the list box
- A list header panel
- A list body panel
The main panel is used to create a panel in a window containing a list box and to adjust other necessary controls. (The list box is created by using the @@27 function.)
The list header and body panels define the contents of the list box. You can define multiple headers and body panels for the same list box, each allocated to a special report.
Review these notes carefully:
- You can check the number of the body panel by holding the [ALT] and [Shift] keys down while the report is being created in the list box. The standard header panel is located just before the body panel in the file.
- The header and body panels can not contain any @@ functions other than @@6 , and @@22. These are used to filter the output.
- The header and body panels can not exceed 132 characters.
- If the header panel is longer than the body panel place underscores at the end of the body panel to give it the same length. The body panel defines the horizontal scroll range.
- Only one line is allowed in the header and body panels.
- The data available in the report body panel can often be determined by the @@33 function in the main panel. The function @@33 defines the appropriate help file. In other cases the text in the title bar or comments in the panel file will indicate which data is available.
You can control the size of the list box in the main panel. The width is determined by the field width and the height is set by the @@27 function. It is possible to define the maximum number of allowed lines in the list (which is often 1000 lines). If a given report exceeds 1000 lines, then you can stop it before the maximum is reached or you can nullify the definition and let the process continue to the end.
The following panels are from the PMMACH__.SKM (Work Center Resource) panel file. They illustrate the resource selection panel.
Example of Main Panel
#20;1;-1;-2;-3;00;00;79;
@@28;SwTSbE;1;80;90;50;50;Work_Center_Resources;
@@33;CRCREG00;
@@31;$1;0;15;?65001;"Work_center_resources";;1;MLWf;0;
@@27;LBOX;TECLShSv;?65001;;;11;1000;0;;D-6;D-4;D+1;D+3;F2;
@@24;Search;1;7;?0;"Search";;1;SL02TNpF5;.ICO=14;CN;F6;
@@24;Open;1;7;?0;"Open";20;1;SL02DTK(\OPEN);.ICO=66;CN;F2;
@@24;New;1;7;?0;"New";;1;SL02TK(INSERT)D(2);.ICO=59;CN;F4;
@@24;Delete;1;7;?0;"Delete";;1;SL02TK(L:DELETE)D(2);.ICO=103;CN;F5;
@@24;Print;1;7;?0;"Print";;1;SL02TK(\PRINT);.ICO=57;CN;F9;
@@24;Close;1;7;?0;"Close";20;1;SL02TF3;.ICO=13;CN;T;F3;
@@24;Help;1;7;?0;"Help";;1;SL02TH;.ICO=71;LM;
@@13;*101;4;*102;1;*103;22;*104;23;*105;21;$211;N;
@@24;[Open;0;7;;;;MLK(\OPEN);F2;
@@24;[New;0;7;;;;MLK(INSERT)D(2);F4;
@@24;[Delete;0;7;;;;MLK(L:DELETE)D(2);F5;
@@24;[Print;0;7;;;;MsLK(\PRINT);F9;
@@24;[Refresh_list;0;7;;;;MWLK(F5);F6;
$1___________&________$Search$Open$New_$Delete$Print__$Close$Help____&
$LBOX&
$[Open_______________&
$[New________________&
$[Delete_____________&
$[Print______________&
$[Refresh_list________&
Example of List Header Panel
#22;1;-1;-2;-3;00;01;79;
@@42;;;;-30;-30;-50;-50;-50;-50;-50;-50;-50;-70;-80;-90;
!W/C_resource!Patt_!Non-work_days!CCT!Caplv_!No_of_resources!Utilization_rate!Pr_tm!Poptm!Avqtm!Settm!SUR____!Cpotm!Acl_!Work_zone
Example of List Body Panel
#23;1;-1;-2;-3;00;01;79;
@@42;;;;-30;-30;-50;-60;-70;-80;-90;-100;-100;-100;-100;-100;-100;-110;
@@38;*58;1;1; Color
@@38;`109;2;4; Utilization rate 1. shift
@@38;`110;2;4; Utilization rate 2. shift
@@38;`111;2;4; Utilization rate 3. shift
@@38;*21;;*21;0;.ICO=3007; Capacity def. finite
@@38;*21;;*21;1;.ICO=3008; Capacity def. infinite
$45__________$69__&$57__________&*_21&_*113&_`__.__118`__.__119`__.__120&_`109&_`110&_`111&__ù3_:__ù4_:__ù5_:__ù1_:__ù2_:__ù30:__&*58$73__________&