Functions
@@0 Numeric Validation
Numeric validation is a special function that is used in almost all applications. It ensures that if an entry is not placed between specified numeric boundaries it will not be accepted into the field. Instead an error message is displayed and the cursor is positioned in the field containing the invalid value. If the field is not changed, then no validation check is performed.
Syntax

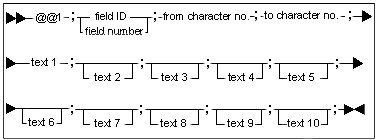
Field ID
The field ID is the direct address to data. It consists of a starting control character followed by a reference number and it ends with the ending control character ampersand (&) or a new starting control character.
Field Number
The field number defines the position of the field in the panel. You can find the field number by counting from the left to the right and from top to bottom.
Use the starting control characters together with the field number.
Max. Value
The maximum value (included) can be defined as an integer or a real number with decimal points.
Min. Value
The minimum value (included) can be defined as an integer or a real number with decimal points.
Example
#500;1;-1;-2;-3;01;00;79;
@@28;SWT;3;65;100;19;150;Example;
@@24;\OK;0;7;?0;;;P;T;F0;
@@24;Cancel;0;7;?0;;;PNPF3;T;F3;
@@24;Help;0;7;?0;;;PH;
@@0;*87;1;3;
_
_Value_(1-3)_*_87&
_
_$\OK___&_$Cancel&_$Help__&
@@1 Text Validation
To validate a new text string specific fields must be tested (against at least 10 already accepted text strings). You can ensure that the third character in a compound key is always A or B. Text validation occurs automatically if at least one character has been changed or not a space.
If the validation fails, then an error message is displayed and the cursor is positioned in the field where the failure occurred.
Syntax
Field ID
The field ID is the direct address to data. It consists of a starting control character followed by a reference number and it ends with the ending control character ampersand (&) or a new starting control character.
Field Number
The field number defines the position of the field in the panel. You can find the field number by counting from the left to the right and from top to bottom.
You can use the field number to connect a @@ function with a field. Note: If the field number in the @@ function and the related field do not correspond, the field is as entry field.
Use the starting control characters together with the field number.
Example
#500;1;-1;-2;-3;01;00;79;
@@28;SWT;3;65;100;19;150;Example;
@@24;\OK;0;7;?0;;;P;T;F0;
@@24;Cancel;0;7;?0;;;PNPF3;T;F3;
@@24;Help;0;7;?0;;;PH;
@@1;$42;1;3;MON;TUE;WED;THU;FRI;
_
_Day_$42_&
_$\OK___&_$Cancel&_$Help__&
@@5 Data Transfer from Indexed Files
To view panel descriptions without having to specify vast amounts of data, transfer an indexed file directly into the panel by following the procedure illustrated below.
Syntax

File Name
These file names are available with the @@5 function:
| File name | Description |
|---|---|
| DPRE | Shift model days (daily production time) |
| UPRE | Shift pattern lines (weekly production time) |
| AKRE | Capacity adjustments |
| RCRE | Work center resources |
| MGRE | Work centers |
| PKRE | Non-working days |
| TTRE | Transit time matrix |
| ORDH | End item orders |
| MRED | Parallel operations |
| SEQC | Sequence optimization controls |
| SHIP | Order links |
Index
The index number as defined in the PMSTYF99.DAT file.
Search Key
This feature defines a search key, which can be used to identify records in the REGS file. You can use the field number or the field reference as the search key. If you require several fields for your definition, a slash [/] can be used to connect the fields you want to apply. In the case of @@30, the search key can be set to null. In this case all entries would be searched.
Receiving Field
To define the field to which data is transferred, you can use the field number or field reference.
Offset in Source
The offset position in the REGS file record is the start point from which the data transfer begins. The transfer of data to the field defined as the receiving field continues until the field is filled. (The number of bytes transferred is equal to the length of the receiving field).
Example
#80;1;-1;-2;-3;01;00;79;
@@28;SWT;5;28;100;4;180;Order_Export;
@@33;CRPORT00;
@@24;OK;1;7;?0;-2;;PNPF3;T;F3;
@@24;Help;1;7;?0;-2;;PH;
_
_
_$OK_________$Help______&
#81;1;-1;-2;-3;01;00;79;
_!Item_number_______________!Field_1_______!Field_2___!Field_3____!Field_4
#82;1;-1;-2;-3;01;00;79;
@@5;EXOI;1;$113;$875;34;$888;74;$897;114;$907;154;
_$113______________________&$875__________&$888______&$897_______&$907__&
@@6 Inclusion of Control Character
When you place a start control character in the first field, it is applied to all the fields in a given string. If a start control character is not present, the panel system defines the position as being the first character in the field and the space position is omitted. You can place different fields side by side without space separation. This method is useful when consolidating strings that do not follow a field reference.
Syntax

Field ID
The field ID is the direct address to data. It consists of a starting control character followed by a reference number and it ends with the ending control character ampersand (&) or a new starting control character.
Field Number
The field number defines the position of the field in the panel. You can find the field number by counting from the left to the right and from top to bottom.
Use the starting control characters together with the field number.
Example
#23;1;-1;-2;-3;00;01;79;
@@6;$45;
$45__________&$69__&$57__________*_21&_`45_`46_`47_&`7__`8__`9__&_~48__~49_&_+3_:__+4_:__+5_:__+1_:__+2_:__&__+30:__&_*58&
@@7 Calculation Field Definition
The @@7 function can be used in panel fields to perform simple calculations such as plus, minus, multiply and divide. Nevertheless, possible rounding off errors may occur under these circumstances. We recommend that you avoid use of the REAL format whenever possible.
If you use dates in your calculations, then specify the dates in seconds use an [~] instead of a [^]. For further detail refer to Example number 2 shown below.
Syntax
![]()
Receiving Field
To define the field to which data is transferred, you can use the field number or field reference.
X (first calculation number)
X is the first number in the calculation.
Operator
The operator can be P (plus), M (minus), G (multiply) or D (divide).
Y (second calculation number)
Y is the second number in the calculation.
Example 1
@@7;14;`50DK750;
$625_________________~136______&_________`29______.&^56____"56__^57____"57__ù65:__ù22_:__&*70*125&$385_________&$171_______&`____&
The value in the field with offset `50 is divided with the constant 750. The result of the calculation is placed in field 14 shown below:
Example 2
@@7;16;~56M~37DK3600;
$625_________________~136______$269_________&^107___"107_&*__181&^56____"56__ù65:__&$159_________&*70*125$_129&_^37____"37__&~________&
The two dates are subtracted and the result is given in number of hours.
@@13 Exit Action
The exit action (or after-process function) is activated when you have finish editing the panel and before returning to the application. At this point, you can re-edit or insert default values into various data areas, regardless of the content of the fields.
Syntax
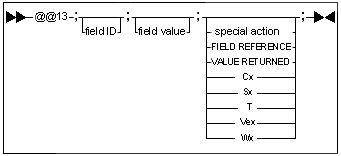
Field ID
The field ID is the direct address to data. It consists of a starting control character followed by a reference number and it ends with the ending control character ampersand (&) or a new starting control character.
Field value
The value to be inserted into the field at exit, regardless of the field content.
Special Action
These special actions can be used:
RETURN VALUE Action
Syntax: FIELD REFERENCE; VALUE RETURNED
This action returns values to the field described by the field reference The control character in the field reference gives the field type.
REXX Call Action
Syntax: Cx
"x" is the REXX command number with a range from 1 to 99.
In the startup CMD file you can specify environment variables to define the REXX command file attached to the REXX command number, such as SET REXXC1 = C:\REXX\BACKUP.CMD. If no environment variables are defined, then the default REXX command filenames are REXXC1.CMD, REXXC2.CMD, and REXXC99.CMD.
PANEL Action
Syntax: Sx
TERMINATE WINDOW Action
Syntax: T
The window is terminated.
FUNCTION KEY Action
Syntax: Fx
where "x" is defined as the function key number to be simulated. It can contain be one or more digits The action simulates the use of the key and is performed immediately such that the rest of the special function definition is skipped. F0 is treated as if the Enter (Return) key was pressed and F3 is treated as the Escape (Esc) key.
DELAY Action
Syntax: Wx
Where "x" is a positive number interpreted as a delay in seconds.
The panel system waits the specified number of seconds before resuming.
Example
#20;1;-1;-2;-3;00;00;79;
@@28;SwTSbE;1;80;90;50;50;Work_Center_Resources;
@@33;CRCREG00;
@@31;$1;0;15;?65001;"Work_center_resources";;1;MLWf;0;
@@27;LBOX;TECLShSv;?65001;;;11;1000;0;;D-6;D-4;D+1;D+3;F2;
@@24;Search;1;7;?0;"Search";;1;SL02TNpF5;.ICO=14;CN;F6;
@@24;Open;1;7;?0;"Open";20;1;SL02DTK(\OPEN);.ICO=66;CN;F2;
@@24;New;1;7;?0;"New";;1;SL02TK(INSERT)D(2);.ICO=59;CN;F4;
@@24;Delete;1;7;?0;"Delete";;1;SL02TK(L:DELETE)D(2);.ICO=103;CN;F5;
@@24;Print;1;7;?0;"Print";;1;SL02TK(\PRINT);.ICO=57;CN;F9;
@@24;Close;1;7;?0;"Close";20;1;SL02TF3;.ICO=13;CN;T;F3;
@@24;Help;1;7;?0;"Help";;1;SL02TH;.ICO=71;LM;
@@13;*101;4;*102;1;*103;22;*104;23;*105;21;$211;N;
@@24;[Open;0;7;;;;MLK(\OPEN);F2;
@@24;[New;0;7;;;;MLK(INSERT)D(2);F4;
@@24;[Delete;0;7;;;;MLK(L:DELETE)D(2);F5;
@@24;[Print;0;7;;;;MsLK(\PRINT);F9;
@@24;[Refresh_list;0;7;;;;MWLK(F5);F6;
@@13;*101;4;*102;1;*103;22;*104;23;*105;21;$211;N;
$1___________&________$Search$Open$New_$Delete$Print__$Close$Help____&
$LBOX&
$[Open_______________&
$[New________________&
$[Delete_____________&
$[Print______________&
$[Refresh_list________&
@@14 Panel Timeout
By using the panel timeout function you can control timed actions or display ongoing progress panels. The timer starts when the panel is created.
Syntax
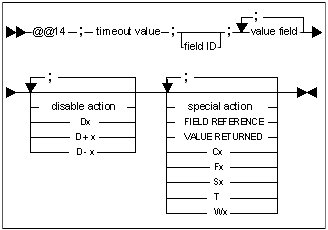
Timeout Value
Value used to define the number of seconds to wait. These values are available:
< 0 The number of seconds to wait is taken from the system parameter.
= 0 There is no waiting (used in-progress windows).
> 0 The number of seconds to wait.
Field ID
The field ID is the direct address to data. It consists of a starting control character followed by a reference number and it ends with the ending control character ampersand (&) or a new starting control character.
Value Field
Shows the values/columns in the list box where the calculations will be performed.
Disable Action
Syntax: Dx, D+x, D-x
For Dx, "x" is a positive number interpreted as the absolute field number.
For D+x or D-x, "x" is a positive number interpreted as the relative field number to the current field.
Examples
@@27;LBOX;HTE;?2002;;;10;1000;0;;D4;D6;F2;
@@24;\Item_number;1;7;?10231;;;R;*231;3;D+4;
@@24;\All;1;7;?10231;;;R;D2;*231;1;D-1;D-4;
Special Action
These special actions can be used:
RETURN VALUE Action
Syntax: FIELD REFERENCE; VALUE RETURNED
This action returns values to the field described by the field reference. The control character in the field reference gives the field type.
REXX Call Action
Syntax: Cx
"x" is the REXX command number with a range from 1 to 99.
In the startup CMD file you can specify environment variables to define the REXX command file attached to the REXX command number, such as SET REXXC1 = C:\REXX\BACKUP.CMD. If no environment variables are defined, then the default REXX command filenames are REXXC1.CMD, REXXC2.CMD, and REXXC99.CMD.
FUNCTION KEY Action
Syntax: Fx
where "x" is defined as the function key number to be simulated. It can contain be one or more digits. The action simulates the use of the key and is performed immediately such that the rest of the special function definition is skipped. F0 is treated as if the Enter (Return) key was pressed and F3 is treated as the Escape (Esc) key.
PANEL Action
Syntax: Sx
TERMINATE WINDOW Action
Syntax: T
The window is terminated.
DELAY Action
Syntax: Wx
Where "x" is a positive number interpreted as a delay in seconds.
The panel system waits the specified number of seconds before resuming.
Example
#13;2;-1;-2;-3;01;00;79;
@@28;SWT;3;66;100;8;150;AT_Timing_Function;
@@14;60;F0;
@@24;OK;0;7;?0;;;PNPF3;T;F4;
@@24;Cancel;0;7;?0;;;PNPF3;T;F3;
@@24;Help;0;7;?0;;;PH;
_Press_OK_in_order_to_execute_function_immidiately:______<$1___&>
_
_Scheduled_at:____<^1_____"1_____&_Time_is_now:____^2_____"2_____&>
_
_Press_Cancel_in_order_to_exit_macro_mode.
_
_$OK________________&$Cancel___________&$Help_____________&
@@15 Data Input from External File
This function is used when data from an external system is specified into the REGS register. Data in the external file is mapped through the use of a panel. After being formatted as a sequential access file, each record in the external file is transferred to a record in the REGS register. Validations can be conducted by using ordinary panel functions. If there are any errors or problems, you can make adjustments based on the use of functional definitions.
File Name
These file names are available with the @@15 function:
| File name | Description |
|---|---|
| DPRE | Shift model days (daily production time) |
| UPRE | Shift pattern lines (weekly production time) |
| AKRE | Capacity adjustments |
| RCRE | Work center resources |
| MGRE | Work centers |
| PKRE | Non-working days |
| TTRE | Transit time matrix |
| ORDH | End item orders |
| MRED | Parallel operations |
| SEQC | Sequence optimization controls |
| SHIP | Order links |
Validation Actions
These variables can be used for validation actions:
| Variable | Action |
|---|---|
| W | Waits for corrective input from the user. The user can alter the field in the panel. |
| X | Excludes the record if an error occurred. The entire record is skipped. |
| ADD | The record is added to the file database through the index. If it already exists the record will be ignored. |
| INS | The record is inserted in the file database without using index. The indexes are generated later. This input method is faster than ADD but requires unique records. |
| REP | The record is replaced in the file database if it exists. |
| DEL | The record is deleted in the file database if it exists. |
| Index | The index number as defined in the PMSTYF99.DAT file. |
| S | The input file format is based on semi-colon separated fields. |
| F | The input file format is based on fixed positioned fields. |
| N | No display. When reading the data file nothing is displayed on the screen - faster read. |
Example
@@15;RCRE;X;ADD;1;F;
Machine_number_$45__________&
Description____$85____________________________&
Location_______$73__________&
@@21 Insert Actual Date and Time
This function can only be used to specify the actual (system) date and time and to insert it into the available date and time fields.
Syntax

Field ID
The field ID is the direct address to data. It consists of a starting control character followed by a reference number and it ends with the ending control character ampersand (&) or a new starting control character.
Field Number
The field number defines the position of the field in the panel. You can find the field number by counting from the left to the right and from top to bottom.
Use the starting control characters together with the field number.
Example
@@21;^2;
@@21;"2;
Start_of_the_schedule___^2_____"2___&
@@22 Inclusion of Report Line
This function is used to validate the content of the data that are specified in the reference. If the value is greater than or equal to the "from" value and less than or equal to the "to" value then the report line is displayed. If the value does not fall within this definition the report line will not be displayed.
Syntax

Field ID
The field ID is the direct address to data. It consists of a starting control character followed by a reference number and it ends with the ending control character ampersand (&) or a new starting control character.
Field Number
The field number defines the position of the field in the panel. You can find the field number by counting from the left to the right and from top to bottom.
Use the starting control characters together with the field number.
Max. Value
The maximum value (included) can be defined as an integer or a real number with decimal points.
Min. Value
The minimum value (included) can be defined as an integer or a real number with decimal points.
Example
#23;1;-1;-2;-3;00;01;79;
@@22;`45;100.0;200.0;
@@22;`46;100.0;200.0;
@@22;`47;100.0;200.0;
$45__________&$69__&$57__________*_21&_`45_`46_`47_&`7__`8__`9__&_~48__~49_&_+3_:__+4_:__+5_:__+1_:__+2_:__&__+30:__&_*58&
@@23 Exclusion of Report Line
This function is also used to validate the content of the data specified in the reference. If this value is less than the "from" value and greater than the "to" value then the report line is displayed. If this criterion is not met then the report line will not be displayed.
Syntax

Field ID
The field ID is the direct address to data. It consists of a starting control character followed by a reference number and it ends with the ending control character ampersand (&) or a new starting control character.
Field Number
The field number defines the position of the field in the panel. You can find the field number by counting from the left to the right and from top to bottom.
Use the starting control characters together with the field number.
Max. Value
The maximum value (included) can be defined as an integer or a real number with decimal points.
Min. Value
The minimum value (included) can be defined as an integer or a real number with decimal points.
Example
#23;1;-1;-2;-3;00;01;79;
@@23;`45;0.0;99.9;
@@23;`46;0.0;99.9;
@@23;`47;0.0;99.9;
$45__________&$69__&$57__________*_21&_`45_`46_`47_&`7__`8__`9__&_~48__~49_&_+3_:__+4_:__+5_:__+1_:__+2_:__&__+30:__&_*58&
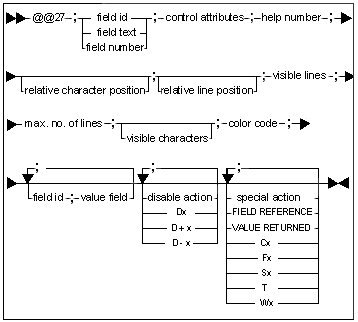
@@24 Button Definition
Use this function to redefine the fields associated with a button. Possible button types are:
- button
- Radio button
- Check box
The type of button is defined by control attributes.
Syntax
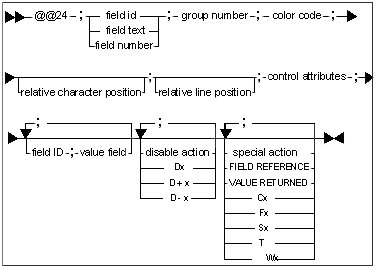
Field ID
The field ID is the direct address to data. It consists of a starting control character followed by a reference number and it ends with he ending control character ampersand (&) or a new starting control character.
Field text
For the most part, the field text definition is used for the following @@ functions to establish a connection between the function and the field: @@24 Button Definition, @@27 Listbox Definition and @@29 Static Control Definition.
Use the starting control characters together with the field text.
Field Number
The field number defines the position of the field in the panel. You can find the field number by counting from the left to the right and from top to bottom.
Use the starting control characters together with the field number.
Group Number
The group number is only important for radio buttons. It determines how the click and unclick of the radio buttons are performed. Radio buttons that are grouped together must have a unique group number greater than zero. To move the cursor focus within a group, use the arrow keys on your keyboard. The [TAB] key can be made to jump between groups.
Color Code
Color includes both the foreground and the background color. The color code is calculated by the using this formula:
Color code = 100 X FOREGROUND COLOR CODE + BACKGROUND COLOR CODE
Examples
The number (7) represents a pale grey background with black text.
The number (0313) represents a dark cyan background with yellow text.
Color Code Table
| Code | Color | Code | Color | |
|---|---|---|---|---|
| 00 | Black | 10 | Dark red | |
| 01 | Red | 11 | Dark pink | |
| 02 | Dark green | 12 | Green | |
| 03 | Yellow | 13 | Dark cyan | |
| 04 | Blue | 14 | Brown | |
| 05 | Pink | 15 | White | |
| 06 | Cyan | 16 | Light green | |
| 07 | Pale grey | 17 | Pale green | |
| 08 | Dark grey | 18 | Default list box yellow | |
| 09 | Dark blue | 19 | Light yellow |
Help Number
Syntax: ?x
The "x" is the help ID in the IPF file and is an integer from 1 to 65535. If ? 0 is given, then the help ID is calculated with respect to the field.
The help number is reserved in this way:
| Value | Reserved |
|---|---|
| 1 <= x = 999 | Panel help |
| 1000 = x = 9999 | Component help |
| 10000 = x = 19999 | Field help (2 byte integer) |
| 20000 = x = 29999 | Field help (4 byte integer, real, date and time) |
| 30000 = x = 39999 | Field help (Characters) |
| 30001 = x = 65535 | General help |
Relative Character Position
This function defines a relative character position as it relates to a current character position. If no value is given the character position is defined as the current character position.
Relative Line Position
This function defines the relative line position as it relates to the current line position. If no value is given the position is defined as the current line position.
Control attributes
| Control character | Add-ons | Description | Example |
|---|---|---|---|
| C | Check box | @@24;PEG_ID_suffix;5;7;?0;;;C;*184;1;|;*184;0; | |
| D | button | @@24;\View_now;0;7;?0;- -;;PD;F0; | |
| E (New) | button | @@24;\Standard;0;7;?0;;;ED;F10021; | |
| I (New) | Icon on tab button | @@24;\Standard;0;7;?0;;;EiD;F10021; | |
| Fxx | Attach to function key xx, xx={2,3,...,12} | @@24;Cancel;0;7;?0;;;- PNPF3;T;F3; | |
| H | button | @@24;Help;0;7;?0;;;PH; | |
| K( ) (New) | Hotkey | @@24;Print;0;7;?0;"Print...";1;SL02TK(CONTROL+P);.ICO=57;CN;F9; | |
| L01 (New) | Link type 1 (bitmap/text pushbutton with no raised border) | @@24;Print;0;7;?0;"Print...";;1;SL01TK(CONTROL+P);.ICO=57;CN;F9; | |
| L02 (New) | Link type 2 (bitmap/text pushbutton with single border) | @@24;Print;0;7;?0;"Print...";;1;SL02TK(CONTROL+P);.ICO=57;CN;F9; | |
| L03 (New) | Link type 3 (color) | @@24;*100;0;7;?0;"";;;L03;;;*145;1;F2; | |
| L04 (New) | Link type 4 (Change the background/ foreground color by holding down the left mouse button and clicking on the field you want to change) | @@24;\Orders;1;1530;?40500;;;SL04;0931;M;$3;DSCH; | |
| L05 (New) | Link type 5 (Like L04,but with a frame) | @@24;\Orders;1;1530;?40500;;;SL05;0931;M;$3;DSCH; | |
| L06 (New) | Link type 6 (Raises a flat icon when the mouse is placed on the field.) | @@24;I60;0;7;?0;"Scenario__(Home)";5;;SL06K(HOME);.ICO=60;CN;F2; | |
| L07 (New) | Link type 7 (Used for color buttons) | @@24;04;2;00;?0;Color_0;4;;L07T;;;~1;00;F0; | |
| M (New) | Pop up menu | @@24;Open_resource...__(Alt+O);0;7;;;;Ml;F2; | |
| s (New) | Separator line | @@24;Print...__(Control+P);0;7;;;;Msl;F9; | |
| b (New) | Menu break | @@24;Print...__(Control+P);0;7;;;;Mbl;F9; | |
| c (New) | Use checkmark | @@24;Delay;1;7;;;;Mcl;*33;3;F40; | |
| l (New) | Linked to list box | @@24;Open_resource...__(Alt+O);0;7;;;;Ml;F2; | |
| w (New) | Linked to windows | @@24;Update_list__(Control+F);0;7;;;;Mwl;F6; | |
| a (New) | Linked to all | @@24;Open_resource...__(Alt+O);0;7;;;;Mal;F2; | |
| xx (New) | Linked to field number | @@24;Delete_log_file...__(Alt+D);0;7;;;;M9;F5; | |
| Np | No pointer focus | @@24;Cancel;0;7;?0;;;P NPF3;T;F3; | |
| P | button | @@24;OK;0;7;?0;;;P;F0; | |
| i | Icon button | @@24;I20;0;7;?0;;;PINP--;*2;0;F8; | |
| R | Radio button | @@24;\Delay;1;7;?0;;;R--;*172;2; | |
| S | Dynamic size | ||
| T (New) | Toolbar control | @@24;Print;0;7;?0;"Print...";;1;SL02TK(CONTROL+P);.ICO=57;CN;F9; | |
| X | Disable if read-only mode | @@24;Backup;0;7;?0;;;P- X;F0; |
Value Field
Shows the values/columns in the list box where the calculations will be performed.
Disable Action
Syntax: Dx, D+x, D-x
For Dx, "x" is a positive number interpreted as the absolute field number.
For D+x or D-x, "x" is a positive number interpreted as the relative field number to the current field.
Special Action
These special actions can be used:
RETURN VALUE Action
Syntax: FIELD REFERENCE; VALUE RETURNED
This action returns values to the field described by the field reference. The control character in the field reference gives the field type.
REXX Call Action
Syntax: Cx
"x" is the REXX command number with a range from 1 to 99.
In the startup CMD file you can specify environment variables to define the REXX command file attached to the REXX command number, such as SET REXXC1 = C:\REXX\BACKUP.CMD. If no environment variables are defined, then the default REXX command filenames are REXXC1.CMD, REXXC2.CMD, and REXXC99.CMD.
FUNCTION KEY Action
Syntax: Fx
where "x" is defined as the function key number to be simulated. It can contain be one or more digits. The action simulates the use of the key and is performed immediately such that the rest of the special function definition is skipped. F0 is treated as if the Enter (Return) key was pressed and F3 is treated as the Escape (Esc) key.
PANEL Action
Syntax: Sx
TERMINATE WINDOW Action
Syntax: T
The window is terminated.
DELAY Action
Syntax: Wx
Where "x" is a positive number interpreted as a delay in seconds.
The panel system waits the specified number of seconds before resuming.
Example
#500;1;-1;-2;-3;01;00;79;
@@28;SWT;5;25;100;5;200;Titlebar_text;
@@24;\OK;0;7;?0;;;PD;F0;
_
_Button_example
_
_______$\OK___&
@@25 Message Box Creation Definition
This function is used to create a standard message box. You can define the type of icons and buttons you prefer.
Syntax
![]()
Icon Type
| Control character | Description |
|---|---|
| N | No icon |
| ? | Query |
| W | Warning |
| I | Information |
| E | Error |
| C | Critical |
Button Types
| Control character | Description |
|---|---|
| A | Abort Retry Ignore |
| C | Cancel |
| E | Enter |
| EC | Enter Cancel |
| H | Help |
| O | OK |
| OC | OK Cancel |
| R | Retry Cancel |
| Y | Yes No |
| YC | Yes No Cancel |
| 1 | Button 1 is default |
| 2 | Button 2 is default |
| 3 | Button 3 is default |
Title Bar Text
Text length must not exceed 60 characters.
Always use underscores [ _ ] as spaces.
Example
#114;1;144;144;144;01;00;79;
@@25;W;Y;System_message_99114W;
@@26;Y;F0;
@@26;N;F3;
@@26;C;F3;
Dimension_of_list_is_reached.
Max_dimension_is_*1___&lines.
_
Clear_list_and_continue?
_
@@26 Message Box Action Definition
This function is used to determine what actions message box buttons must execute.
Syntax

Action button
| Control character | Action |
|---|---|
| A | Abort |
| C | Cancel |
| E | Enter |
| H | Help |
| I | Ignore |
| N | No |
| O | OK |
| R | Retry |
| Y | Yes |
Field ID
The field ID is the direct address to data. It consists of a starting control character followed by a reference number and it ends with the ending control character ampersand (&) or a new starting control character.
Value Field
Shows the values/columns in the list box where the calculations will be performed.
Special Action
These special actions can be used:
RETURN VALUE Action
Syntax: FIELD REFERENCE; VALUE RETURNED
This action returns values to the field described by the field reference. The control character in the field reference gives the field type.
REXX Call Action
Syntax: Cx
"x" is the REXX command number with a range from 1 to 99.
In the startup CMD file you can specify environment variables to define the REXX command file attached to the REXX command number, such as SET REXXC1 = C:\REXX\BACKUP.CMD. If no environment variables are defined, the default REXX command filenames are REXXC1.CMD, REXXC2.CMD, and REXXC99.CMD.
FUNCTION KEY Action
Syntax: Fx
where "x" is defined as the function key number to be simulated. It can contain be one or more digits. The action simulates the use of the key and is performed immediately such that the rest of the special function definition is skipped. F0 is treated as if the Enter (Return) key was pressed and F3 is treated as the Escape (Esc) key.
PANEL Action
Syntax: Sx
TERMINATE WINDOW Action
Syntax: T
The window is terminated.
DELAY Action
Syntax: Wx
Where "x" is a positive number interpreted as a delay in seconds.
The panel system waits the specified number of seconds before resuming.
Example
#114;1;144;144;144;01;00;79;
@@25;W;Y;System_message_99114W;
@@26;Y;F0;
@@26;N;F3;
@@26;C;F3;
Dimension_of_list_is_reached.
Max_dimension_is_*1___&lines.
_
Clear_list_and_continue?
_
@@27 List Box Definition
This function is used to redefine a field as a list box. A list box can contain colored text and bar graphs. Refer to the following for further details.
In all installed panels the field text LBOX are used as a link between the @@ function and the field.
Disable action will be executed when nothing is selected in the list box. This function is used to disable, for example, the and buttons in the example given below.
Double clicking in the list box will initiate a Special action.
If no selection is made, the color code for the list box will be the same as the one for the background default screen.
Syntax
Field ID
The field ID is the direct address to data. It consists of a starting control character followed by a reference number and it ends with the ending control character ampersand (&) or a new starting control character.
Field text
For the most part, the field text definition is used for the following @@ functions to establish a connection between the function and the field: @@24 Button Definition, @@27 Listbox Definition and @@29 Static Control Definition.
Use the starting control characters together with the field text.
Field Number
The field number defines the position of the field in the panel. You can find the field number by counting from the left to the right and from top to bottom.
You can use the field number to connect a @@ function with a field. I: If the field number in the @@ function and the related field do not correspond, the field is as entry field.
Use the starting control characters together with the field number.
Control attributes
| Control character | Description | Example |
|---|---|---|
| H | Horizontal scrollbar | @@27;LBOX;HTE;?2002;;;10;1000;0;;D4;D6;F2; |
| N | No selection | @@27;LBOX;G1TN;?0;;;11;1000;0;;F99; |
| M | Multiple selection | @@27;LBOX;G1MT;?0;;;11;1000;0;;F2; |
| E | Extended selection | @@27;LBOX;HTE;?2002;;;10;1000;0;;D4;D6;F2; |
| T | Table header visible | @@27;LBOX;HTE;?2002;;;10;1000;0;;D4;D6;F2; |
| G (default) | Owner drawn text list box | @@27;LBOX;GHTE;?2002;;;10;1000;0;;D4;D6;F2 |
| G0 | Standard list box | @@27;LBOX;G0HTE;?2002;;;10;1000;0;;D4;D6;F2; |
| G1 | Owner drawn text and bar graphic list box | @@27;LBOX;G1T;?0;;;11;1000;0;;F2; |
Help Number
Syntax: ?x
The "x" is the help ID in the IPF file and is an integer from 1 to 65535. If ? 0 is given, then the help ID is calculated with respect to the field.
The help number is reserved in this way:
| Value | Reserved |
|---|---|
| 1 <= x = 999 | Panel help |
| 1000 = x = 9999 | Component help |
| 10000 = x = 19999 | Field help (2 byte integer) |
| 20000 = x = 29999 | Field help (4 byte integer, real, date and time) |
| 30000 = x = 39999 | Field help (Characters) |
| 30001 = x = 65535 | General help |
Relative Character Position
This function defines a relative character position as it relates to a current character position. If no value is given the character position is defined as the current character position.
Relative Line Position
This function defines the relative line position as it relates to the current line position. If no value is given the position is defined as the current line position.
Visible Lines
This value defines the height measured in number of lines in the panel.
Max. Number of Lines
This value defines the maximum number of lines allowed (most often set to 1000 lines).
Visible Characters
Integer > 0 and < 132. This defines the number of visible characters. If no value is given, then the length of the field defines the number of visible characters.
Color Code
Color includes both the foreground and the background color. The color code is calculated by the using this formula:
Color code = 100 X FOREGROUND COLOR CODE + BACKGROUND COLOR CODE
Examples
The number (7) represents a pale grey background with black text.
The number (0313) represents a dark cyan background with yellow text.
Color Code Table
| Code | Color | Code | Color | |
|---|---|---|---|---|
| 00 | Black | 10 | Dark red | |
| 01 | Red | 11 | Dark pink | |
| 02 | Dark green | 12 | Green | |
| 03 | Yellow | 13 | Dark cyan | |
| 04 | Blue | 14 | Brown | |
| 05 | Pink | 15 | White | |
| 06 | Cyan | 16 | Light green | |
| 07 | Pale grey | 17 | Pale green | |
| 08 | Dark grey | 18 | Default list box yellow | |
| 09 | Dark blue | 19 | Light yellow |
Value Field
Shows the values/columns in the list box where the calculations will be performed.
Disable Action
Syntax: Dx, D+x, D-x
For Dx, "x" is a positive number interpreted as the absolute field number.
For D+x or D-x, "x" is a positive number interpreted as the relative field number to the current field.
Special Action
These special actions can be used:
RETURN VALUE Action
Syntax: FIELD REFERENCE; VALUE RETURNED
This action returns values to the field described by the field reference. The control character in the field reference gives the field type.
REXX Call Action
Syntax: Cx
"x" is the REXX command number with a range from 1 to 99.
In the startup CMD file you can specify environment variables to define the REXX command file attached to the REXX command number, such as SET REXXC1 = C:\REXX\BACKUP.CMD. If no environment variables are defined, then the default REXX command filenames are REXXC1.CMD, REXXC2.CMD, and REXXC99.CMD.
FUNCTION KEY Action
Syntax: Fx
where "x" is defined as the function key number to be simulated. It can contain be one or more digits. The action simulates the use of the key and is performed immediately such that the rest of the special function definition is skipped. F0 is treated as if the Enter (Return) key was pressed and F3 is treated as the Escape (Esc) key.
PANEL Action
Syntax: Sx
TERMINATE WINDOW Action
Syntax: T
The window is terminated.
DELAY Action
Syntax: Wx
Where "x" is a positive number interpreted as a delay in seconds.
The panel system waits the specified number of seconds before resuming.
Example
#20;1;-1;-2;-3;01;00;79;
@@28;SWT;3;80;100;17;200;Work_Center_Resources;
@@33;CRCREG00;
@@27;LBOX;HTE;?2002;;;10;1000;0;;D4;D6;F2;
@@24;\Open;0;7;?2003;;;PD;F2;
@@24;\Search;0;7;?0;;;P;F6;
@@24;\New;0;7;?0;;;P;F4;
@@24;\Delete;0;7;?0;;;P;F5;
@@24;\Print;0;7;?0;;;P;F9;
@@24;Cancel;0;7;?0;;;PNPF3;T;F3;
@@24;Help;0;7;?0;;;PH;
@@13;*101;4;*102;1;*103;22;*104;23;*105;21;$211;N;
__Machine_number_$1___________&____$\Search__&
_
$LBOX_______________________________________________________________________&
_
_
_
_
_
_
_
_
_
_
_
_
<$\Open____&>$\New...__&$\Delete__&$\Print...&_$Cancel___&_$Help_____&
@@28 Window Definition
This function is used to define a window. You can use this function in all panel files except those associated with these elements:
- Message box
- Spool file
- List box header
- Body panels
Syntax

Window Attributes
| Control character | Description |
|---|---|
| B | Border (not together with D or SB) |
| D | Dialog border (not together with B or SB) |
| H | Horizontal scrollbar (not used) |
| MX | Maximum button |
| MN | Minimum button |
| MA | Mouse align |
| N | No move with owner |
| P0 | Set previous window as parent (prevents the previous window from overlapping the current window) |
| S | System menu |
| SA | Screen alignment |
| SP | Shell position |
| SB | Size border (not together with B or D) |
| SM | System modal |
| SW | Standard window (B and MN) |
| SW0 | Standard window (destroy other windows first) |
| SW1 | No title bar |
| T | Title bar text is set to current text, not to text of the previous window |
| V | Vertical scrollbar (not used) |
Position
The table below shows all possible values of the position code, and the position of Window #2 as it relates to Window 1 or the Desktop.
| Position code | Position | Position code | Position | |
|---|---|---|---|---|
| 0 |

|
6 |

|
|
| 1 |

|
7 |

|
|
| 2 |

|
8 |

|
|
| 3 |

|
9 |

|
|
| 4 |

|
Default |
|
|
| 5 |

|
Width
Use this function to define the window width in standard characters. A standard character is taken from a mono-spaced font with a certain width so that 80 standard characters are displayed in one line of the screen.
Width depends on character spacing.
Character Spacing
Use this function to define the character spacing for the standard font.
If the character spacing is defined as 100 (%), then there are a maximum of 80 characters on each line. If you reduce the character spacing to 80 (%), the number of characters increases from 80 to a 100, to generate a window that matches the size of the screen.
Height
Use this function to define window height in standard characters. A standard character is taken from a mono-spaced font of a certain height so that 37 lines of standard characters are displayed on the screen.
Height depends on line spacing.
Line Spacing
Use this function to define the line spacing of the standard font.
If the line spacing is set at 100 (%), then the maximum height is 37 lines. If you increase the line spacing to 185 (%), for example, then the number of lines will be reduced from 37 to 20 so that they will not be larger than the size of the screen.
Title Bar Text
Text length must not exceed 60 characters.
Always use underscores [ _ ] as spaces.
Example
#500;1;-1;-2;-3;01;00;79;
@@28;SWT;5;25;100;5;200;Titlebar_text;
@@24;\OK;0;7;?0;;;PD;F0;
_
_Button_example
_
_______$\OK___&
@@29 Static Control Definition
The static control definition is used to define static control in, for example, a group box (shown below). You can create color rectangles where the color is controlled by the field value.
Syntax
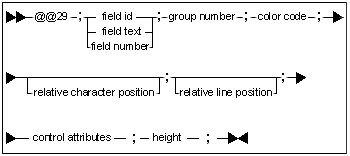
Field ID
The field ID is the direct address to data. It consists of a starting control character followed by a reference number and it ends with the ending control character ampersand (&) or a new starting control character.
Field text
For the most part, the field text definition is used for the following @@ functions to establish a connection between the function and the field: @@24 Button Definition, @@27 Listbox Definition and @@29 Static Control Definition.
Use the starting control characters together with the field text.
Field Number
The field number defines the position of the field in the panel. You can find the field number by counting from the left to the right and from top to bottom.
Use the starting control characters together with the field number.
Group Number
The group number is only important for radio buttons. It determines how the click and unclick of the radio buttons are performed. Radio buttons that are grouped together must have a unique group number greater than zero. To move the cursor focus within a group, use the arrow keys on your keyboard. The [TAB] key can be made to jump between groups.
Color Code
Color includes both the foreground and the background color. The color code is calculated by the using this formula:
Color code = 100 X FOREGROUND COLOR CODE + BACKGROUND COLOR CODE
Examples
The number (7) represents a pale grey background with black text.
The number (0313) represents a dark cyan background with yellow text.
Color Code Table
| Code | Color | Code | Color | |
|---|---|---|---|---|
| 00 | Black | 10 | Dark red | |
| 01 | Red | 11 | Dark pink | |
| 02 | Dark green | 12 | Green | |
| 03 | Yellow | 13 | Dark cyan | |
| 04 | Blue | 14 | Brown | |
| 05 | Pink | 15 | White | |
| 06 | Cyan | 16 | Light green | |
| 07 | Pale grey | 17 | Pale green | |
| 08 | Dark grey | 18 | Default list box yellow | |
| 09 | Dark blue | 19 | Light yellow |
Relative Character Position
This function defines a relative character position as it relates to a current character position. If no value is given the character position is defined as the current character position.
Relative Line Position
This function defines the relative line position as it relates to the current line position. If no value is given the position is defined as the current line position.
Control attributes
| Control character | Description |
|---|---|
| FF | Foreground color frame. The color code is taken from the field. |
| FR | Foreground color rectangle. The color code is taken from the field. |
| G | Group box |
| I | Icon |
| TL | Text, left aligned |
| TR | Text, right aligned |
| TC | Text, centered |
Height
Defines the static control height (lines) in standard characters.
Example
#672;1;-1;-2;-3;01;00;79;
@@28;SW;3;63;100;12;180;_-_Operation_status;
@@33;CSGPDS00;
@@29;Operation_status_coloring;0;7;;;G;10;
@@29;Default_color;0;7;;;G;5;
@@29;Active;0;7;;;TL;1;
@@29;*75;0;7;;;FR;1;
@@29;*76;0;7;;;FR;1;
@@29;*77;0;7;;;FR;1;
@@29;*78;0;7;;;FR;1;
@@29;*79;0;7;;;FR;1;
@@29;*80;0;7;;;FR;1;
@@24;7;3;7;?0;;;CNP;*9;1;|;*9;0;
@@24;10;3;7;?0;;;CNP;*10;1;|;*10;0;
@@24;14;3;7;?0;;;CNP;*11;1;|;*11;0;
@@24;17;3;7;?0;;;CNP;*12;1;|;*12;0;
@@24;20;3;7;?0;;;CNP;*13;1;|;*13;0;
@@24;C\hange_color;0;7;?0;;;PS;F6;
@@24;\Change_color;0;7;?0;;;PS;F2;
@@24;Planned;2;7;?0;;;R;*3;1;
@@24;Received;2;7;?0;;;R;*3;2;
@@24;In_process;2;7;?0;;;R;*3;3;
@@24;Sequence_locked;2;7;?0;;;R;*3;4;
@@24;Fixed_locked;2;7;?0;;;R;*3;5;
@@24;\OK;0;7;?0;;;PD;T;F0;
@@24;Cancel;0;7;?0;;;PNPF3;T;F3;
@@24;Help;0;7;?0;;;PH;
õOperation_status_coloring____________________&õDefault_color_&
_____________________________________õActive&______*80___&
_$Planned_(10,70)&____________*75___&_$&
_$Received_(30,40,45)&________*76___&_$&________$C\hange_color...&
_$In_process,_started_(50,55)&*77___&_$&
_$Sequence_locked_(15)&_______*78___&_$&
_$Fixed_locked_(20)&__________*79___&_$&
_
_$\Change_color...&
_
_$\OK___&_$Cancel&_$Help__&
@@30 Combination Box Definition
This function is used to define a combination box. This can be presented in any one of these ways:
- Dropdown
- Dropdown list
- Simple dropdown
Syntax
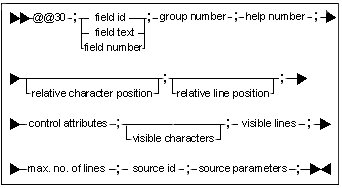
Field ID
The field ID is the direct address to data. It consists of a starting control character followed by a reference number and it ends with the ending control character ampersand (&) or a new starting control character.
Field text
For the most part, the field text definition is used for the following @@ functions to establish a connection between the function and the field: @@24 Button Definition, @@27 Listbox Definition and @@29 Static Control Definition.
Use the starting control characters together with the field text.
Field Number
The field number defines the position of the field in the panel. You can find the field number by counting from the left to the right and from top to bottom.
Use the starting control characters together with the field number.
Group Number
The group number is only important for radio buttons. It determines how the click and unclick of the radio buttons are performed. Radio buttons that are grouped together must have a unique group number greater than zero. To move the cursor focus within a group, use the arrow keys on your keyboard. The [TAB] key can be made to jump between groups.
Help Number
Syntax: ?x
The "x" is the help ID in the IPF file and is an integer from 1 to 65535. If ? 0 is given, then the help ID is calculated with respect to the field.
The help number is reserved in this way:
| Value | Reserved |
|---|---|
| 1 <= x = 999 | Panel help |
| 1000 = x = 9999 | Component help |
| 10000 = x = 19999 | Field help (2 byte integer) |
| 20000 = x = 29999 | Field help (4 byte integer, real, date and time) |
| 30000 = x = 39999 | Field help (Characters) |
| 30001 = x = 65535 | General help |
Relative Character Position
This function defines a relative character position as it relates to a current character position. If no value is given the character position is defined as the current character position.
Relative Line Position
This function defines the relative line position as it relates to the current line position. If no value is given the position is defined as the current line position.
Control attributes
| Control character | Description | Example |
|---|---|---|
| B | List box | @@30;$269;8;7;?0;;0;BI;0;3;100;C;WM;$257; |
| D | Dropdown | @@30;$257;1;7;?0;;;DI;0;5;1000;C;SW;; |
| I | Initialize list on creation | @@30;$257;1;7;?0;;;DI;0;5;1000;C;SW;; |
| L | Dropdown list | @@30;*62;1;7;?0;;;LZI;24;10;100;C;WL;; |
| R | Refresh list on dropdown | @@30;$1;0;7;?0;;;DR;0;4;100;R;ORDF;1;$1;113; |
| S | Simple | @@30;$1;1;7;?0;;;SI;0;10;100;C;WC;$1; |
| P | Palette | @@30;*58;0;7;?0;;;PI;10;17;100;C;SC;; |
| Z | Zero-based index is returned on selection. Only for L. | @@30;*62;1;7;?0;;;LZI;24;10;100;C;WL;; |
Visible Characters
Integer > 0 and < 132. This defines the number of visible characters. If no value is given, then the length of the field defines the number of visible characters.
Visible Lines
This value defines the height measured in number of lines in the panel.
Max. Number of Lines
This value defines the maximum number of lines allowed. This value is most often set to 1000 lines.
Source ID
The source ID determines what to put in the combination box.
| Source ID | Description | Example |
|---|---|---|
| C | Common |
@@30;$269;8;7;?0;;0;BI;0;3;100;C;WM;$257; |
| I | Immediate |
@@30;*182;0;7;?0;;;LZI;40;10;10;I;+; Item;+; Shop_order;+; Coloring_group;+; Order_network_and_Gantt;+; Delay;+; Throughput_time;+; |;1;2;3;4;5;6; |
| R | REGS | @@30;$1;0;7;?0;;;DR;0;4;100;R;ORDF;1;$1;113; |
Source Parameters
The syntax of the source parameters depends on the source ID.
| Source ID | Syntax |
|---|---|
| C |
|
| I |
|
| R |
|
@@31 Entry Field Definition
The entry field definition overrides default entry field attributes. This definition, for example, will allow you to substitute a yellow background for the background color that comes standard with the system.
Syntax
--@@31-;---field ID-------;-group number-;-help number-;--
|-field text---|
+-field number-+
----------------------------------;------------------------------
| | | |
+-Relative Character Position-+ +-Relative Line Position--+
---control attributes-;------------------------;--
| |
+-Visible Characters-+
Example
#633;1;-1;-2;-3;01;00;79;
@@28;SWT;5;80;100;19;180;Spool_file;
@@31;$1;0;7;?0;;;OL;0;
@@31;$5;0;7;?0;;;OL;0;
@@27;LBOX;HTE;?0;;-1;14;2000;131;;F99;
@@24;\Print;0;7;?0;;;P;F9;
@@24;Cancel;0;7;?0;;;PNPF3;T;F3;
@@24;Help;0;7;?0;;;PH;
_$1___&__$5______________________________&
$LBOX________________________________________________________________________&
_
_
_
_
_
_
_
_
_
_
_
_
_
_
_
_$\Print...&_$Cancel___&_$Help_____&
@@32 Numeric Spin Button Definition
This function is used to define a numeric spin button as shown in the example below:
Syntax
--@@32-;---field ID-------;-group number-;-color code-;-help number-;--
|-field text---|
+-field number-+
----------------------------------;------------------------------
| | | |
+-Relative Character Position-+ +-Relative Line Position--+
---control attributes-;-Lower Value-;-Upper Value-;--
Example
#05;1;-1;-2;-3;01;00;79;
@@28;SWT;5;69;100;10;180;Gantt_chart_-_Settings;
@@33;CRPORT00;
@@29;Workcenter_selection;0;7;;;G;4;
@@24;\Workcenter;1;7;?10189;;;R;D7;*189;0;
@@24;Workcenter_\list;1;7;?10189;;;R;D3;D5;*189;1;
@@30;$196;8;7;?0;;;D;0;5;100;C;WC;;
@@30;$208;10;7;?0;;;D;0;5;100;C;WC;;
@@30;*62;1;7;?0;;;LZI;24;10;100;C;WL;;
@@24;Include_balance_profile;2;7;?10064;;;C;*64;2;|;*64;1;
@@24;\View_now;0;7;?0;;;PD;F0;
@@24;Cancel;0;7;?0;;;PNPF3;F3;
@@24;Help;0;7;?0;;;PH;
@@32;*32;0;7;?0;;;D;1;2000;
@@13;T;
$Workcenter_selection_______________________________________________&
_$\Workcenter&_________from$196_________&_____õto_$208_________&
_$Workcenter_\list&____list*62_&
_
__Report_start_date^2_____&õMaximum_No._of_days_*32__&
_
_$Include_balance_profile&
_
_$\View_now&_$Cancel___&_$Help_____&
@@33 Help File Definition
This function is used to load extra help files into a panel. You can also use it to load field context help files.
Syntax
--@@33-;------------------------
| |
+-Help File Name-;--+
|
+-----------------+
Example
This example shows the order links field help file (CRSHIP00.HLP) being loaded.
#48;1;-1;-2;-3;01;00;79;
@@28;SWT;5;74;100;14;180;Orders_-_Order_Links;
@@33;CRSHIP00;
@@29;Parent_order;0;7;;;G;4;
@@29;Component_order;0;7;;;G;4;
@@24;Cancel;0;7;?0;;;PNPF3;F3;
@@24;Help;0;7;?0;;;PH;
@@13;T;
___Status<$_30&__Type_$_29&
_
___Availability_date^4_____&"4___&__________Required_quantity`5_______&>
_
_$Parent_order__________________________________________________________&
__Item_number______$49_______________________&_Order_number_~11______&
___Operation_number_~12___&
_
_$Component_order_______________________________________________________&
__Item_number______$74_______________________&_Order_number_~9_______&
___Operation_number_~10___&
_
_$Cancel&_$Help__&
@@34 Internal Field Number Definition
This function is used to define an internal field number in a panel field. The internal field number is used by the system to disable controls.
Syntax
--@@34-;---field ID-------;-internal number-;--
|-field text---|
+-field number-+
Example
In the example below the checked box Big profile has an internal field number of (1).
#15;1;-1;-2;-3;01;00;79;
@@28;SWTP0;5;45;100;5;200;Select_item;
@@30;$1;0;7;?0;;;DR;0;4;100;R;ORDF;1;$1;113;
@@24;\Big_profile;2;7;?0;;;C;*1;1;|;*1;2;
@@34;2;1;
@@24;\OK;0;7;?0;;;PD;T;F0;
@@24;Cancel;0;7;?0;;;PNPF3;T;F3;
@@24;Help;0;7;?0;;;PH;
__Item_number__$1________________________&
_$\Big_profile&
_
_$\OK___&_$Cancel_&_$Help___&
@@35 List Box Value Field Definition
The @@35 function is used to specify the list box field values and the columns that you want to use in your calculations. This function should be included in panels that already have their list box data defined, such as the Body Panel.
Syntax: @@35;<Value Field>;<Field ID>;
@@36 List Box Value Field Calculation
Function @@36 defines which calculations you want to conduct on given values in the list box column. For convenience, you must insert one or more of the @@36 functions that you are using in the Main panel.
Important notes:The calculation function should be written in upper case. Only one calculation can be associated with each @@36function.
Syntax
@@36;<Value Field>;<Field ID>;<Calculation Function>;
Example with a Main Panel
#20;1;-1;-2;-3;01;00;79;
.
.
@@36;1;1;SUM;
@@36;2;1;SUMS;
@@36;3;1;MIN;
@@36;4;1;MINS;
@@36;5;1;MAX;
@@36;6;1;MAXS;
@@36;7;0;CNT;
@@36;8;0;CNTS;
@@36;9;1;AVG;
@@36;10;1;AVGS;
Dummy fields are placed to show the results:
.
.
_SUM<`_______.&>____SUMS<`_______.&>
_MIN<`_______.&>____MINS<`_______.&>
_MAX<`_______.&>____MAXS<`_______.&>
_CNT<`_______.&>____CNTS<`_______.&>
_AVG<`_______.&>____AVGS<`_______.&>
Calculation results are shown after the entire list box is full. When you select a calculation (such as SUMS, MINS, MAXS, AVGS and CNTS), the results of this calculation will not appear until the panel is updated.
If you use the list box attribute W and @@14 you can see the results immediately after each calculation is specified. There will be a brief pause, the main panel is displayed again and the information pertaining to the calculation will be updated and presented.
The W function must be included in the @@27. The W will act as a reminder that if the @@14 function is defined, it has to be executed each time a selection is made in the list box.
@@37 Exporting Data to External Programs
If data from a report in Infor M3 SWB has to be handled by an external program, you can export from the report directly to the program concerned. This applies to the following reports in Infor M3 SWB:
- Work Center Schedule
- Load Profile
- Load Report
- Order Analysis
To be able to export data to external programs you must specify a function for each relevant panel in the panel files.
For example, to export data from the Order Analysis report (PMDSCH__.SKM) to an Excel spreadsheet in a panel file, you must specify the @@37 function for the panel that contains data definition information applicable to the relevant list box. To clarify this process the example below shows the procedure in detail (using panel #82).
Syntax
![]()
Function
Defines path and file name for the data file
Example
#80;1;-1;-2;-3;01;00;79;
@@28;SWT;5;28;100;4;180;Order_Export;
@@33;COHEAD00;CRPORT00;
@@24;\OK;1;7;?0;-2;;PNPF3;T;F3;
@@24;\Help;1;7;?0;-2;;PH;
_
____$\OK______$\Help__&
#81;1;-1;-2;-3;01;00;79;
_
#82;1;-1;-2;-3;01;00;79;
@@37;%MOVEXDIR%\CONTROL\PMEXPO.FID;DSCH;%DATA%\PMDSCH.TXT; START_K:\MSOffice\EXCEL.EXE_/R_C:\MVXAPP11\CONTROL\PMMADSCH.XLS
@@38 Colors and Bar Graphs in List Boxes
The @@38 function is used to convert character strings (typically letters) into plain text, bitmaps or icons. It is most commonly used in list boxes. For example, in the Machine View list box, information can be displayed using colors and bar graphs instead of only in numbers.
This function can be of assistance in obtaining a quick overview of the contents of a list box. The @@38 function can be introduced in two different ways dependent on the type of representation you choose, that is, substitution, color, bar graph representing percent, etc. Refer to the examples below for further detail.
Syntax (Type = 0)
--@@38-;-Field Number-;-Type=0-;-Data Reference-;--
---Data value-;-Text-;-------;----------;
+ | + +-Text-+
Syntax (Type > 0)
--@@38-;-Field Number-;-Type>0-;-Attribute-;
@@39 Background Bitmaps
The @@39 function is used to place background pictures (bitmaps) into the panel screen.
Syntax
--@@39-;-Image ID-;---------------;--
+-Attribute-+
-----------------------;----------------------;
+-Delta X Position (pixels)-+ +-Delta y Position (pixels)-+
Example
The following is an example from the main menu in Infor M3 SWB:
#30;1;-1;-2;-3;01;00;79;
@@28;SW0SbTASh;5;80;100;34;100;Main_Menu;
@@39;500;LT;;;
...
The above @@39 function places the bitmap file 500.bmp as background in the panel screen #30.
@@40 Progress Bar
When you execute a command, a progress bar gives you a way to estimate the length of time it will take for it to be completed. It does this by giving you the percent of information that has already been processed. You can then estimate how much time the remaining information processing will take. For directions in setting up the progress bar refer to the example shown below.
Syntax
--@@40-;-Field Number-;-Group Number-;--
---Color Code-;-Help Number-;----------------------;--
+-Delta X Position-+
-----------------------;-Attribute-;--
+-Delta y Position-+
------------------;-----------------;
+-Minimum Value-+ +-Maximum Value-+
Example
The following example refers to a progress bar that is used to show how long a planning order compilation will take.
#68;2;144;144;144;01;00;79;
@@28;DT;5;45;100;5;185;Planlægger;
@@14;0;
@@24;Fortryd_planlægning;0;7;?0;;;PNPF3;T;F3;
@@24;Stop_planlægning;0;7;?0;;;PNPF4;T;F4;
@@40;`1;0;7;?0;10;;ST;;;
_
__Udført`1_______________________&
_
_$Fortryd_planlægning&_$Stop_planlægning&
The above set up gives you a panel screen in which the progress bar information reflects the percent of the planning task completed.
@@41 Panel Tabs
When you create panel tabs, every tab is also a separate panel in and of itself. The panels are defined by the @@41 function, while the content of each tab is defined by using the @@24 function.
Syntax
--@@41-;-Field Number-;-Group Number-;--
---Color Code-;-Help Number-;----------------------;--
+-Delta X Position-+
-----------------------;-Attribute-;-Height-;
+-Delta y Position-+
Examples
This example is extracted from the Order component:
#30;1;-1;-2;-3;01;00;79;
...
@@41;TABC;0;7;?0;;;SHF;188;
@@24;\Standard;0;7;?0;;;ED;S30; (Note 1)
@@24;\Mere;0;7;?0;;;E;S31;
$TABC& (Note 2)
$\Standard$\Mere&
...
#31;1;-1;-2;-3;01;00;79;
...
@@41;TABC;0;7;?0;;;SHF;188;
@@24;\Standard;0;7;?0;;;E;S30;
@@24;\Mere;0;7;?0;;;ED;S31;
$TABC&
$\Standard$\Mere&
...
In screen panel #30 the standard tab is displayed first. In screen #31 the supporting tab is first to be displayed. In line @@24;\Standard& the last panel is called 30 (S30) and in line @@24;More& the panel is called S31. Even though they appear to be the same, they are in fact two different panels. Therefore, you must define TAB C, by using both \Standard and \More and to include in your definition any of the other controls relevant to each tab definition.
You can also make tabs that use icons instead of words for tab labels. The following is an example of how you do this using the component machines.
#21;1;-1;-2;-3;01;00;79;
...
@@41;TABC;0;7;?0;;;SHF;197;
@@24;\Standard;0;7;?0;"Standard";;;EiD;.ICO=16;C;S21;
@@24;\Mere;0;7;?0;"Mere";;;Ei;.ICO=56;C;S27;
@@24;O\pstillingstid;0;7;?0;"Opstillingstid";;;Ei;.ICO=70;C;S25;
$TABC&
$\Standard$\Mere$O\pstillingstid&
...
#25;1;-1;-2;-3;01;00;79;
...
@@41;TABC;0;7;?0;;;SHF;197;
@@24;\Standard;0;7;?0;"Standard";;;Ei;.ICO=16;C;S21;
@@24;\Mere;0;7;?0;"Mere";;;Ei;.ICO=56;C;S27;
@@24;O\pstillingstid;0;7;?0;"Opstillingstid";;;EiD;.ICO=70;C;S25;
$TABC&
$\Standard$\Mere$O\pstillingstid&
...
#27;1;-1;-2;-3;01;00;79;
...
@@41;TABC;0;7;?0;;;SHF;197;
@@24;\Standard;0;7;?0;"Standard";;;Ei;.ICO=16;C;S21;
@@24;\Mere;0;7;?0;"Mere";;;EiD;.ICO=56;C;S27;
@@24;O\pstillingstid;0;7;?0;"Opstillingstid";;;Ei;.ICO=70;C;S25;
$TABC&
$\Standard$\Mere$O\pstillingstid&
...
@@42 Positioning Columns in List Box
In every panel a certain amount of space is allocated to a list box. This space is consistent with the requirements for the individual fields. An item number requires 25 characters for example, therefore the list box is provided with enough space for 25 Ws, (where the W character absorbs most of the space available). Because an item number seldom takes much space in the panel, you can decrease the column width by using the @@42 function and still not decrease the actual size of the field.
You must apply the @@42 function to both the main panel and the body panel if you want to move the column header (along with the corresponding data in the column) to a list box. We recommend that you also replace the column header and data to their original position.
Syntax
--@@42-;--------;--------;...;--------;
+-C1-+ +-C2-+ +-Cn-+
Example
The following example shows the panel file for weekly production time patterns. To decrease the Monday column by two characters, add the function @@42 to both the main and the body panel.
#22;1;-1;-2;-3;00;01;79;
@@42;;;-20;
_Week___Monday_____Tuesday____Wednesday__Thursday___Friday_____Saturday___Sunday
#23;1;-1;-2;-3;00;01;79;
@@42;;;-20;
$1___&_$5___&_____$9___&_____$13__&_____$17__&_____$21__&_____$25__&_____$29__&
This operation will move the third column (Tuesday) two characters to the left. The second column (Monday) will be decreased by two characters correspondingly.
@@42;;;-20;-40;-60;-80;-100;-120
@@43 Security Level
The Security Level function is only accessible when Infor M3 SWB is used together with the Infor M3 BE server.
This section describes the programming syntax that is used for setting up the security level. If you make any customization of this function, then the changes must be inherited in all panel files containing the @@43 control function.
Syntax
@@43;<SL>;<DF>;----;
| |
<ER>
| <SL> Security bit mask | |
|---|---|
| >0 | True |
| <0 | False |
| A | Any level except 0 |
| Use & for logical AND | |
| <DF> Disable function | |
| F | Disable all fields except button, tab and list box. |
| A | Disable all fields except tab and list box and F3 (Cancel) and F1 (help). |
| P | Disable all pushbuttons except F3 (Cancel) and F1 (help). |
| <ER> Enable reference | |
| <FIELD1>;<FIELD1>; | |
| <FROM>;...;<TO>; | |
| ...;<TO>; | |
| <FROM>;...; | |
| <FKEY1>;<FKEY2>; | |
| and combinations. | |
Examples
| Syntax | Description |
|---|---|
|
@@43;2;F; |
All fields are disabled except button, tab and list box when security level (IPASCL) has bit0 set. |
|
@@43;-2;F; |
All fields are disabled except button, tab and list box when security level (IPASCL) has bit0 cleared. |
|
@@43;3;A;F0;F7;8;...;11; |
All fields disabled except tab, list box, field #8 to #11 and buttons with action F0 and F7 when security level (IPASCL) is 3 (bit0 and bit1 set). |
|
@@43;2;P; |
All buttons except F3 (cancel) and F1 (help) are disabled. |
|
@@43;1&-2;P; |
Disable all buttons except F3 (Cancel) and F1 (help) when security level (IPASCL) has bit0 set and bit1 cleared. |