Scheduling Designer Reports in Admin
Space Administrators can schedule the distribution of Designer reports by email. You can specify the format you want for each report, how often to run it, and its recipients.
Tips:
- Space Administrators can also set up Designer report bursting and exception reporting. See Setting Up Report Bursting and Setting Up Exception Reporting.
- Give users permission to schedule reports in Designer and both original Dashboards and Dashboards 2.0 by placing users in a group that has self-scheduling enabled. See Manage Groups.
- You can see the status of Designer report schedules in Admin - Manage Access - Background Job. See Monitoring Background Jobs.
- Visualizer reports are scheduled in Dashboards 2.0.
To create a report schedule
| 1. | Go to Admin - Manage Access - Report Scheduler. It lists currently scheduled reports, if any. |
| 2. | Click Actions
- Create New Report Schedule. The New Report Schedule dialog box opens
as shown below.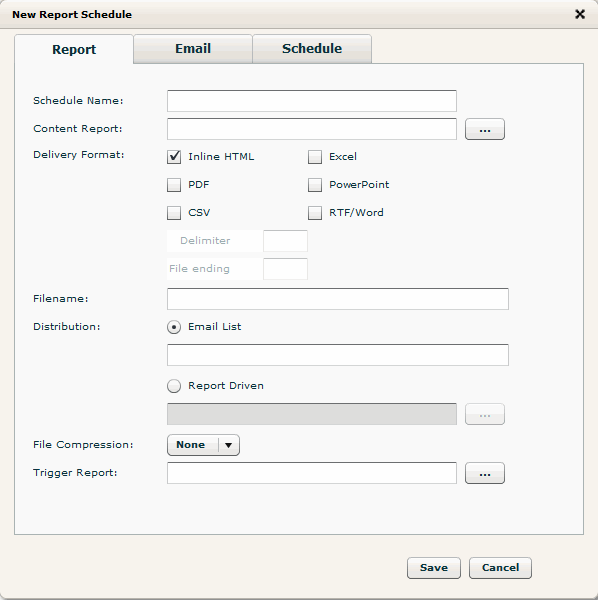 |
| 3. | In the Report
tab, provide a name for the schedule and select the report you want to
schedule for delivery in the Content Report field. Also specify the format
in which to deliver the report (inline HTML, PDF, CSV, Excel, PowerPoint
or RTF/Word) and the filename to use for the report attachment. For Distribution,
recipients can either be entered manually as a list of email addresses
separated by semi-colons or determined by the result set of a report.
See About Report-Driven
Report Distribution. You can select more than one delivery format. You can use session variables and report parameters (to pass prompt values) in the Filename. For example, you could specify the following in the Filename field: Projections for $P{ProductCategory} in $P{Region} during V{Current Month} If the dashboard user selects Beverages from the ProductCategory prompt and NorthEast from the Region prompt and the current month is April 2013, Birst will produce a PDF attachment with the following name when the report is run: "Projections for Beverages in NorthEast during 201304.pdf". You can specify a trigger report that, at scheduled execution time, controls whether or not the email with the content report is sent to the distribution list. This trigger report must contain a table only and no chart. Email messages with the content report are sent to the recipients only if the trigger report returns a result set. For example, you could set up a trigger report to return results only if a certain measure falls below a threshold value. See Setting up Exception Reporting. |
| 4. | In the Email
tab, enter the text of the email notification. You
can also change the From email address and the Subject. To change the default From email address and Subject for all new report schedules in a space, see Changing the Default From Address and Subject for Scheduled Reports. You can include a link to a dashboard page in the body of the email message. You can use session variables and report parameters in the Subject and Body of the email message. 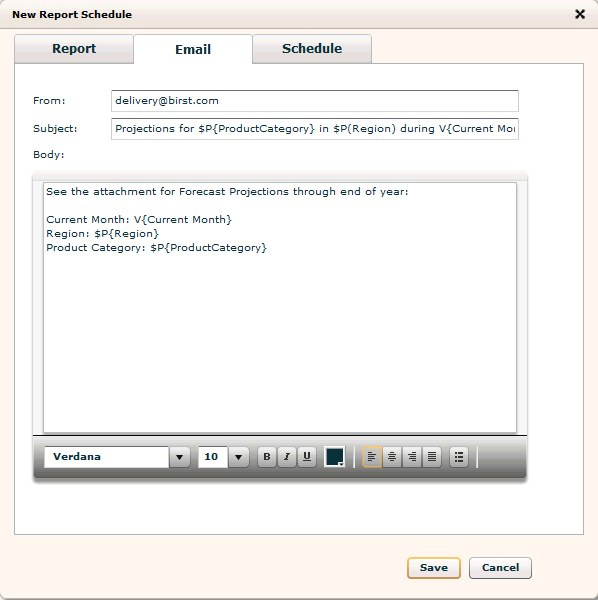 |
| 5. | In the Schedule tab, specify how often to run the report and at what time to run it. |
| 6. | Click Save. The report schedule is listed on the Report Scheduler page. By default, it is enabled. |
| 7. | Run the report immediately by clicking Actions - Run Now. |
Tips:
To modify, enable, or disable a scheduled report, or to run it immediately, select the report schedule on the Report Scheduler page then click Actions and select the appropriate menu item.
To delete one or more reports, select it or use Ctrl-click to select multiple reports, then click Actions - Delete Report Schedule. If a report is not migrated to the current release it is grayed out and you cannot delete it.
Report schedules that use a trigger report or report-driven distribution can only be created in Admin. But after they have been created, they can be managed in Dashboards and Designer by users with Admin privileges.
Report Schedules and Birst Upgrades
Schedules created on a previous release of Birst can only be modified or copied. They cannot be run, enabled or disabled, or deleted.
The process for upgrading or migrating reports to a newer release version has changed in 5.22.0.
Prior to release 5.22.0, to continue running report schedules on newer releases, you would select the report, then select the Modify Report Schedule option, then just save it. This process migrated the report schedule to the current release (as shown in the Release column) with full capabilities.
Starting with release 5.22.0, it is easier to migrate your report schedules as described in the following steps.
To migrate report schedules to the current release
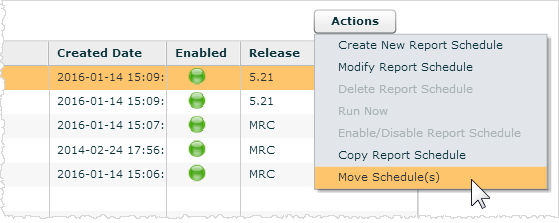
- Go to Admin - Manage Access - Report Scheduler.
- Use Cntrl-click or Shift-click to select multiple schedules.
- Click Actions - Move Schedule(s).
Tips:
- If a report is already migrated, and you select it, the Actions - Move Schedule(s) option is grayed out.
- After migration, the report schedule cannot be modified using prior release versions.
See Also
Including
a Link to a Dashboard in a Scheduled Report Email
Setting Up Exception Reporting
Setting Up Report Bursting
Changing
the Default From Address and Subject for Scheduled Reports
Scheduling a Report from
Designer
Scheduling a Report from
Dashboards
Exporting Report Data in Admin
Sharing and Exporting