Setting Up Federated Joins
In Advanced spaces, Birst supports federation between data sources, including data sources with non-conforming dimensions.
Tip: When planning for federation, see Best Practice: Federate versus Integrate Data.
Support includes:
- Federation across:
- A source in the Birst data store and a Live Access source.
- Two Live Access relational sources (XMLA is not supported).
- Federation with conforming and non-conforming dimensions.
- Birst Live Access implies either Data Flow mapped to a Data Source or Manage Local Sources mapped to a Fact/Dimension.
- All join types: inner, left outer, right outer, full outer.
- Advanced federated query capabilities such as Count Distinct and Averages.
Considerations include:
The data types of the joined columns must be the same. If needed, change one of the data types in Birst. See Defining Column Properties.
Currently, federated joins are created and managed only on the Admin - Define Sources - Manage Local Sources tab. These federated joins can be created for Live Access sources that were originally created using either Data Flow or Manage Local Sources. The Manage Local Sources tab is enabled after you configure a Live Access source.
Snowflaking is not supported.
Discovery and Automated spaces are not supported.
The following instructions describe how to create a federated join between a Birst data store and a Live Access source or between two Live Access sources.
- Prior to creating a federated join between the Birst data store and a Live Access source
- To set up the Live Access data model and import definitions
- Federation Between Sources with Conforming Dimensions
- Federation Between Sources with Non-Conforming Dimensions
- To create federated joins between two Live Access sources
For information about standard joins, see Setting Up Joins.
Prior to creating a federated join
- Create the master data source, the Birst data store.
- Import
the data into Birst.
- Use an Application Connector to access to an enterprise application such as Salesforce, SAP, and Marketo.
- Upload a file such as Microsoft Excel, Access, or delimited ASCII text.
- Create
the data model. See Creating a Data
Model.
- Target the columns as measures and attributes.
- Set the grains and hierarchies.
- Process the data.
- Set up Birst Connect and Live Access
to the local data.
- Create the connection to the local relational database with Birst Connect. See Using Birst Connect.
- Create the Live Access connection. See Creating a Live Access Connection.
To set up the Live Access data model and import definitions
Set up the dimensional hierarchy, then assign the tables to be imported to the appropriate levels.
- In Admin - Define Sources - Manage Local Sources, create the dimensional hierarchy for the Live Access source.
- Click File - Import Table/Cube Definition to import the sources.
- For each table to be imported, check which ones are Measures.
- For each table to be imported, select the Import to Level. These are the levels you created in the dimensional hierarchy.
- Click Import.
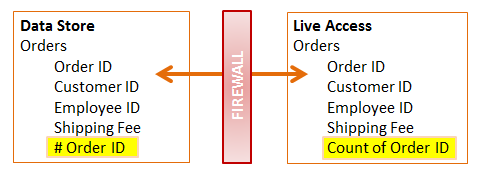
Federation Between Sources with Conforming Dimensions
No explicit joins need to be set up for conforming dimensions. However the dimension must exist in both the Live Access source and the Birst data tier.
Example scenario:
Identical dimensional attribute names, data types, hierarchy level keys, and different unique measure names.
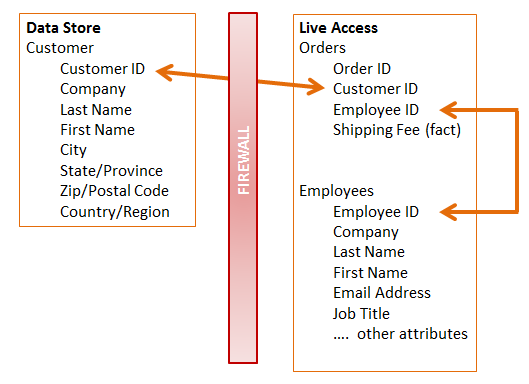
Federation Between Sources with Non-Conforming Dimensions
Example scenarios:
- The dimension exists in the Birst data store; the fact is from Live Access.
- The opposite scenario of the dimension existing in a Live Access source, and the fact in the Birst data store is also supported.
To create federated joins between sources with non-conforming dimensions using Manage Local Sources
- Go to Admin - Define Sources - Manage Local Sources.
- Click the Joins dropdown list.
- Check Federated.
- Select the tables and select a Join Type.
- Click Federated Join and enter the join condition.
- The syntax to use for a data store dimension with a Live Access fact is:
"Data Store Dimension Logical table name1".logical_name1=“Live Access Fact Logical table name2".logical_name2
For example, using Products in the data store, and SalesItem in Live Access:
“Products Products".ProductID="SalesItem".ProductID - The syntax to use for a data store fact with a Live Access dimension is:
"Data Store Fact Logical table name1".logical_name1=“Live Access Dimension Logical table name2".logical_name2
For example, using Orders in the data store and Shippers in Live Access:
"Orders Day Fact".ShipperID="Shippers".ShipVia
Important: In this example, ShipperID must be marked as a level key so that the ShipperID column exists on the fact table. A good way to check is to right-click View Processed Data on the Orders fact table in the Data Flow tab. You see the structure of the generated fact table.
- Click Save.
Birst automatically creates the join key and maps the fact tables.
To create federated joins with non-conforming dimensions for Live Access sources modeled in Data Flow
- Import the Live Access sources in the Data Flow tab. See Modeling a Live Access Relational Database Source.
- Go to Admin - Define Sources - Manage Local Sources.
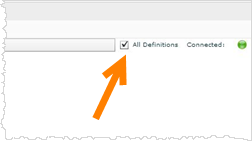
- Click the All Definitions checkbox.
- Expand the measures and see that the new measure tables that map the Live Access sources imported via the Data Flow tab now appear. For example, Orders fact or SalesItem fact.
- Click the Joins dropdown list.
- Check Federated.
- Select the tables and select a Join Type.
- Click Federated Join and enter the join condition.
- The syntax to use for a data store dimension with a Live Access fact is:
"Data Store Dimension Logical table name1".logical_name1=“Live Access Fact Logical table name2".logical_name2
For example, using Products in the data store, and SalesItem in Live Access:
“Products Products".ProductID="SalesItem Fact".# ProductID
Important: In this example, ProductID must be marked as a measure on the Products Live Access source in the data store for the # ProductID columns to exist on the fact table. A good way to check this is to expand the measures in Manage Local Sources and click on the SalesItem fact. You see the structure of this fact table.
- The syntax to use for a data store fact with a Live Access dimension is:
"Data Store Fact Logical table name1".logical_name1=“Live Access Dimension Logical table name2".logical_name2
For example, using Orders in the data store and Shippers in Live Access:
"Orders Day Fact".ShipperID ="Shippers Shippers".ShipVia
In this example, ShipperID must be marked as a level key so that the ShipperID column exists on the Fact table. A good way to check is to right-click and View Processed Data on the Orders Fact table in the Data Flow tab. You see the structure of the generated fact table.
- Click Save.
Birst automatically creates the join key and maps the fact tables.
To create federated joins between two Live Access sources
- Follow steps 1-7 in the previous section.
- In Step 8, the syntax to use for a Live Access fact with a Live Access dimension is:
" Live Access Dimension Fact Logical table name1".logical_name1=“Live Access Dimension Logical table name2".logical_name2
For example:
"Orders".CustomerID="Customers".CustomerID