Define Column Properties in Modeler
Modeler Prep allows data modelers to transform and clean their data sources directly in Birst. This module is designed to help with data sources you imported directly into Birst. By creating preparation pipelines or scripts to create an enhanced view of these data sources, users are effectively making adaptive sources for reporting purposes.
For Live Access use cases, data sources will usually come report ready. Therefore, we do not allow users to modify these sources in the Prep module. However, users may still want to adjust how specific columns or sources are interpreted within Birst. For Live Access use cases, we’ve enabled users to change these properties in the Relate module. This allows users to adjust their sources as well as join them all in one place.
Column properties can be modified as a one-off adjustment or a bulk change. These modifications can be made to imported data, Live Access data, and ADR sources.
Modify Column Properties
To modify column properties:
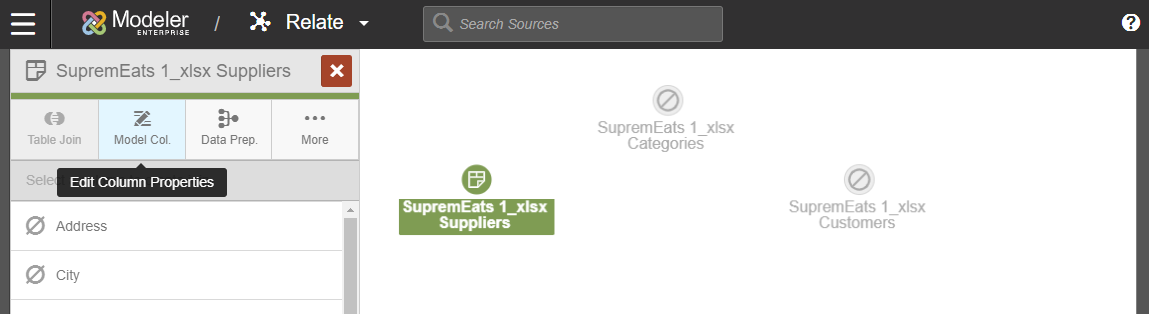
- Access the column properties from Modeler- Relate.
- Select the source.
- Click the Model Col. icon.
- Important: Some column properties for Professional spaces are disabled for raw sources in the Relate view as these edits should be made under the Prepare module as mentioned above. See Prepare Data for more details.
- Select each column by checking the column's checkbox. Use the select/deselect all as necessary.
-
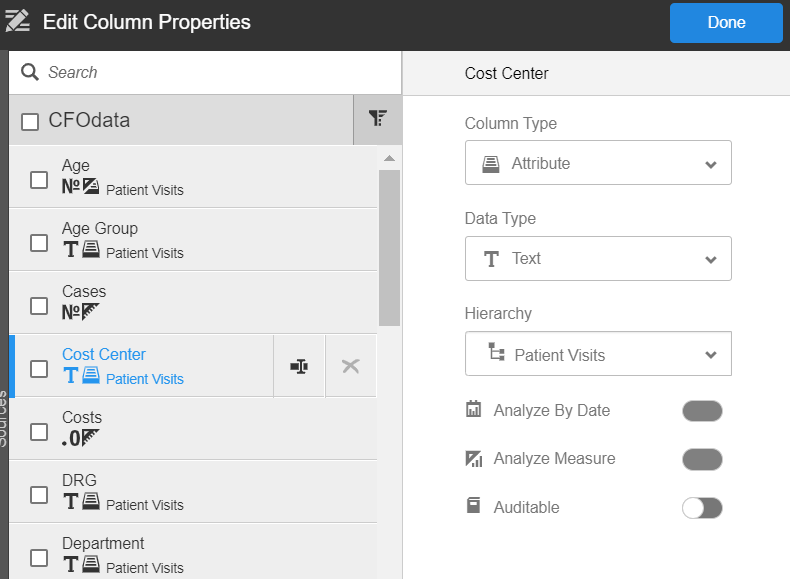
Assign value changes to your columns. Columns have the following properties:
- Column Type: choose how your column will be interpreted in the subject area; Attribute, Measure or both. Setting the column to “None” with hide it from the subject area.
- Column Width: set the column width to ensure your imported data is not truncated. The default width is 50 characters. This is only available for varchar columns in Live Access sources.
- Data type: Birst will attempt to automatically detect the column’s datatype, but users can overwrite the default if needed, e.g. Text, Numeric, Decimal, etc.
- Analyze by Date: To decide if this column should be used as a date to analyze measures against. You can only select this option for columns that data type contains “Date” or “Date and Time.”
- Analyze Measure: indicates the column is a measure in a degenerate dimension. This allows you to use the measure like an attribute, for example, for grouping instead of counting. This is only available for Measures. If Analyze Measure is checked, the column will be listed under the Attributes folder in the default Subject Area of Designer and Visualizer. Tip: If this column can be used as the grain for another table, do not check this box.
- Formula: Using your existing column names from the data base, create a custom formula for the column selected.
Note: Formula validation only functions for Birst Connect 2 Live Access connections. Other scenarios may result in a "Formula Validation Disabled" message and icon, meaning Birst does not validate the formula and use it as is in Visualizer, Designer, or Dashboards.
- Note:The formula field cannot be used for the original existing columns in a Live Access database. Users can create a new column to customize formulas if need be.
Note: A column being used to join to other data sources cannot be renamed. To rename that column, delete the existing join first, then rename the column and recreate the join.
- The following columns are only in Enterprise Modeler addition with ADR sources:
- Auditable: To ensure that if a specific attribute is queried, it is then included in the Audit Trail. This property can only be set for columns of type “Attribute” or “Both”.
- Hierarchy: Users assign attribute columns to an existing hierarchy using the dropdown menu. These columns will then be included in their respective dimension tables and hierarchy folders in the subject area. Measure type columns will not be tied to a hierarchy unless the column type is marked as “Both”.
- Tip: If you wish to remove columns from a hierarchy, you can achieve this by marking this column’s Data type to “None” – this will effectively remove the column from the dimensional data model
- Click Save.
Add a Column
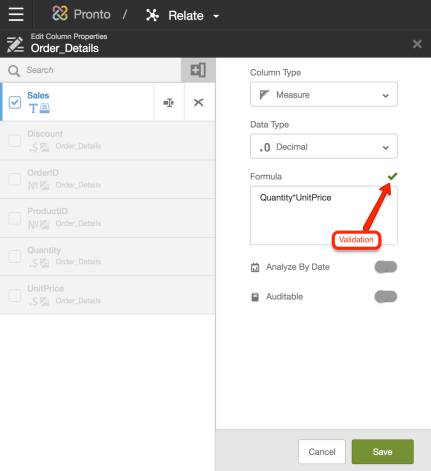
You can add custom columns to your Live Access sources using Modeler Relate. For example, if a measure for Revenue does not exist directly in a Live Access table, you can add a new column to the table and enter a formula: Quantity*UnitPrice.
Note: To create a new column with uploaded data for your Professional space, use the Prepare module.
To add a new column to your Live Access source:
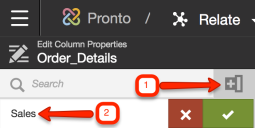
- Navigate to Modeler - Relate and select the source you want to add the new column to.
- Click Model Col.
- Click on the +add column icon on the top right corner, name the new column, and click the green check mark to save.
- Fill in the column type, data type, and add a formula to the new column.
-
Birst will automatically validate the formula against the database.
- Tip: The formula's syntax must match the source's database. For example, if the database is Oracle, then you need to use Oracle specific syntax.
- Tip: If a source name contains space characters, use quotation marks around the name. For example: Quantity * “Unit Price”
- Once the validation succeeds, you will be able to save your new column and use it in Birst.
See Also: