Creating Data Security Filters
Space Owners and Space Administrators can create data-level security filters for Advanced spaces and Discovery spaces. Infor allows you to add security filters at the source column level to secure both fact (measure) and the dimensional (attribute) data. To secure the data:
- You create a visibility control table that specifies which users have access to which columns. You upload the data visibility control table to the space, set its hierarchies and grains, and process it like any other data source. See Creating a Visibility Control Table.
- You set
up data security filters on the relevant columns. A security filter is
a query that uses a WHERE clause and the USER system variable to restrict
access to the specified users.
Tip: If the same filter will be re-used, create a session variable that contains the query. - At runtime Birst instantiates the USER variable and sets it to the user login credentials.
- Birst passes the list of values from the data visibility control table to the security filters.
- Users see only the column data that they should see based on the security mapping table.
Both measure and attribute columns can be secured. If a security filter is applied to a column that is targeted as both a measure and an attribute, Infor secures both the fact table and the dimension table.
Important: Ensure that all references to data elements that are the same across all sources are secured by the same security filter definition. Failure to secure the same column across all of your sources may produce unexpected results.
To create a new security filter
Prior to creating a security filter, create the visibility control table. See Creating a Visibility Control Table.
- In the Admin module, click Define Sources -> Manage Sources.
- Select the
data source containing columns you want to secure. The columns in the
data source display in the Columns tab.
Tip: You only need to secure columns that are used in the data model. If a source column is not targeted in the model, it is not available to users at all. - Click the Options column. The Advanced Column Properties dialog opens.
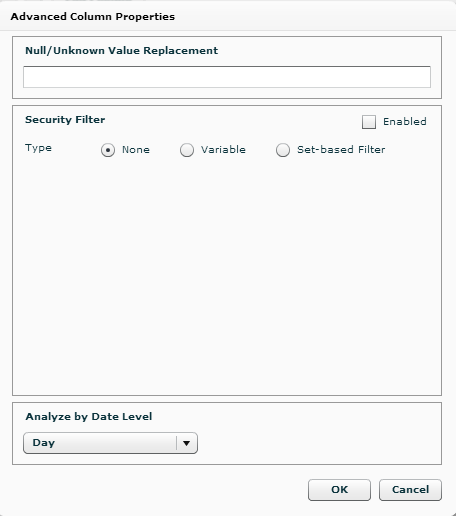
- Check Enabled.
- Select the type of security filter:
- Set-based filter:
Use set-based to enter a logical query that returns a list of
filter values, or provides a list of constant values on which
to filter. Birst
uses the query results or constants in a sub-query as: WHERE
<column> IN (<physical query version of logical query
for set-based filter).
Example set-based filter:
SELECT [Mapping.Retail_Store_Code] FROM [ALL] WHERE [Mapping.Username]=GetVariable('USER') - Variable: Use a
session variable security filter if the column to be secured exists
in more than one source. First, create the session variable that
has the query. See Creating Variables.
Birst uses the query results as: WHERE <column> IN (comma-separated list).
When you select the variable type, you get a list of predefined system session variables. Select the security filter session variable. Its syntax displays in the panel.
Tip: See Process Data -> View Processed Data to see the query and results.
- If needed, click Support Outer Join. See Inner versus Out Joins.
- Select any user groups that should be exempted from the security filter. These groups would be allowed to see the data.
- Click OK to close the Advanced Column Properties dialog.
- Click Save.
- Have your
users log out and log in again.
Tip: The Space Owner is not restricted by column security control filters. To fully test the filters, use a a non-owner user ID.
Creating a Visibility
Control Table
Using Variables in Birst
Defining Column Properties
Creating Variables