Setting Data Source Processing Properties
To specify how a data source is processed, you can set options such as the processing group to assign to the source, whether to only keep data from the last upload, how to handle source data changes, specify data characteristics such as the type of encoding and what character to use as a column separator, and how to handle bad records (replace with null or skip the record).
- Accessing Properties
- Processing Directives
- Source Data Change Behavior Properties
- Data Characteristics Properties
- Advanced Properties
- Custom Time Hierarchy Keys
- R Server Properties
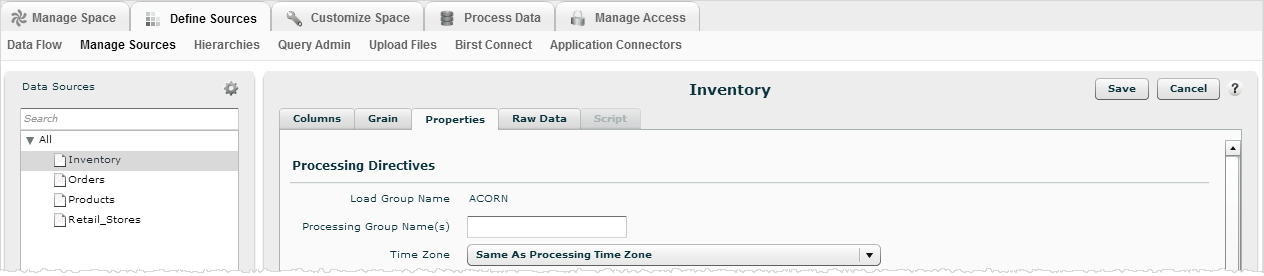
To access data source processing properties
- Go to Admin - Define Sources - Manage Sources.
- Select a data source from the list, then click the Properties tab.
- Change the
settings on the Properties tab. See the following sections for details.
- Click Save.
Processing Directives
The Processing Directives settings control various activities during data processing.
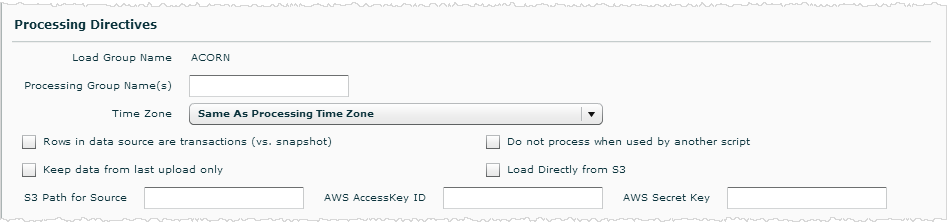
Load Group Name: This is an internal default and cannot be changed.
Processing Group Name(s): By default all sources are assigned to a single default processing group. To have more control over how data loads and processes, you can create a new processing group or assign the source to another processing group in this field. Separate multiple processing group names with commas. See Assigning Sources to Processing Groups.
Time Zone: The time zone refers to the input time zone for the source data. By default this is the same as the processing time zone for the space, which is set at Admin - Manage Space - Modify Properties - Processing Time Zone. To manage the relationship between these settings see Time Zone Shifting for Data Processing.
Rows in Data Sources are Transactions (vs. Snapshot): This setting indicates whether the rows in the data source should be treated as snapshots or transactions. It applies to both raw data sources and scripted sources. Check this box if the rows in the data source are transactions, for example, data from an ordering system.
When both Rows in Data Source are Transactions and Keep Data from Last Upload Only options are unchecked (the default setting), no records are deleted or updated in the corresponding fact table in the warehouse during data processing. By default, the corresponding report query filters the data for the last load number only. Birst reports on the latest data by default so that you don’t get duplicate data in your reports in case you are loading all the data each time, versus loading only incremental data.
Leave this box and the Keep Data from Last Upload Only box unchecked if you want to take snapshots of your data each time the data is loaded and processed. Since snapshots are being taken, you do have the ability to query all loads for desired dimensions by checking the Show All Snapshots checkbox for the corresponding hierarchy under Define Sources, Hierarchies.
Tip: If the data source contains a large amount of data, leaving this box unchecked can create large data volumes if this source is loaded daily. This in turn can make queries run slower. You can set a snapshot policy under Advanced Options which lets you specify how often to take snapshots of your data.
See Setting Transaction and Snapshot Policies for a Data Source.
Keep Data from Last Upload Only: Checking this box truncates and loads the corresponding fact table in the warehouse during data processing. Note that this has no impact on loading the dimension tables from this source. Dimension tables will never be truncated (to ensure reports do not get broken since dimension tables can be joined to other dimension tables). If this option is selected, reports will display fact data from the last load only as all previous loaded data has been truncated.
Use this option if you only want to query the most recent data from this source and do not want to maintain historical data. No snapshots are taken when Keep Data from Last Upload Only is selected, regardless of whether the Rows in Data Source are Transactions box is checked or not. See Setting Transaction and Snapshot Policies for a Data Source.
Do Not Process when Used by Another Script: By default when a scripted source is processed, all upstream staging table sources that they refer to are also processed. If multiple scripted sources and a shared upstream source are processed in the same processing group, then the upstream source gets loaded only once. Also, if a scripted source is re-processed individually in a subsequent run, the upstream source is also re-processed to ensure that the latest data is reflected.
While this is the expected behavior, for performance optimization you might not want or need to re-process the upstream source. To override the default behavior, the Do Not Process when Used by Another Script property tells Birst to skip processing a staging table source when a script depends on it.
Important: When using this override, be sure that the upstream source data does not change.
Best Practice: It is a best practice to create a new processing group for this activity.
After you check this option and you re-process the scripted source, Birst does not reload the staging table for the upstream source.
S3 Settings: The Load Directly from S3, S3 Path for Source, AWS AccessKey ID, and AWS Secret Key settings apply to an S3 data source and the Appliance when using Redshift.
The AWS Access Key ID and Secret Key refer to the keys for the S3 path from where the file is sourced. In both cases, an initial load of the source needs to happen using Birst Connect with subsequent loads being triggered directly from S3 to Redshift, with both the S3 bucket and Redshift instance being hosted in the same AWS region. These sources should be strictly used as a staging source feeding into a scripted source, and not by directly targeting the source to a dimension or grain.
Source Data Change Behavior
The Source Data Change Behavior settings affect whether and how Birst reacts to changes in the source date during subsequent processing.
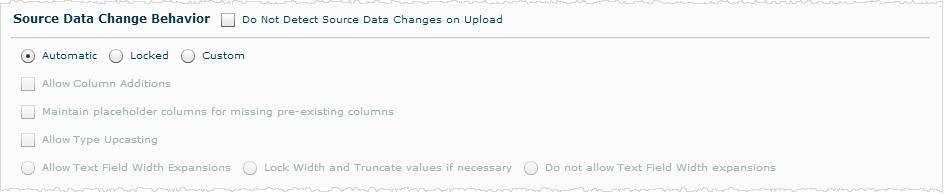
Do Not Detect Source Data Changes on Upload: When this option is selected, any data source metadata changes (datatypes, widths etc.) are not detected.
Important: This option is recommended only when it is known that the data source structure does not change. It is expected that the data source column data type and length must be configured to correctly reflect the column data type and length as in source system. Additionally, other source data change options such as locking are not compatible with this property selected.
In the Manage Sources - Raw Data tab, sources of type Text and CSV will not be refreshed if this option is selected. This behavior is seen when uploading a file greater than 10MB from Birst Connect with processing engine version 5.21 and beyond.
Automatic, Locked, or Custom: These options determine how Birst reacts to changes it detects in the source data.
- Automatic is the default and means that Birst automatically makes changes when there have been changes in the source data since the last time you uploaded the data. Birst adds and removes columns and makes other changes as necessary when changes exist in subsequent loads of the source data.
- Select Locked if you do not want to make any changes to the source data properties after the first upload. If Locked is selected and the source data changes in a subsequent upload (such as new columns, missing columns, data types), there will be an error when the data is processed.
- Select Custom if you would like to choose how to handle specific types of changes in the source data. When you select Custom, the fields below become active so you can choose which types of changes to allow.
- Allow Column Additions: When Source Data Change Behavior is set to Custom, by default it allows column additions. If a new column appears in the source, uploading the file with the new addition will succeed. If you do not want Birst to automatically add new columns, deselect this option.
By default, the newly added column will be targeted to the most common target, that is, the hierarchy that is most commonly used for that source. To change targeting behavior for new columns click Advanced Options in the Properties tab and select an option for Newly Detected Source Columns. - Maintain Placeholder Columns for Missing Pre-existing Columns: Check this box if you would like to keep placeholders for columns that used to be present in the source but are missing from a subsequent upload.
- Allow Type Upcasting: Check this box if you want Birst to automatically convert columns to a different data type (e.g., Integer, Varchar, DateTime, Float) based on the kind of data in the column in subsequent uploads of the source data. If this box is not checked, you will receive an error if a column contains data that does not match its data type when you process the data.
Tip: The data type can be locked for individual columns by checking the Lock Type box in the Columns tab. - Allow Text Field Width Expansions: Check this box if you want Birst to automatically expand the width of text fields if the data in a text field exceeds the assigned width in subsequent uploads of the data source. For example, if a Description field is set to a maximum width of 100 characters (in the Width property of the Columns tab) and when the data source is loaded again a value in the Description field contains 200 characters, check this box if you want Birst to automatically expand the width of this column to accommodate the 200 characters.
- Lock Width and Truncate if Necessary: Check this box if you want Birst to lock the width of text fields and truncate values that exceed the assigned width in subsequent uploads of the data source. For example, if a Description column is set to a maximum width of 100 characters (in the Width property of the Columns tab) and when the data source is loaded again a value in the Description column contains 200 characters, the value will be truncated to 100 characters and extra characters will be discarded.
- Do not Allow Text Field Width Expansions: Check this box if you do not want Birst to allow text fields to be expanded beyond the maximum width set in the Width property of the Columns tab. For example, if a Description column is set to a maximum width of 100 characters and when the data source is loaded again a value in the Description column contains 200 characters, an error will occur when the data is processed.
- Allow Column Additions: When Source Data Change Behavior is set to Custom, by default it allows column additions. If a new column appears in the source, uploading the file with the new addition will succeed. If you do not want Birst to automatically add new columns, deselect this option.
Data Characteristics
The Data Characteristics setting determine how Birst interprets characteristics of the data.
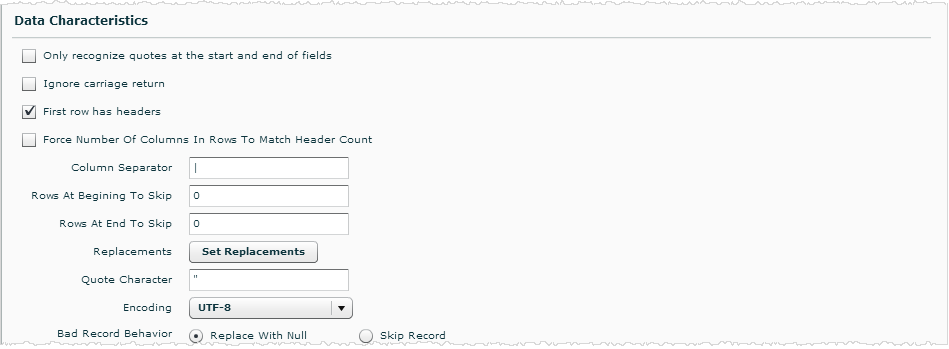
Only Recognize Quotes at the Start and End of Fields: If this box is checked, quotes embedded in fields are not treated as the start/end of quoted strings. For example,
abc|red"red |green"c
would be translated as:
abc, red"red, green"c
rather than:
abc, red"red, green", c
Ignore Carriage Return: If this box is checked, carriage returns in the data will not be recognized.
First Row Has Headers: If this box is checked, the columns in the first row of the source will be treated as column headers. This box is checked by default.
Force Number of Columns in Rows to Match Header Count: If this box is checked, Birst adjusts the number of columns in the source to match the number of headers if necessary.
Column Separator: Enter the character that is used as the column separator in the data source here. By default, the column separator is | (pipe).
Rows at Beginning to Skip: Enter the number of rows at the beginning of the data source to skip
here. By default, the value is 0. For example, if you have an Excel file
that has a title or other information at the top and the actual data doesn’t
start until line 7, you would enter 7 here.
Rows at End to Skip: Enter the number of rows at the end of the data source to skip here.
By default, the value is 0.
Replacements: Click the Set Replacements button to open the Replacements dialog box in order to specify a value in the data source you would like to replace with a different value. For example, you could replace "United States" with "USA". In the Replacements dialog box, click Add then type the value you want to replace in the Original Value column and the value to replace it with in the New Value column. You can specify more than one value to replace in a data source. Click OK when you are done setting replacement values.
The replacements
entered here only apply to the data source highlighted on the left side
of the Manage Sources page.
Quote Character: By default, the quote character is set to
". If strings are quoted with a different character in this
data source, enter that quote character, for example, '.
Encoding: Select the type of encoding to use for this data source here. By default,
the encoding is set to UTF-8. This needs to match the format of the incoming
data.
Bad Record Behavior: When encountering a bad record, select whether to replace the bad record with a Null value or skip the record. For example, this would apply if the data type of a column in the source has changed and the Source Data Change Behavior is set to Locked.
Cardinality: The cardinality of a raw or scripted Discovery source. Enter a non-zero number. The default for a scripted Discovery source is 0. The default for a raw Discovery source is the number of rows of the last uploaded source file.
Tip: This is different than setting the cardinality of processed grained measure tables, which is done by setting the cardinality of the hierarchies.
Advanced Properties
Click the Advanced Options button at the bottom of the page to specify how to target new source columns, specify delete keys, and set a snapshot policy (how often to take snapshots).
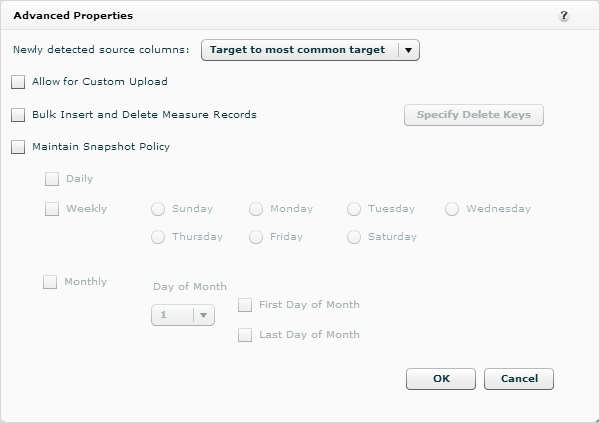
Newly Selected Source Columns: Select which hierarchy to assign any new columns that may be detected in this data source in the future.
By default new columns target to the most common target.
- Target to Most Common Target: Newly added columns in the source will automatically be targeted to the hierarchy that is most commonly used for that source. For example, there is a Categories source and all four columns in the source are targeted to the Categories hierarchy. When a fifth column is added to the source, it is automatically targeted to the Categories hierarchy.
- Do Not Target: Does not assign newly added columns to a hierarchy.
- Select from a Hierarchy: Otherwise, you can select from existing hierarchies.
Allow for Custom Upload: This feature is no longer used and has been deprecated in the product.
Bulk Insert and Delete Measure Records: Check this box to enable the Specify Delete Keys button. Click the Specify Delete Keys button to set delete keys for the source. Setting delete keys allows you to update records in your fact tables. When delete keys are specified, fact data is treated as transactions where the delete key combination is unique in the corresponding fact table in the warehouse. If a record with the same delete keys is uploaded again, then the existing record in the fact table is deleted and the new one is inserted. See Specifying Delete Keys.
Maintain Snapshot Policy: Check this box to specify a snapshot policy. You would use this option if you want to specify when snapshots of the data should be taken (on a daily, weekly, or monthly basis) rather than every time the data is uploaded if Rows in Data Source are Transactions (vs. Snapshot) and Keep Data from Last Upload Only are not checked.
To set your own snapshot policy here, make sure the Rows in Data Source are Transactions (vs. Snapshot) and Keep Data from Last Upload Only boxes on the Properties tab are not checked. The source will be processed only when data processing runs on the snapshot days you select here. See Setting Transaction and Snapshot Policies for a Data Source.
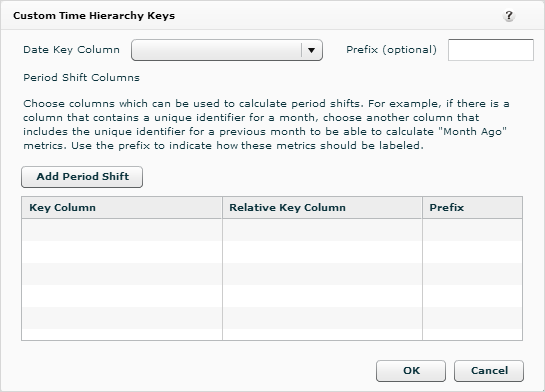
Custom Time Hierarchy Keys
The Custom Time Hierarchy Keys button only displays at the bottom of the Properties tab for sources that have a date column.
Use the Custom Time Hierarchy Keys dialog to create a custom time hierarchy definition based on a custom time table. You can create your own time attributes and period shifts that are specific to your organization. See Creating a Custom Time Hierarchy for step-by-step instructions.
R Server Properties
If Birst is connected to R Server, the R Server settings appear.
Manage Linkage to R Server: Use this dialog box to change the path to the file on the R server you would like to upload or to add an R expression to execute before pulling the file from the R server. Once a file has been uploaded from R, Birst saves the link information in the data source so that upon subsequent processing, this file will be re-uploaded. This way, new data sets can be pulled from R as part of a regularly scheduled load process. See Importing Data into Birst from R.