Distributed Development Model
This topic describes how to design a Birst environment that is suitable for multiple developers and also describes the recommended workflow to use for your distributed development environment. The Infor Team recommends creating three types of spaces:
- Development spaces
- User acceptance testing (UAT) space
- Production space for business users
Create the data model, reports, and dashboards in a development space, then migrate the development space to the user acceptance testing space for testing. When the changes have been validated in the user acceptance testing space, migrate to the production space.
The high level steps in the distributed development model workflow are:
-
Create a user acceptance testing (UAT) or quality control space based on the production space.
-
Create one or more development spaces.
-
Make all changes in the development space(s).
-
Merge changes into the user acceptance testing (UAT) space and perform testing there.
-
Migrate the tested changes into production.
To create a distributed development environment
-
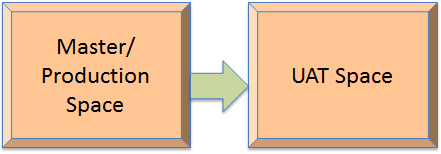
Create a user acceptance testing (UAT) space. This space will be used to validate new development and changes. Create a copy of the master space. To do this, you can use the Copy Space button on the home page.
-
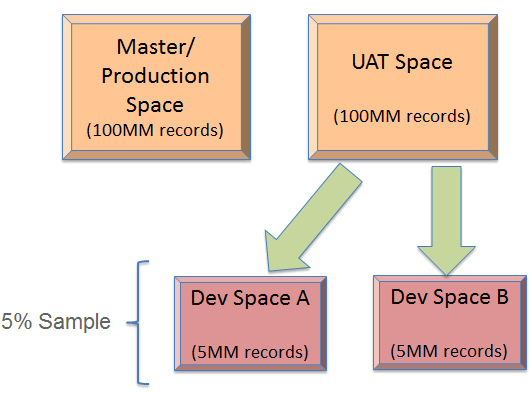
Next, create one or more development spaces. Each developer should have their own development copy. To do this, create copies of the UAT space using the Copy Space button on the home page.
-
Next, use sampling to shrink the development spaces. This will dramatically cut reprocessing time. In the following diagram, two copies of the UAT space have been created to be used as development spaces, one for developer A and one for developer B. Data sampling was used in the development spaces to reduce the size of the data to a 5% sample. See About Data Sampling for information.
-
Make all changes in the development space(s). This includes data model changes, report changes, custom measures and attributes, and session and repository variables.
-
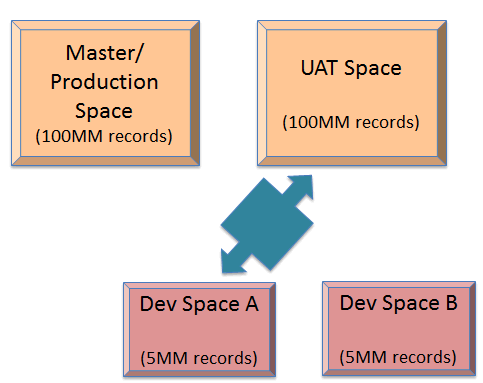
Merge changes into the UAT space using the Compare and Merge Spaces feature. You can use Compare and Merge Spaces to do the following tasks:
-
Copy individual changes from development space(s) into the UAT space.
-
Bring down to the development space(s) any changes by other users that are desired.
-
Test and validate the changes in the UAT space.
-
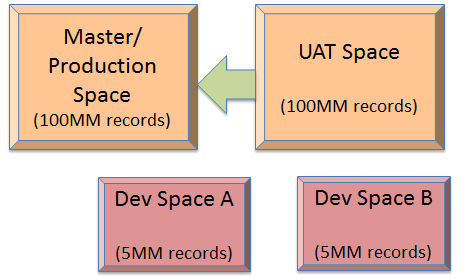
Lastly, migrate the tested changes into production. There are two methods you can use to accomplish this:
-
Copy specific, tested changes from the UAT space into the production space using the Compare and Merge Spaces feature.
-
If all changes are to be accepted and the data is the same in the production and UAT spaces, you can swap spaces and re-copy. To do this, use the following steps:
-
Swap the UAT and production spaces (using the swapspacecontents command) such that UAT is the new production space. After the swap, the spaces should retain their respective space IDs, user and group permissions and membership settings, and scheduled reports.
-
Delete the old production space using the Delete button on the home page.
-
Copy the new production space to create a new UAT space.
Comparing and Merging Spaces
Creating a New Space
Copying a Space
Creating a Data Model
Validating
Your Data Model