Validating Your Data Model
After creating a data model, a Space Administrator can run a model scan in order to check the health of the metadata. Inconsistent, incorrect or missing metadata can lead to problems when processing data or creating reports. Running the model scan validates your data model and alerts you to any issues. You can select the areas to check such as data sources, hierarchies, aggregates, and custom attributes or check all areas of your data model. The model validation scans the repository against a set of validation rules and provides a detailed report that describes any issues that are detected.
Example metadata validation rules include:
Hierarchy names should be unique and level names should be unique within the hierarchy.
The expression for a Custom Attribute or Custom Measure cannot exceed 10 nested IF/ELSE statements as this creates more than 10 levels of nested case statements which is not supported by SQL Server.
You can run the scan multiple times against your data model.
Tip: Space Administrators can run the model scan at the command line using the validatemetadata command.
To run a data model scan
| 1. | Go to Admin
- Manage Space - Model Scan. The Model Scan page opens. If you are running
the model scan for the first time, you see the following message: Otherwise you see the message from the last scan you ran with the date and time of the scan. You can run a scan of your model as many times as you like. |
| 2. | From the dropdown
list, select the area of your data model to validate or select All to
validate all areas, then click Run. The following areas can be validated: |
- All (all areas listed below)
- Aggregates
- Custom Attributes
- Custom Measures
- Data Sources (this validates the settings for data sources on the Manage Sources page)
- Data Sources - Data Flow (this validates settings for data sources that are specific to Data Flow, such as Exclude From Warehouse Model.)
- Hierarchies
| 3. | If no issues
are encountered for the area you selected, you see the message "Your
model is valid".  If issues are encountered during the scan, you see the following notification and the issues will be listed in the table at the bottom of the page. 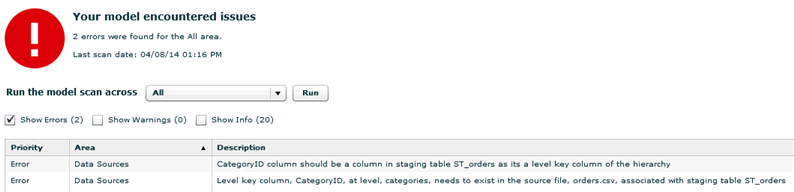 |
| 4. | You can control
the level of information that is displayed in the table by checking the
appropriate box: |
| e. | If Show Errors is selected, critical items will be listed. These are items that will cause problems and should be resolved. |
| f. | If Show Warnings is selected, warnings will be included in the list of issues. Warnings indicate an item does not have a critical error but does not follow best practices. |
| g. | If Show Info is selected, informational messages will be displayed that describe the rules that have been applied during the scan. |
| 8. | Take corrective
action to fix any issues identified in the scan. For example, the two
errors below indicate that the column CategoryID should be on the Orders
source because Orders is targeted to the hierarchy named Categories. Continuing with the example, the Grain for the Orders source on the Manage Sources page shows that the Categories hierarchy is targeted to the Orders source. This means that the level key for Categories, CategoryID, needs to be on the Orders source. 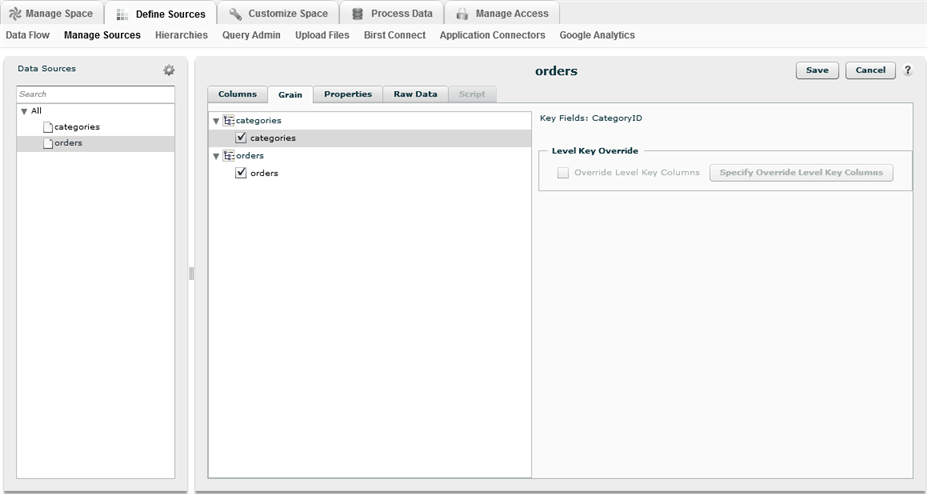 Looking at the columns for Orders in the Columns tab of the Manage Sources page, the CategoryID is not on this source. Because a hierarchy named Categories with a level key of CategoryID was targeted to the Orders source and the Orders source does not have a column called CategoryID, the dimension table will not be populated correctly when it is created. This is the reason the model scan issued the errors. In order to resolve this, you would need to uncheck the Categories hierarchy in the Grain tab for the Orders source on the Manage Sources page. 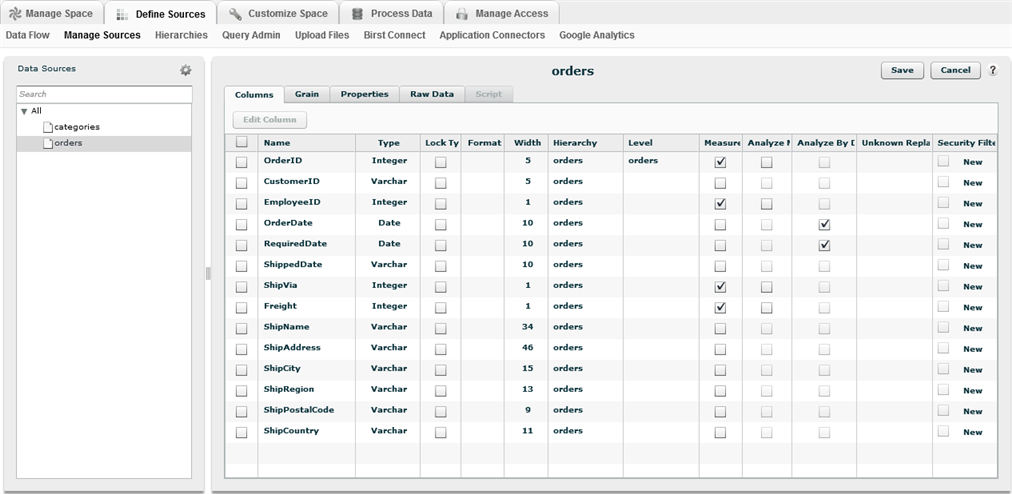 |
| 9. | After unchecking
the Categories hierarchy in the Grain tab for the Orders source and running
the model scan again, the two errors are cleared: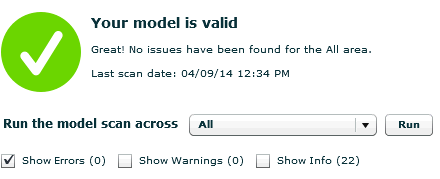 |
See Also
Creating a Data Model
Creating Hierarchies
Defining the Grain of
a Data Source