Accepting and completing a clustered assignment
To accept and complete a clustered assignment using the RF Task Manager:
- From the RF device Main menu, select Picking. The Pick Menu is displayed.
-
Perform one of the
following:
- To perform a specific assignment number, select Assignment Pick.
- To allow the system select the assignment to be completed, select Task Picking.
-
If you selected
Assignment Picking, the
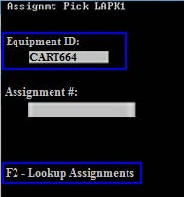
Assignment Pick (LAPK1) screen is displayed. To
receive the pick task, enter the equipment ID and the assignment number. Note
that if the equipment type is included on the assignment, the Equipment ID
field is mandatory. If not, you can press
Enter to navigate past
the field.

You can press F2 to look up the assignment number. The Assignment List (CRESLT) screen displays the open work assignments. Navigate to the applicable assignment and press Enter to select it. The Assignment Pick (LAPK1) screen is displayed again.
-
With the equipment ID and assignment number specified, press
Enter. The system
performs checks to verify:
- The Equipment ID is valid. If invalid, a message displays indicating that the equipment ID is not valid. You must correct the entry before you can continue.
- The Equipment ID is valid and the equipment type for the equipment ID specified is the same as the equipment type specified on the assignment. A message displays indicating that the equipment type is different than the expected type. You can select to override the expected equipment type.
- There are no open clusters with the same equipment ID.
- The Equipment ID (the cart, for example) is empty and does not have any inventory.
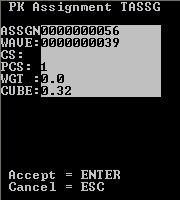
If no conflicts exist, the PK Assignment (TASSG) screen displays the first pending task detail for the assignment.
-
View the
Assignment Summary screen. Press
Enter to accept.

-
To accept the assignment
shown on the RF device, press
Enter. The pick task list
displays with details about the first task in the planned assignment.
Note:
- After you accept an assignment, the system assigns you all tasks for that assignment.
- You can complete tasks in the order presented, or press 4 to scroll backward or press 6 to scroll forward on the list of picks.
- When the task is complete, press Enter. The next task displays.
- When all tasks within a planned assignment are complete, the Assignment Complete screen is displayed.