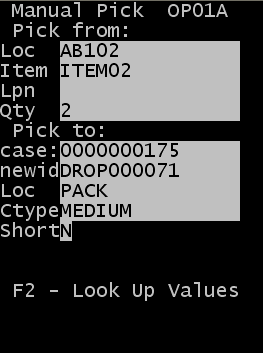
- Loc
- Specify the location
from which the pick is coming.
- Item
- Specify the item
code.
- Lpn
- Specify the ID
associated with the product.
- Qty
- Specify the amount
of product to pick. The amount cannot exceed the amount in the location.
- Case
- The case ID is
created during allocation.
Note: If a Drop ID is not assigned (see below), the case ID
becomes the license plate for the picked inventory. You can then move, pack, or
load the picked product following the pick ID.
- New ID
- Specify a new
container ID (drop (ID) for the picked product.
Note: Use a Drop ID to assign your ID to the container created
during the pick. This can be a smaller container such as a tote or carton or a
large container such as a pallet. If a new ID (Drop ID) is assigned during the
pick, this becomes the license plate for the picked inventory. You can then
move, pack, or load the picked product following the pick.
- The same case ID
cannot exist on different drop IDs. See
Adding new case IDs during standard and cluster picking.
- LOC
- Specify a new
location for the product.
- Ctype
- Specify the carton type
for the pick.
Note: Press F2 to
view a list of possible carton types. This action displays a list of
cartons for which the Display for
Picking flag is active in the Carton
Configuration screen.
- SHORT
- Specify Yes
Y to indicate that the pick was shorted.
Otherwise, specify No N. The default is
N.
Note: Specify yes only if you are picking less
than expected for the item in the current case ID and location. This
updates the quantity picked.
