Performing pallet picks (single and multiple) – pick by order
To perform single- or multiple-pallet picks when initiating the picks by order, open the main menu.
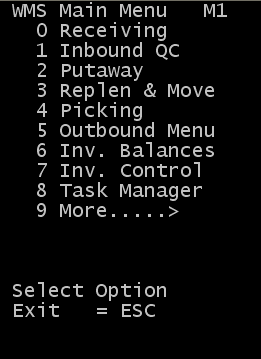
-
From the RF
device Main menu, select Picking. The Pick Menu (PM1) screen is
displayed.
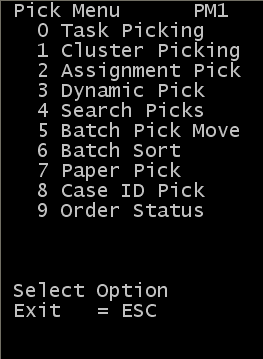
-
From the Pick Menu, select Dynamic
Pick. The Dynamic Pick
(DAPM) menu is displayed.
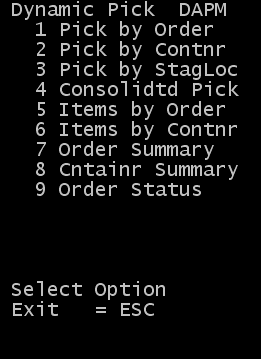
-
Select
Pick by Order. The
Dynamic Pick (OP6A) screen is displayed.
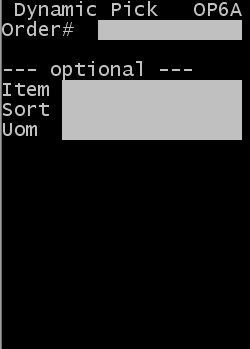
-
Specify this
information:
- Order #
- Order number to pick. Required.
-
The following information is optional:
- Item
- Item code on the current order to pick.
- Sort
- Does not apply to pallet picks.
- Uom
- Unit of measure to pick. Options available are Case (C) or Pallet (P). To get pallet picks, press P.
-
Note: If the UOM is left blank, picks are presented to the picker based on their permission(s) type(s). If the picker has permission for both case and pallets, it distributes the pallet picks first.
-
Press
Enter. The
Dynamic Pallet Picking (OP12) screen is
displayed.
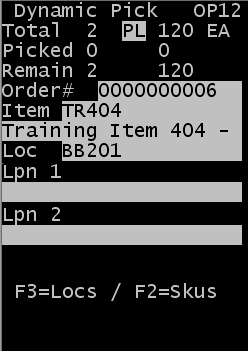
The initial screen displays this information:
- Total
- The first column displays the total quantity to pick for this unit of measure. The second column displays the total master units to pick of this UOM. Layers are used in this example.
- Picked
- The first column displays the quantity already picked for this UOM. The second column displays the master units picked for this UOM.
- Remaining
- The first column displays the number of this UOM still remaining to be picked. The second column displays the master units still remaining to be picked for this UOM.
- Order #
- Current order number.
- Item
- Item to be picked.
- Loc
- Suggested location from which to pick.
-
Note: Lookup capabilities are available from this screen to find alternate product to pick if necessary.
To view other locations for the item, press F1. This does not include the location that is currently on the picking screen. Although this option allows you to view other potential pick locations, the application might or might not accept the locations based on assigned location rules and rotation rules.
To view all items on the shipment order, press F2. The sequence of this view is based on the line item number within the shipment order detail. Press 6 (forward) and 4 (back) to scroll records. Each record displays the total amount allocated for the item in the Qty field. You can scroll to any record within the shipment order and press Enter to display the pick screen for that record.
-
Specify this information to complete the
pick
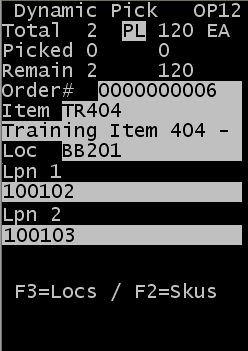
- Loc
- Suggested location. You can change the location as long as what is being picked meets rotation requirements for the item.
- Lpn 1
- First license plate being picked.
- Qty (not shown)
- Quantity to pick. This is defaulted to 0 and hidden in the base screen, meaning the entire contents of the pallet are being picked.
- Lpn 2
- If a second license plate is to be picked for this item, scan that license plate in the second LPN field. If only picking one pallet, leave this field blank.
- Qty
- Confirm the quantity of the second license plate picked. Use 0 to pick all.
-
Note: The screen that displays above has been configured to allow 1 or 2 pallets to be picked simultaneously. As previously noted, the screen can be configured to record up to three pallet picks on one screen.
-
To continue pallet
confirmation, press
Enter. The
Stage Pick (OPXZ) screen displays.
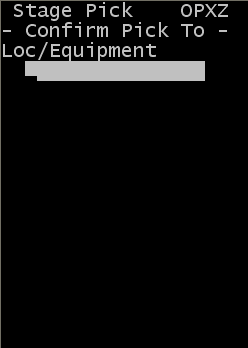
- Confirm Pick To
- Loc/Equipment
- The In-transit location to confirm the pick to. This location must be configured with a location type of INTRANSIT, STAGED or PICKTO. Once the pick is completed, the license plates picked will show in inventory balances within this location until they are moved to another location.
-
The
Get Next DA Pick screen is displayed for the
operator to either request another task by pressing
Enter or select to move
the picked product to another location.
Note: For more information on how to use the move options, refer to the Moving Picked Inventory section in the Infor WMS Picking User Guide.
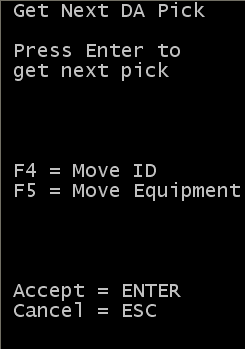
- Press Enter to get another pick for the current order.