Resolving serial inventory balance discrepancies
The previous sections describe how to resolve issues with serial numbers that occur during receiving or picking. The same type of problems such as bad labels, incorrect quantity counted, or lost RF connection, can occur during regular inventory moves. A separate screen is available to resolve this type of issue when the quantity does not match between serial number inventory and license plate inventory.
To resolve these inventory problems:
-
From the Serial Maintenance (SNM) menu,
select Move Serials. The Move Serials (SNMV1) screen displays.

-
Complete the information required to find the receipt record to
correct.
- OWNR
- Owner (optional).
- Item
- Item number to correct (optional).
- LPN
- License plate number to correct. In most cases, entering a license plate is the only information needed to find a list of all inventory records for the license plate. You can then select the specific record to update.
- LOC
- Location (optional).
-
Press Enter to search for a list of
receipt records to correct. The Pick SN (SNMPLST) screen
displays.

The screen displays a separate page for each inventory record to correct based on the search criteria entered in the previous screen. Only pick records meeting the search criteria that have an inventory discrepancy display.
- Use the 4 or 6 key to scroll though the pick records.
-
Press
Enter to select the
record you want to update. The
Move SN (SNMV2) screen displays.

This screen is a display only screen that provides information about the inventory record to correct.
- Ownr
- Inventory owner.
- Item
- Item number for selected record.
- Lpn
- License plate number for selected record.
- Loc
- Current inventory location.
- Inv Qty
- Quantity for the current license plate in inventory.
- SN Qty
- Number of serial numbers associated to the current picked license plate.
- Rem Qty
- Remaining number of serial numbers that need to be captured for the current license plate to resolve the discrepancy. (It is the Inventory Quantity minus Serial Number Quantity).
-
Press
Enter to begin applying
additional serial numbers to this record. The
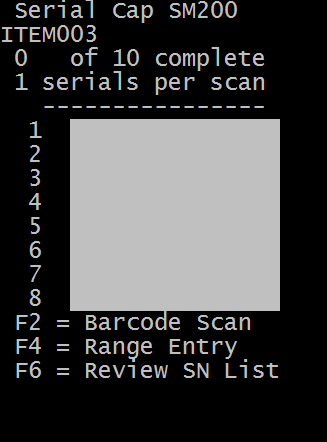
Serial Capture screen displays.

The Serial Capture screen indicates the number of serial numbers that have already been linked to the selected license plate.
- Scan or enter the remaining serial numbers to complete the license plate.
- If necessary, press F2 to scan a barcoded label and initiate barcode parsing functionality, the barcode can be 2D or another configuration.
-
Scan the serial numbers to be applied in this screen or press F4 to display the Range
Entry screen.
Note: This screen can only be used if the item is configured to use the Auto-increment rules required for range entry.
-
If necessary, press
F6 to view the list of
serial numbers that have already been associated with the license plate. The
SNRESULT screen displays a list of the serials
contained on the current license plate.

-
Press
ESC to return to the
Serial Capture
screen.
Once all serial numbers required for the license plate have been captured, the system returns to the initial screen to allow another record to be maintained.