Completing an RF-directed replenishment

To complete an RF-directed replenishment:
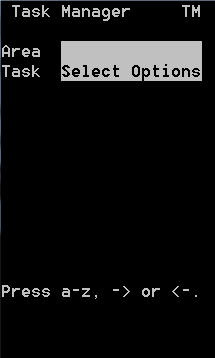
  1. From the RF device Main menu, select Task Manager. The Task Manager (TMM) screen is displayed.
  2. Select Standard. The Task Manager (TM) screen is displayed.

  3. Specify this information:
    Area1
    Area for the tasks. If this field is blank, the application displays tasks for all areas for which you have permission.
    Task
    Task type being performed. To select replenishment tasks, type R. RP – Replenish displays in the field. If nothing is selected, you can receive other non-pick task types.
  4. To display the first Replenishment task, press Enter twice. If applicable, the 
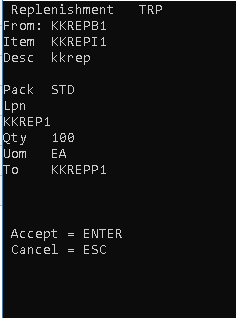
Replenishment (TRP) screen is displayed with all replenishments for the areas or zones you designated in the Area1 field. You must execute these tasks in the order in which they display.

    Replenish TRP

  5. To accept the task, press Enter. The Task Replenishment (TRP2) screen is displayed.
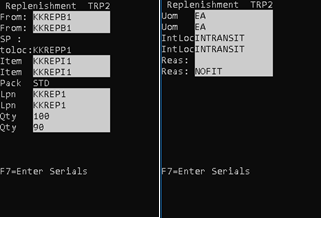
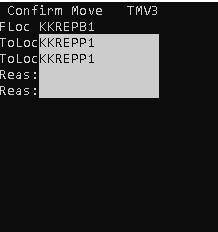
    Replenish TRP

  6. Confirm this information:
    From
    From location or current location of the item.
    Item
    Item being replenished.
    Pack
    Code identifying the set of UOM by which the item is tracked.
    Lpn
    License plate number for the item.
    Qty
    Quantity to replenish.
    To
    To location or location where you are placing the item.
    Uom
    Unit of measure for the item, such as case, pallet, innerpack, or each.
    IntLoc (In Transit Loc)
    Temporary location for the move to record the first step of the transaction. This field can be used differently depending on operation needs. Possible uses include:
    • Use a default value of INTRANSIT to show the inventory is in process. If always leaving this as INTRANSIT, the RF screen can be modified to hide the field from the user.
    • Allow the operator to enter or scan a different temporary location, such as an equipment ID number. This improves the tracking of the physical location of the inventory while the move is in process.
    Reas
    Reason code associated with the deployment
  7. Press Enter.
  8. If LOTVAL screen is displayed, then specify a valid lot attribute value for each lot. This screen is displayed when lot attribute validations are checked as visible or required on the RF Lot Attribute Validation page.

    If lot attribute validation is not required, then the Pick Order (TPK03) screen is displayed to continue the pick.

  9. Press Enter. The Task Replenishment Confirmation (TMV3) screen is displayed.

    Replenish TMV3

  10. Confirm this information:
    FLoc
    From location or current location of the item.
    ToLoc
    To location or location where you are placing the item.
    Reas
    Reason code associated with the replenishment.
  11. Perform one of the following:
    • To display the next task in queue, press Enter.
      • If the quantity confirmed on the replenishment is less than the quantity on the initial task, the Task Replenishment Return (TMV4) screen is displayed.

        Replenish TMV4

      • The Task Replenishment Return (TMV4) screen provides direction on where to move any excess quantity that did not get confirmed during the replenishment. Note that this screen is for information purposes only; it does not trigger any system actions.
      • Press Enter to advance to the next replenishment task.
    • To cancel, press Esc.
  12. When the replenishment tasks are complete, press Esc.