Special instructions for RF-directed picking

This section describes how to accept and process special instructions for RF-directed picks.

Note: 
  • Picking notes only display if they have been entered at either the Item or Shipment Order detail level. See Generating special instructions with RF picks.
  • Picking notes display after you enter all required data on the RF device and press Enter for the first time. This occurs before the application committing the transaction to the database.
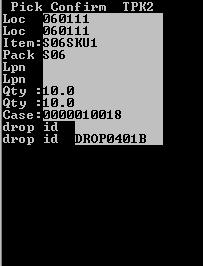
  • Pick notes fields display what has been entered in the appropriate fields, up to a maximum of 255 characters.

To accept and process special instructions for RF-directed picking:
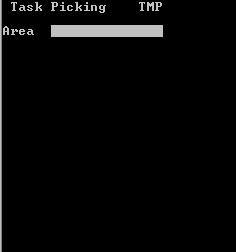
  1. From the RF device Main menu, select Picking (4). The Pick Menu (PM1) screen is displayed..
  2. Select Task Picking. The Task Picking (TMP) screen is displayed.
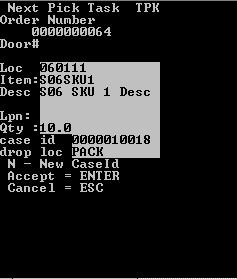
  3. Specify this information:
    Area1
    The area or location for the tasks. If this field is blank, the application finds tasks for all areas in which you have permission.
  4. If applicable, the application sends you the first pick task. The Pick (TPK) screen is displayed.

  5. Do one of the following:
    • To accept the current pick task, press Enter.
    • To cancel and enter a reason code, press Esc. Any special instructions associated with the item or pick task display here.

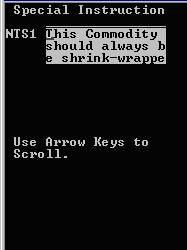
    When special instructions are defined for both the item and the order detail, both display on the RF device. Special instructions defined for the item display first, followed by those defined for the order detail.

  6. Use the up and down arrow keys to scroll messages if necessary.
  7. To accept the entry, press Enter twice.

  8. Specify this information:
    Loc
    Location of the item before picking.
    LPN
    License Plate Number associated with the item if there is one.
    QTY
    Amount of item in the designated location.
    Drop id
    New ID associated with the item (optional).
    REAS
    Reason code, if applicable. (Whenever you short-pick a task, enter a reason code.) This only displays if you enter less than required quantity for the pick.

    The application enters information into the following fields:

    CASE
    Case ID or label number associated with the pick task.
    PACK
    Pack ID for the item.
    Item
    Item to be picked.
  9. Press Enter. The RF device transmits the data to the database.
  10. Do one of the following:
    • To accept the next task, press Enter.
    • To cancel, press Esc.
    Note:  If picking cases to a Pallet ID, you can enter DROP as the ID. You can then pre-assign one pallet ID and pick many cases to that pallet. This allows you to treat the pallet as one unit for moving and status updates.
  11. Repeat steps 5 through 10 until all pick tasks have been completed.
  12. To exit the screen, press Esc.
    Note:  N/n - New Case ID refers to your ability to assign a new Case ID to picks remaining after an initial case is full. See Adding new case IDs during standard and cluster picking.