Performing a cluster pick by wave
The cluster pick by wave option provides the ability to use cluster picking with task direction to pick multiple orders that have been grouped together onto the same wave with a single pass through the pick aisles. You initiate the pick process by entering or scanning the wave number to pick. Based on your permissions to specific areas of the warehouse, the picks for the wave are given to the operator in location sequence to reduce the number of trips down the aisle, thereby minimizing travel time.
-
Select
to specify the
wave number to pick. The screen
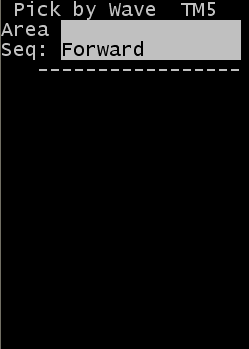
Pick by Wave (TM5) is displayed.
-
Specify this information:
- Area
- Specify the area as configured in the application to search for open pick tasks. You must have permission to pick in the designated area. If this field is blank, the application accesses tasks for all of the areas to which you have permission.
- Seq
- Use the arrow keys to choose the sequence for the picks. Select (default) for picks by location starting with the lowest location route sequence first. Select for picks in the other direction.
- UoM
- Use the arrow keys to select the UoM type, which displays pick
tasks associated with the selected UoM type. Possible options:
- Each
- Case
- Inner Pack/Layer
- Pallet
Note: By default, this value is empty.
The Enter Wave (TM51) screen is displayed.
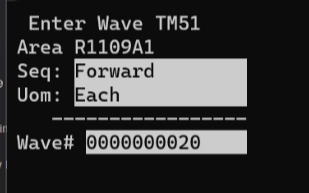
-
Scan or specify the wave number to pick and press
. The Cluster
Summary screen (TPKSUM) screen is displayed.

-
After reviewing any necessary information on the summary screen,
press
on the
Cluster Summ (TPKSUM) screen. The
Pick by Wave (TPKW) screen is displayed with the
first pick for the selected wave within the Area, if specified.
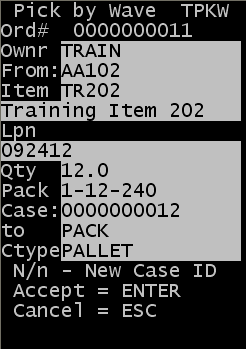 This screen shows the detail of the next pick task to perform. Tasks are displayed in pick route sequence according to the Sequence (Forward/Reverse) indicated on the previous screen.Note: The N/n - New Case ID message refers to your ability to assign a new case ID to picks that remain after an initial case is full. See Adding a new case ID during standard picking.
 -
Press
to accept the task
and the
Pick by Wave (TPKW2) screen is displayed. The
key can be pressed to
cancel the task. This will require using a reason code to indicate why the task
was not performed.
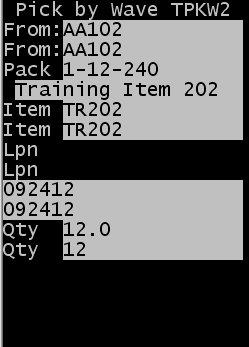 Specify this information as prompted to complete the pick:
- From
- Specify the location where the item is picked.
- Pack
- This is the pack for the item.
- Item
- Specify the item to pick.
- Lpn
- Specify the license plate number associated with the product.
- Qty
- Specify the amount of items picked.
- Reason
- Specify a reason code. The reason code field is displayed unless an event, such as a short pick that requires input of a reason code, occurs. If an event occurs, the reason code is displayed on a separate reason code screen.
Note: You can configure RF Picking Strategies on the workstation to control the operator input required for three of the fields listed above: Item, From License Plate (LPN) and From Location.- The options for control of the Item and From Location fields are Display and Confirm. If you select Display, the value is displayed but the RF user does not confirm it. If you select Confirm, the value is displayed and the RF user is required to confirm it by scanning or specifying a matching value.
- The options for the From License Plate (LPN) field are identical with exception of a third option - Display only if LPN exists. With this option selected, if an item does not have an LPN, the LPN field is not displayed. If an item does have an LPN, the value is displayed but RF user confirmation is not required.
See the Infor WMS Configuration User Guide for information on RF Picking Strategies. The Prompts Editor tool is also available to control RF behavior including the fields that display and require entry during pick confirmation.
-
Press to confirm the lot
attributes for the pick. The next Pick by Wave (TPKW3) screen is
displayed to continue the pick.
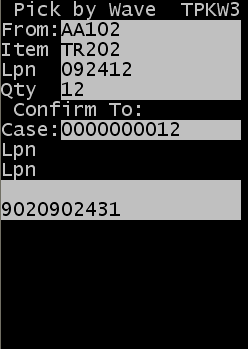
- Case
- This is the Case ID or label number associated with the pick
task. In this example the Case ID is not confirmed as part of the pick. If
you need to confirm each pick to the Case ID allocated, that field can be
made editable. Note: You can configure RF Picking Strategies on the workstation to control the operator input for the Case ID. The three available options are: Display, Confirm, and Not Displayed.
- If you select Display, the value is displayed but the RF user does not confirm it.
- If you select Confirm, the value is displayed; the RF user must confirm each pick to the Case ID.
- If you select Not Displayed, the Case ID is not displayed on the RF screen.
- Lpn (Also referred to as DropID)
- Specify the Drop ID (new License Plate) for the pick. By default, if you do not specify a Drop ID, the Case ID becomes the To Lpn in the background for less than full pallet picks.
Note:- Use a Drop ID to assign your ID to the container you create during the pick. This can be a smaller container such as a tote or carton or a large container such as a pallet. If a new ID (Drop ID) is assigned during the pick, this becomes the license plate for the picked inventory. You can then move, pack, or load the picked product following the pick.
- If another pick has been completed to a DropID for the same Case ID that is on this pick, the previous Drop ID will be shown in the first row below the text label for the field. The user can confirm the current pick to the same Drop ID or input a different one.
- If you are using an RF Pick Strategy for the zone the item is being picked from, you can determine the behavior of the Drop ID by the option you select for the To License Plate/Drop ID field on the strategy. The To License Plate/Drop ID field contains the most configurable options available. See the Infor WMS Configuration User Guide for additional information on RF Pick strategies.
-
Press
to confirm the
license plate you are picking to. The next Pick by Wave
(TPKW4) screen is displayed to specify the container type and
location.
Note: This screen (TPKW4) only displays if the license plate specified on the pick does not already exist. If a location and carton type have already been specified for the license plate, the Pick Next Task (TM52) will be displayed as shown in step 9.

- Ctype
-
Specify the carton type for the container you use for the pick contents. This must be a valid carton type. The location entered as the To Location can be either a Pick To or In Transit type location. This may be the Equipment ID you to which you are picking.
Press to view a list of possible carton types. This action displays a list of cartons for which the Display for Picking flag is active in the Carton configuration screen.
Note: If you are using an RF Pick Strategy for the zone the item is being picked from, you can determine the behavior of the Carton Type by the option you select for the Carton Type field on the strategy. The three available options are: Display, Confirm, and Not Displayed.- If you select Display, the carton type is displayed but the RF user does not confirm it.
- If you select Confirm, the value is displayed; the RF user must specify or scan a valid value to confirm it.
- If you select Not Displayed, the carton type is not displayed on the RF screen.
- To Loc/Equip
- Specify the new location of the product after the pick. The
location entered as the To Location can be either a Pick To or In Transit type
location. In many cases, this may be the user Equipment ID.
Note: By using RF Picking Strategies, you can configure the system to use an Equipment ID requiring the user to sign into the RF with a default To Location. You must also set up Equipment IDs as In Transit type locations for this functionality to work correctly. The RF Picking strategy includes options available for the To Location field in addition to the automatic default of an Equipment ID. The three available options are: Display, Confirm, and Not Displayed.
- If you select Display, the carton type is displayed but the RF user does not confirm it.
- If you select Confirm, the value is displayed; the RF user must confirm the value.
- If you select Not Displayed, the To Location is not displayed on the RF screen. You should only select the Not Displayed option if within the zone(s) the strategy is attached to, either the Equipment ID is always used as the default To Location or the Zone default To Location is always used (with no overrides).
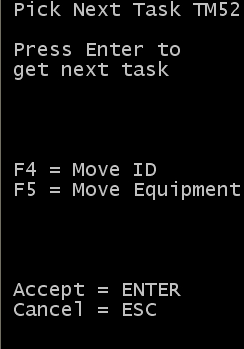
After you complete the last field on the screen and press , the pick is complete. -
The
Pick Next Task screen (TM52) is displayed for
you to view remaining open picks, request another task by pressing
, or move the picked
product to another location.
Note: For more information on how to use the move options, refer to the Moving picked inventory section in this guide.
-
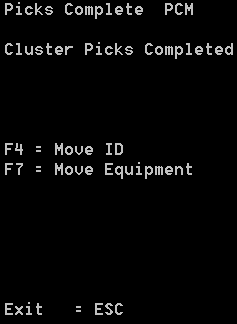
To complete picking, repeat steps 5 through 9 until all pick tasks
are complete. When you complete all pick tasks, the Picks Complete (PCM) screen
is displayed.