Excel Import
The Excel Import functionality is available on many Infor WMS WM module screens. You can use the import feature to import records from a spreadsheet into the Infor WMS system. As a minimum, you only need to import data for the required fields on a screen to successfully import records into the WM module. The required fields for imported data are the same fields you are required to complete when you specify the data within the Infor WMS user interface. The Import selection is available on these WM screens:
- Alternate Item (Warehouse facility level)
- Assign Locations (Assign Locs tab within Item screen at Warehouse facility level)
- ASN/Receipt
- Bill To (Enterprise level and Warehouse facility level)
- Carrier (Enterprise level and Warehouse facility level)
- Code Translation
- Customer (Enterprise level and Warehouse facility level)
- Freight Bill To (Enterprise level and Warehouse facility level)
- Item (Enterprise level and Warehouse facility level)
- Item Slotting Plan By Zone
- Location (Warehouse facility level)
- Owner (Enterprise level and Warehouse facility level)
- Owner Bill To (Enterprise level and Warehouse facility level)
- Pack (Warehouse facility level)
- Purchase Order
- Returned Lots
- Ship From (Enterprise level and Warehouse facility level)
- Ship To (Enterprise level and Warehouse facility level)
- Shipment Order
- Supplier (Enterprise level and Warehouse facility level)
- Zone (Warehouse facility level)
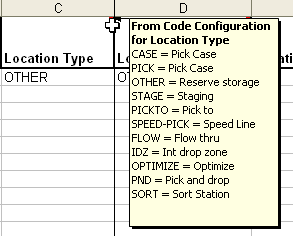
Spreadsheet templates for the various record types are provided within the Infor WMS application. You can download these templates using the export feature. See Excel Export for information on the export feature. You can use the system-provided templates as an initial starting point for creating records in a spreadsheet. Review the comments within the specific fields in the templates for any entry restrictions. Comments are indicated with a red triangle in the upper right corner of a header cell. Place the cursor over the comments indicator to review any field-specific information.
An example of Location Type field code restrictions included in the spreadsheet comments is shown below.
Within a spreadsheet, you can add rows to create new records. You can also modify existing rows and import the changes back into the system.
You can perform an import by clicking the Import button within a screen; for example, the Item screen or Location screen. See Importing an Excel spreadsheet using the Import feature on a screen for additional information. If you have multiple record types to import, you can use the master Import feature. See Importing the Excel spreadsheet via the master import feature for additional information.
Once you initiate an import from a specific screen or via the master Import feature, you can view the Logs screen to check the results of import process. See Reviewing the import logs for additional information.