Quantity confirmation for RF-directed picking

This section describes how to process quantity confirmation for RF-directed picks.
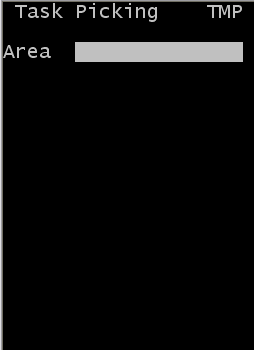
  1. From the RF device Main menu, select Picking (4). The Pick Menu (PM1) screen is displayed.
    This takes you directly to all Picking options. You can still select Task Manager (8) to go the Task Manager (TMM) screen. Use the Pick Menu since all Picking options can be used with this option.
  2. Select Task Picking (0). The Task Picking (TMP) screen is displayed.
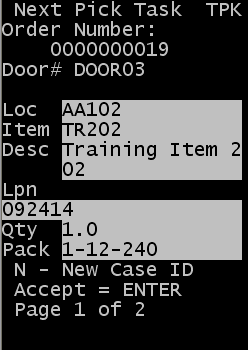
  3. Specify this information:
    Area
    Specify the area or location of the tasks. If this field is blank, the application finds tasks for all of the areas to which you have permission.
  4. If applicable, the application sends you the first pick task. The Pick (TPK) screen is displayed.

  5. Do one of the following:
    • To accept the current pick task, press Enter.
    • To cancel and enter a reason code, press Esc. Any special instructions associated with the Item or Pick task display.

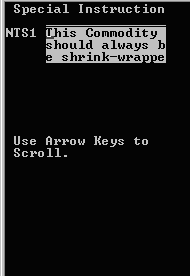
    In cases where special instructions have been defined for both the item and the order detail, both display on the RF device. Special instructions for items display first, followed by instructions for order details.

  6. Use the up and down arrow keys to scroll messages.
  7. To accept the entry, press Enter twice.
  8. Specify this information:
    Loc
    Location of the items before picking.
    LPN
    ID (LPN) associated with the items.
    QTY
    Quantity of items in the designated location.
    Drop id
    New ID associated with the items (optional).
    REAS
    Reason code, if applicable. Whenever you short-pick a task, specify a reason code. This displays only if you pick less then the required quantity.

    These fields are populated by the application and do not require confirmation.

    CASE
    Case ID or Label number associated with the pick task.
    PACK
    Pack for the item.
    Item
    Item being picked.
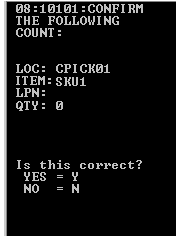
  9. If quantity confirmation is allowed, the following screen is displayed:

  10. If the quantity in the location matches the QTY field on the RF device, select Y (Yes) and continue the picking process.
    If the quantity in the location does not match the QTY field on the RF device, select N (No) and a Request to Count is created. Continue the picking process.
  11. Do one of the following:
    • To accept the next task, press Enter.
    • To cancel, press Esc.
    Note: If you are picking cases to a Pallet ID, you can specify DROP as the ID, and pre-assign one pallet ID; then pick cases to that pallet. This allows you to treat the pallet as one unit for moving and for status updates.
  12. To exit the screen, press Esc.
    Note: The N/n - New Case ID message refers to you assigning a new Case ID to picks remaining after an initial case is full. See Adding a new case ID during standard picking.