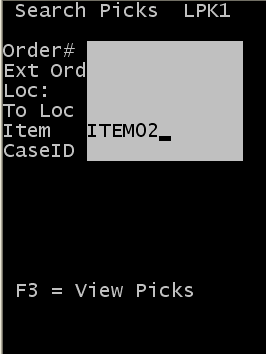
Using the Search Picks option (LPK1)

Use this option to enter various parameters to search for open picks. After you make your entries, the system displays a list of open picks from which to choose. After selecting a pick, you are asked to scan or enter information to ensure the pick is completed accurately.

  1. From the RF device Main menu, select Picking (4). The Picking Tasks (PM1) screen is displayed.
  2. Select Search Picks. The Search Picks (LPK1) screen is displayed.

  3. Specify this information:
    Order #
    Specify the shipment order number.
    Ext Ord
    Specify the external order number from the shipment order.
    Loc
    Specify the location from which to pick.
    Note: Usually, you do not know this location. However, if you use the consolidated picking function you know the from location.
    To Loc
    Specify the location to which the product is picked. Usually, this is the pack location for the order; it can be the location you specify in Stage Loc on the order detail.
    Item
    Specify the item number to pick.
    CaseID
    Specify the case ID created during allocation.
  4. Press F3 to view a list of picks based on the search criteria.

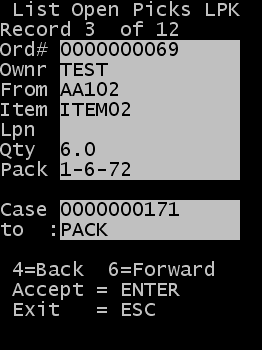
    Each available pick is displayed on a separate page. You can view the count of the number of picks at the top part of the result screen. To scroll through the list of records, use the 6 key to move forward and the4 key to move backwards. You can use Esc to exit the list without starting a pick.

    The displayed picks are sorted by case ID and location routing sequence. This does not display picks with a current status of In Process.

  5. Press Enter to select the pick to complete.
  6. The Confirm Pick screen (LPK3) is displayed.

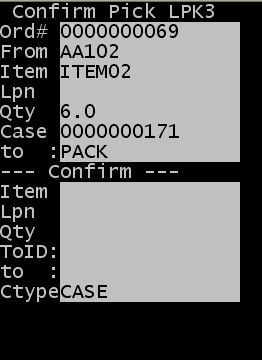
    This process updates the pick record to an In Process status.

  7. Specify this information:
    Item
    Specify the item code.
    LPN
    Specify the ID associated with the product.
    Qty
    Specify the amount of product to pick.
    Note: You can record a short pick by using a quantity other than expected. This causes part of the order line to be not fully allocated.
    To ID
    Specify the drop ID for the pick.
    Note: Use a Drop ID if you are assigning your ID to the container you create during the pick. This can be a smaller container such as a tote or carton or a large container such as a pallet. If a new ID (Drop ID) is assigned during the pick, this becomes the license plate for the picked inventory.
    To
    Specify a new location for the picked product.

    This is an optional field. If it is blank, the picked inventory is moved to the To location identified on the top part of the screen.

    Ctype
    Specify the carton type for the pick.

    Press F2 to view a list of possible carton types. This displays a list of cartons for which the Display for Picking flag is active in the Carton configuration screen.

    Note: You can configure RF Picking Strategies on the workstation to control operator input for four of the fields listed above: License Plate (LPN), To LPN/To ID, To Location, and Carton Type. See the Infor WMS Configuration User Guide for information on RF Picking Strategies. The Prompts Editor tool is also available to control RF behavior including the fields that display and require entry during pick confirmation.

    If the drop ID is blank, the product is tracked by using the case ID through inventory.

  8. Press Enter to complete the pick.
    If additional picks exist within the search criteria used in step 3, you are returned to the list of open picks on screen LPK2.
  9. Repeat steps through to complete another pick or press Esc to exit the screen.
    After the last pick is complete for the current search criteria, the No open picks exist for current search criteria message is displayed.
  10. Press Esc to return to screen LPK1 and change the search criteria.