Performing dynamic picking for layer quantities
Dynamic picking is the process of selecting product that has been allocated using the dynamic allocation logic in the system. As previously mentioned, users can pick cases, layers, or pallets based on the pack unit of measures defined for the item. The application suggests the best pick location according to the item's rotation rules. The operator can override the suggested location to pick different inventory as long as the product selected meets the requirements defined for the item.
The pick screen for Layer picking is the same as used for case picks. This screen informs the operator the number of layers to be picked as well as the total number of master units.
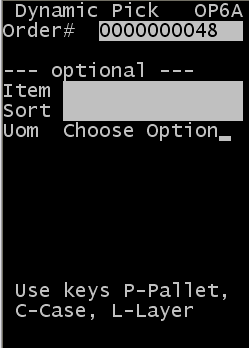
This example shows uses the Dynamic Pick by Order pick screen.
-
Press
. The
Dynamic Pick (OP05) screen is displayed.
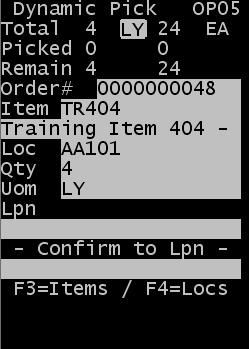
The initial screen displays this information:
- Total
- The first column displays the total quantity to pick for this unit of measure.
- Picked
- The first column displays the quantity already picked for this UOM.
- Remaining
- The first column displays the number of this UOM still remaining to be picked.
- Order #
- Current Order Number.
- Item
- Item to be picked.
- Loc
- Suggested location from which to pick.
- Qty
- Quantity to pick. This is the number of the UOM listed. For example, if the pick is for 24 master units and there are 12 units in a case, the Quantity is 2 and the UOM is CS (Case).
- Uom
- Unit of measure
expected to pick.
Note: To view other locations for the item, press . This does not include the location that is currently on the picking screen. A maximum of five locations and associated quantities can display in alphanumeric order. This option allows you to view other potential pick locations, but the application may or may not accept the locations based on certain rules including assigned location rules and rotation rules.
To view all items on the shipment order, press . The items display according to the line item number within the shipment order detail. Press to move forward and to move back through the records. Each record displays the total amount allocated for the item in the Qty field. You can scroll to any record within the shipment order and press to display the pick screen for that record.
-
Specify this information
to complete the pick:
- Loc
- Suggested location. You can change the location if the item and license plate exist in the location and it meets rotation requirements for the item.
- Qty
- Quantity to pick. The expected quantity was initially populated on the screen. You can input a quantity that is less than what was ordered if necessary, based on inventory availability. For example, the quantity to pick is 9, but the license plate from which you are picking only has 5 remaining. The operator can record those 5 and then be provided with a second pick task to complete the item.
- Lpn
- License plate from which you are picking.
- Confirm To Lpn
- New license plate for case picks. This is often the ID applied to a pallet or container upon which multiple items are placed during the pick process for an order.
- Loc Lpn
- New license plate
for the product remaining in the location if the LPN that was in the location
is being recorded as Picked. For example, the operator is directed to pick 38
cases of an item from the case pick location. There is a license plate (1234)
in the location that contains 40 cases. The picker can take the entire pallet
from the pick location (40 cases) and leave the 2 cases behind in the location.
The picker can assign a new LPN (5678) to the two remaining cases and leave the
38 cases picked on the initial LPN.
Note: The Loc Lpn can also be an existing pallet. Many case pick locations hold more than one pallet. Using the scenario above, Lpn 1234 could be in a pick location, as well as license plate 5555. When the associate picks 38 of LPN 1234, Loc Lpn of 5555 could be entered. This would add the two remaining cases to the existing inventory for LPN 5555. If this LPN initially had 80 cases, it would now contain 82 cases.
-
Press
to continue
confirming the pick. If the license plate you confirmed the pick to is new, the
next
Dynamic Pick screen (OP05L) is displayed to
specify the container type and location for the new license plate.
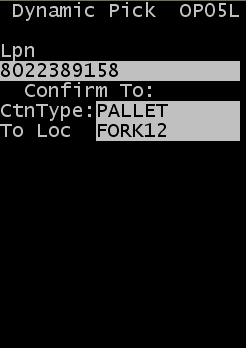
- CtnType
- Specify the carton type for the container you use for the
pick contents. This must be a valid carton type.
Note: Press to view a list of possible carton types. This action displays a list of cartons for which the Display for Picking flag is active in the Carton configuration screen.
- To Loc
- Specify the new location of the product after the pick. The location entered as the To Location can be either a Pick To or In Transit type location. In many cases, this will be the Equipment ID the user is picking to or a default in transit location used by the operation.
Note: This screen (OPO5L) only displays if the license plate specified on the pick does not already exist. If a location and carton type have already been specified for the license plate, the Pick Next Task (OPO5L) will be displayed. -
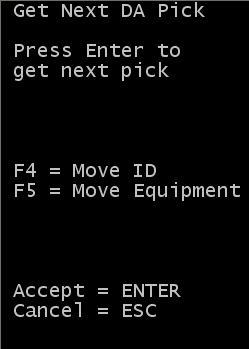
The
Get Next DA Pick screen is displayed for the
operator to either request another task for the current order by pressing
or to choose to
move the picked product to another location.
Note: For more information on how to use the move options, refer to the Moving Pick Inventory section in the Infor SCE Picking User Guide.