Closing a case ID or drop ID through RF device

To close a case ID or a drop ID using an RF device:
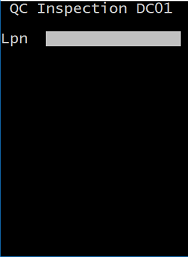
  1. From the RF device Main menu, select Outbound Menu (5). The Outbound Mgmt (OBM) screen is displayed.
  2. Select QC/Close Tote (6).
  3. Select QC/Close Tote. The QC Inspection DC01 screen is displayed.

    QC DC01-1

  4. Specify or scan the case ID or drop ID you want to inspect, and then press Enter. The QC 
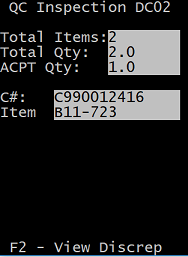
Inspection DC02 screen is displayed.
    Note: After you scan the drop ID you want to inspect, the system checks if inspection of the container has already been completed. If inspection is complete, a message is displayed indicating that the items have been inspected and the tote is closed.

    QC DC02

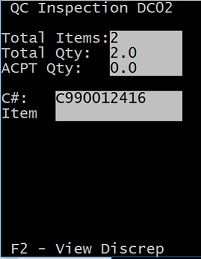
    The displayed summary information for the license plate includes:

    Total Items
    Total number of SKUs available for the drop id scanned. This field is view only.
    Total Quantity
    Total quantity for the selected drop id. The total quantity is the sum of all pick details for the drop ID. This field is view only.
    ACPT Quantity
    Initial quantity is 0. After inspection, the accepted quantity is updated for the next inspection. This field is view only.
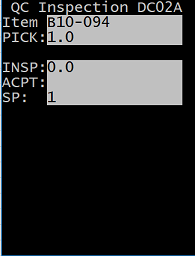
    PICK Quantity
    Sum of Qty Picked
    RJCT Quantity
    Sum of Qty Rejected
    LPN
    LPN scanned in the QC Inspection (DC01) screen.
    Item
    This field is blank until you scan the SKU to be inspected.
    PICK Counts
    Sum of UOM Qty Picked
    ACPT Counts
    Sum of UOM Qty Accepted
    RJCT Counts
    Sum of UOM Qty Rejected
    Note: You can break down a Unit of Measurement (UOM) into smaller units if the USEPACKUOMONRF system setting is set to On. The Count fields are hidden unless the USEPACKUOMONRF flag is ON.
  5. If you scan an Item on the QC Inspection DC02 screen and there are PackOutDetail records with multiple Lot+PackKey combinations, use the QC Inspection DC02SEL screen to choose the Lot+PackKey to be QC inspected.
    LPN
    LPN scanned on DC01
    Item
    Item scanned on DC02
    Item description
    Description of the item
    Pack
    PackKey from PackOutDetail
    Lot
    Lot from PackOutDetail
    Note: Several Pack UOM fields and Lottable fields are available on the screen, but only the fields with populated data are displayed. The Selector screen displays one screen of data for each unique combination of Lot and PackKey.
  6. Scan the item to be inspected. The QC Inspection DC02A screen is displayed.

    QC DC02A

    Note that the QC Inspections DC02A screen is not displayed if these conditions occur:

    • If the item does not have a remaining quantity to be scanned or if the item is not part of the current license plate, the QC Inspections DC02A screen is not displayed. A message is instead displayed indicating the item does not exist in the LPN and instructing you to press F3 to record the picking error. You can either press F3 to record the error or press ESC to return to the previous screen.
    • If the contents of the container have been validated but the system indicates there is at least one item with a discrepancy, the QC Inspections DC02A screen is not displayed. You can press F2 to view discrepancies. When you press F2, the View Discrep QCOVR screen is displayed. This screen only displays items within the container that have not been completed. Press F3 to log an error for the item currently displayed.
  7. On the QC Inspection DC02A screen, complete these inspection confirmation fields for the item:
    Item
    Item scanned in previous screen. This field is view only.
    Item description
    Description of the item.
    Pick
    Pick quantity for the item. This field is view only.
    Insp
    A counter of what has been inspected in the container for the item. The initial quantity is 0 the first time the item is scanned. This field is view only.
    Acpt
    Specify the accepted quantity after the inspection. The accepted quantity cannot be greater than the quantity remaining to be inspected. If you specify a value greater than the quantity remaining, an error message is displayed.
    UOM
    The UOM for this inspection.
    F3 – Pack Details
    Function key to see pack breakdown.
    Note: Additional fields on the QC Inspection DC02A screen are disabled by default to improve the speed of the QC inspection flow. You can enable the quantity rejected, reason, UDF1, UDF2, UDF3, type, and closed fields by setting the visible expression of a field to 1 in the mobile personalization screen.
  8. When all validations for the current item are complete, the QC Inspection DC02 screen is again displayed with the updated summary information. You can continue the QC inspection process of the container.

    QCDC02-2

  9. When the QC inspection for all quantity in the container is complete, a message is displayed. Press Enter. The QC Inspection DC01 screen is again displayed so that you can scan another license plate for QC inspection if applicable.
  10. Access the QCDETAILS screen by pressing F3 from the QC Inspection DC02A and View Discrep QCOVR screens, to display pack information and UOM level information for the LPN and Item.
    LPN
    LPN scanned on QC Inspection (DC01)
    Item
    Item scanned in previous screen
    Item description
    Description of the item
    Lot
    Lot description
    Pack
    Pack description
  11. Use the View Discrep QCOVR screen to view the pack breakdown and the picked and inspected quantities by UOM level.
    LPN
    LPN scanned on QC Inspection (DC01)
    Item
    Item scanned in previous screen
    Item description
    Description of the item
    PICK Qty
    Sum of Qty Picked
    ACPT Qty
    Sum of Qty Accepted
    RJCT Qty
    Sum of Qty Rejected
    PICK Count
    Sum of UOM Qty Picked
    ACPT Count
    Sum of UOM Qty Accepted
    RJCT Count
    Sum of UOM Qty Rejected
    From Loc
    Current location
    F3 – Pack Details
    Function key to see pack breakdown