Example 1: Value Change
Suppose that you want to add 1000 hours to each store that is in a mall location. After clicking on the Worksheet, specify the following information in the Mass-Edit Criteria pop-up window:
The application performs the following calculations:
- Adds 1000 to all the
locations that meet the filter criteria, which are stores that are mall
locations. The values in the following locations change:
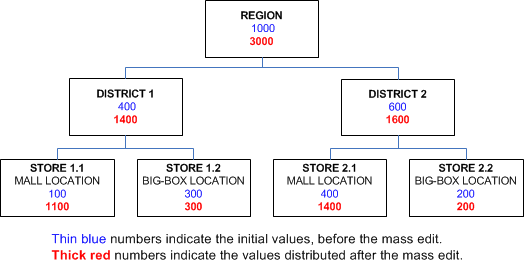
- STORE 1.1 now has a value of 1100.
- STORE 2.1 now has a value of 1400.
- Aggregates the values for
the stores to the parent districts. The values in the following locations
change:
- DISTRICT 1 now has a value of 1400.
- DISTRICT 2 now has a value of 1600.
- Aggregates the values for the districts to the parent region. The values in the REGION location changes to 3000.
The following table compares the initial and mass-edited values:
| Location | Initial Hours | Mass-Edited Hours (By Value) |
|---|---|---|
| REGION | 1000 | 3000 |
| DISTRICT 1 | 400 | 1400 |
| DISTRICT 2 | 600 | 1600 |
| STORE 1.1 - MALL LOCATION | 100 | 1100 |
| STORE 1.2 - BIG-BOX LOCATION | 300 | 300 |
| STORE 2.1 - MALL LOCATION | 400 | 1400 |
| STORE 2.2 - BIG-BOX LOCATION | 200 | 200 |
The following diagram displays the initial and mass-edited values in the context of the hierarchy:
