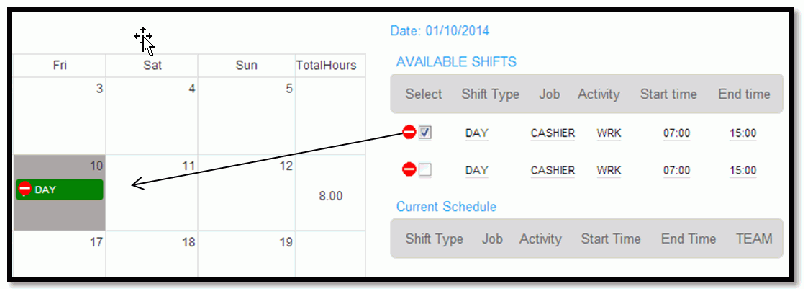
Self-scheduler calendar layout
General information
After an Open process is accessed by an employee, the details associated with the process are displayed in the section above the main calendar. The process Name and date range are displayed, as well as the date of the selected cell.
Main calendar
Self-scheduled and pre-scheduled shifts are displayed in this calendar. There is also a Total Hours column, which calculates the employee's productive hours per week.
The bottom right of each calendar cell displays the number of available shifts for that particular cell. The number of shifts dynamically updates with every assignment. Self-scheduled shifts are displayed in green until the employee clicks , in which case the shifts turn blue. Pre-scheduled shifts are also displayed in blue and time-off is displayed in orange.
Any shifts that violate schedule compliance display an icon in the shift’s calendar cell. Click the icon to view the details of the violation. If there are more than two assignments for a particular cell, click in the calendar cell to see the hidden shifts.
Right pane
The right pane consists of three sections that dynamically update depending on the calendar cell the employee selects. The right pane consists of three sections:
- Available Shifts. To activate the right pane, the employee must click on a cell within the main calendar. Unassigned shifts that match the employee’s job and skills are displayed here. If there are schedule compliance warnings or scheduling rule errors associated with a shift, the corresponding icon will be displayed. The icon warns the employee that an error may be triggered. If schedule compliance errors or scheduling rule errors on shift selection are triggered, those violating shifts will be pre-filtered out of the available shifts section. The employee cannot keep the selection.
- Current Schedule data is displayed in the middle section. The data comes from the pre-scheduled, published shifts from MVS. The data cannot be removed from the Self-Scheduler module.
- Time Off information is displayed at the bottom of the right pane. Like current schedule data, time off assignments cannot be removed from the Self-Scheduling module.
Self-scheduling and submitting
To add a shift to the calendar, the employee does the following:
- Selects a day with available shifts.
- Selects the check box next
to the shift that interests them, in the available shift section of the right pane.
The shift is displayed in green in the main calendar.
- Repeats the previous steps as many times as needed.
- Clicks after selecting all self-scheduled shifts
that interest them.
The employee’s selected shifts change from green to blue in the main calendar.
To remove a shift, the employee de-selects the shift in the right pane. The employee does not need to click again.
Scheduling rules
Scheduling rules configured in the Group and Group Rule section of the system are displayed here. The text is pulled from the Group Rule Name field, and the rule is selectable. Once selected, a form is displayed with all the information related to the rule. This information gives an employee an understanding of what can be self-scheduled.
Minimum rules
Minimum rules are configured primarily to ensure that the least desirable shifts are equitably distributed to all employees. For example, a minimum rule may require employees to self-schedule at least one weekend shift every scheduling period.
Minimum rules can be an error or warning. However, we recommend that you only configure a minimum rule as a warning. If minimum rule is configured as an error, the employee cannot continue until the error is corrected. When a minimum rule warning is triggered, the rule is displayed in yellow in the scheduling rules section. Once the warning is satisfied, the rule is displayed with a blank background color.
Maximum rules
Maximum rules can be configured to ensure that the most desirable shifts are evenly distributed among all self-scheduling employees. For example, an employee might try to self-schedule all Tuesday, Wednesday, and Thursday shifts to gain a long weekend. This scenario can be managed with a maximum rule.
Maximum rules can be checked at the shift selection, final submission, or at both of these points. There are 2 levels: Warning and Error. If the rule must be enforced, then the rule should use an error as the employee will not be able to proceed with the violating shifts. We recommend that you use the validation point of shift selection. Shifts that violate the Maximum Rule will be pre-filtered out at this point. This pre-filtering saves employees from self-scheduling shifts that break rules and re-submitting their selections.
If the maximum error requires final submission, the violating shift is displayed in the Available Shifts section in the right pane. An icon indicates to the employee that an error will occur. If the employee still opts to self-schedule the shift, the icon will appear in the main calendar. The icon will be removed upon submit. The maximum rule will also appear in red in the scheduling rules section once the employee self-schedules the shift. The red icon will revert back to a white background color upon submit and the shift is removed.
