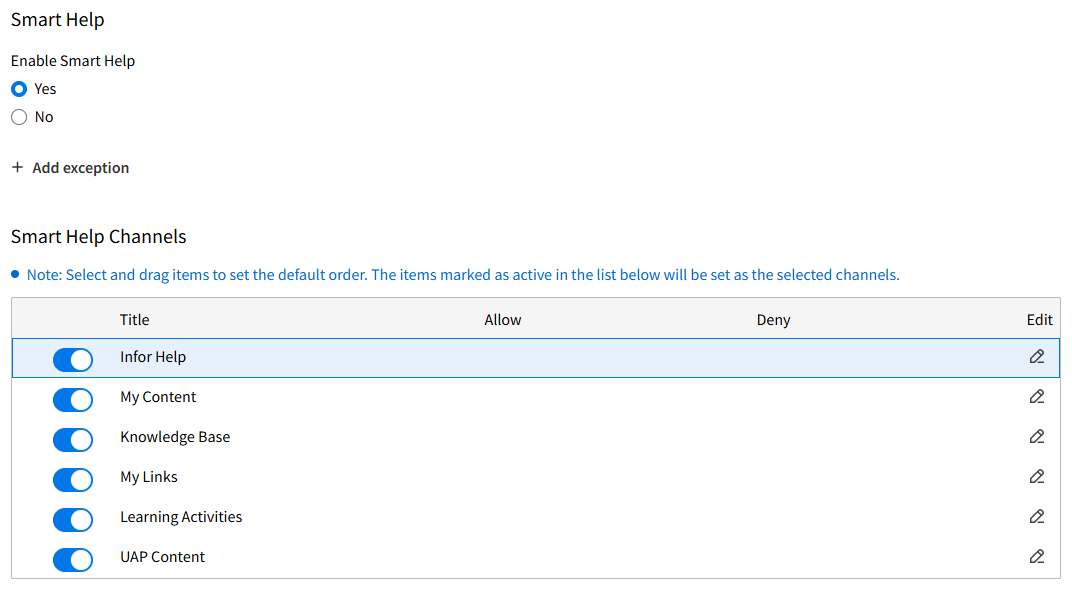
Smart Help settings

Customize your online help experience by configuring Smart Help settings in Infor OS Portal.

Users with the required IFS Security Role can perform these tasks:

  • Enable or disable Smart Help
  • Add role-based exceptions or rules for Smart Help enablement so only specific users can access and view the widget
  • Hide specific content channels at the tenant-level so that they are not displayed in the Smart Help panel
  • Manage IFS role-based exceptions and rules at the Smart Help channel-level so that you can enable/disable a channel by IFS Role
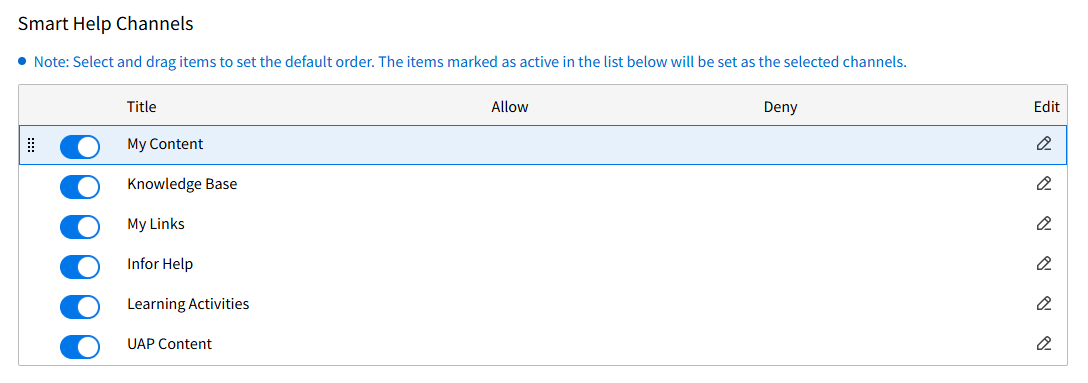
  • Set the order that the content sections are displayed in the Smart Help panel
  • Rename certain channel titles
Smart Help Settings in 2025.04
Note: Refresh your browser page to see the changes.

Enabling or disabling Smart Help

Use this procedure to enable or disable Smart Help at the tenant level. A user with system administrator access can perform this task.

  1. Sign in to Infor OS Portal™ as a user with system administrator access.
  2. Navigate to OS Portal, then click Portal.
  3. From the menu, select Settings > Smart Panel Settings.
  4. Scroll to the Smart Help settings section.
  5. Select Yes or No to enable or disable the Smart Help widget for the Enable Smart Help section.
    Note: Smart Help is enabled by default. We recommend that Smart Help is kept enabled so that users can access all available features.

    Optionally, add an exception to the Smart Help widget so that it can be enabled or disabled by user role. Customers can set up a rule that prevents some users from accessing the widget.

Managing exceptions to Smart Help enablement

You can add an exception to the Smart Help widget so that it can be enabled or disabled by role. Customers can set up a rule preventing some users from accessing the widget.

Note: Smart Help is enabled by default. We recommend that Smart Help is enabled so that users can access all available features.
  1. Sign in to Infor OS Portal™ as a user with system administrator access.
  2. Navigate to OS Portal and click Portal.
  3. Select Settings > Smart Panel Settings from the menu.
  4. Scroll to the Smart Help settings section.
  5. Add an exception:
    1. Click + Add exception in the Enable Smart Help section.
    2. Specify a title in the Name field for the exception.
    3. Select whether Smart Help is enabled or disabled for this exception using the Yes and No options.
    4. Specify a role to add this exception to. You can use the Search field to search for specific roles. A role must be added to complete the exception.
    5. Click OK.
    6. Click Save.
  6. Manage an existing exception:
    1. Click Edit exceptions.

      The existing exceptions are listed in the table.

    2. Select the exception to edit, and click Edit.
    3. Edit the exception and click OK.
    4. To remove an exception, select it from the table, and click Remove. You can select multiple exceptions to remove them simultaneously.

    You can drag and drop the exceptions in the table to set the priority to use in your account. New exceptions are always the highest priority in the table.

Configuring the order of your Smart Help channels

The Smart Help settings are used to set the order that the content channels are displayed in the widget. Additionally, you can hide certain content channels from displaying.
Note: Refresh the browser page to see the changes.
Smart Help Settings_2025.04
  1. Sign in to Infor OS Portal™ as a user with Infor System Administrator access.
  2. Navigate to OS Portal, then click Portal.
  3. Select Settings > Smart Panel Settings.
  4. Scroll to the Smart Help settings section.
  5. Select the order in which the content channels are displayed. You can also hide specific content channels so that they are not displayed in the Smart Help widget.

    The Smart Help Channels section lists the content channels available for Smart Help. In this section, you can set the order that the channels display and hide a channel from being used.

    The order in which the content channels are listed in the Smart Help Channels table is the order the channels display in the widget. You can select a channel and drag it to a new place in the table to change the order of the channels.

  6. To set the order of the content channels, navigate to the Smart Help Channels table:
    1. Select and highlight the channel to move.
    2. Click to the left of the channel's toggle. An Icon with eight dots displays to the left of the channel toggle.
    3. Clicking and holding the Icon for that channel, drag the channel to a new place in the order.
  7. To enable a content channel so that it is displayed in the widget:
    1. Identify the channel you want to enable.
    2. Slide the Toggle to the right to enable the channel in Smart Help.
  8. To hide a content channel so that it is hidden in the widget:
    1. Identify the channel you want to disable.
    2. Slide the Toggle to the left to disable the channel for Smart Help.
  9. Click Save.
  10. Refresh your browser (F5). You must refresh your browser for your changes to be reflected.

Managing channel access by IFS role

Infor System Administrators can set access to specific content channels in Smart Help at the IFS Role level. This allows companies to set up access rules for IFS roles by channel.

Administrators can assign up to five IFS Roles access to a specific Smart Help channel so that only users with one of those five roles can access that channel. The IFS Roles that are allowed access display in the Allow column.

Additionally, an Administrator can also restrict access to up to five IFS Roles for a specific Smart Help channel so that users with one of those roles cannot access the channel. The IFS Roles that are denied access display in the Deny column.

Note: OS Portal prioritizes IFS Roles that are denied access. If a user has a role that is allowed access and a role that is denied access, OS Portal denies that user access.
  1. Sign in to Infor OS Portal™ as a user with Infor System Administrator access.
  2. Navigate to OS Portal, then click Portal.
  3. Select Settings > Smart Panel Settings.
  4. Scroll to the Smart Help section.
  5. Select the channel you want to manage access for, then click the Edit icon in the Edit column. The Edit Configuration window is displayed.
  6. Select the Permissions tab.
  7. To allow access to this channel by IFS Role:
    1. Use the Search role field in the Allow section to search and specify IFS Roles to allow access. Suggested results display based on the characters you specify.
    2. Click the role(s) from the suggested results you want to allow access.
    3. The role is added to the Allow section. You can add up to five IFS Roles.
    4. Optionally, click the x icon for the IFS Role in the Allow section to remove the IFS Role's access.
  8. To deny access to the channel by IFS Role:
    1. Use the Search role field in the Deny section to search and specify IFS Roles to deny access. Suggested results display based on the characters you specify.
    2. Click the role(s) from the suggested results you want to deny access.
    3. The role is added to the Deny section. You can add up to five IFS Roles.
    4. Optionally, click the x icon for the IFS Role in the Deny section to remove the IFS Role's setting.
  9. Click Apply.

Renaming a channel

Infor System Administrators can customize the channel title for the My Content and My Links channels. When an administrator changes the title of a channel, it is reflected for all users in that tenant.

  1. Sign in to Infor OS Portal™ as a user with Infor System Administrator access.
  2. Navigate to OS Portal, then click Portal.
  3. Select Settings > Smart Panel Settings.
  4. Scroll to the Smart Help section.
  5. Select the channel you want to manage access for, then click the Edit icon in the Edit column. The Edit Configuration window is displayed.
    You can only change the title of the My Links and My Content channels.
  6. Select the Basic tab.
  7. Click the Lock icon to unlock the Title field.
  8. Specify a new name for the channel in the Title field.
    Edit Configuration Window_Settings 2025.04
  9. Click Apply to save your changes.

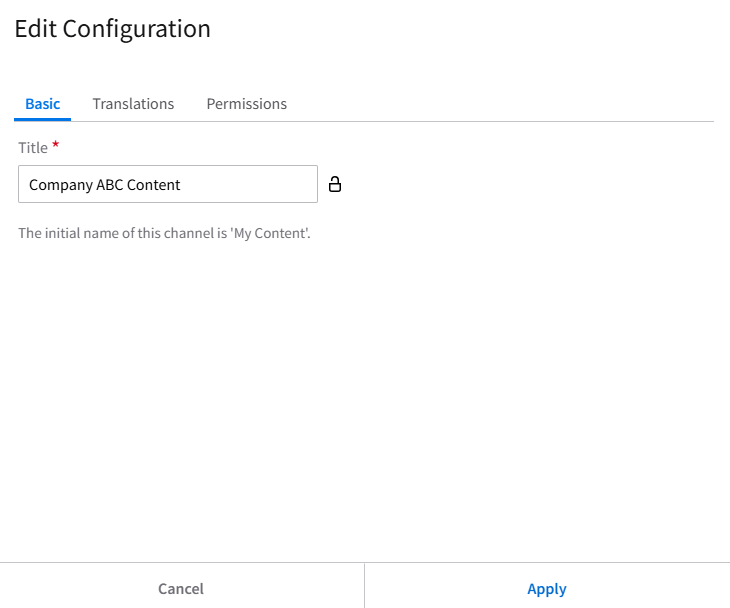
Using translations for channel titles

In addition to adding a custom title for the My Links and My Content channels, you can upload a translation for the titles.

  1. Sign in to Infor OS Portal™ as a user with Infor System Administrator access.
  2. Navigate to OS Portal, then click Portal.
  3. Select Settings > Smart Panel Settings.
  4. Scroll to the Smart Help section.
  5. Select the channel you want to manage access for, then click the Edit icon in the Edit column. The Edit Configuration window is displayed.
    You can only change the title of the My Links and My Content channels.
  6. Select the Translations section.
  7. Click Add translations and specify a Title.
  8. Click Export to export the language locale files. The zip file is downloaded.
  9. Identify the language/locale file you want to use in your downloaded zip.
  10. Specify a title and a description, then save the file.
  11. Back in OS Portal, click Import and import the language file you want.
  12. Click Apply.