Creating a new export template
To create a new export template, open the Template Editor and click the button. You can also click the Template Editor’s menu and select New, then Export Template.
The Template Editor launches the Create Export Template wizard in the main data pane, starting with the XSLT File Path screen. You can click the button on the toolbar at any point in the process to preview the XML. You can also click at any time to cancel the process.
The XSLT file is used to transform the data in the XML output file into its final format. To specify an XSLT file for the template now, use the button to the right of the XSLT File Path field to enter the file path. This step is optional, as the XSLT file can be added later. To advance to the next step, click . The wizard shows the Required Error Tag screen.
The error tag will be used in the data output when no value can be found for a required keyword. Enter a value of your choice, such as EXPORTED_WITH_EXCEPTION, in the Required Error Tag field, then click . The wizard shows the Process Parameters screen.
If the data export process for which you’re creating the template takes any parameters, you can enter them here. For example, a meter reading export template can include parameters that Infor Public Sector will use to select the readings to export, such as _DAYSBEFORE and _DAYSAFTER parameters that are used to select readings within a particular date range. Click the button to add any process parameters. For each parameter, you enter a name and a value.
You can also enter a name for a group of parameters in the Parameter section name field, such as _METERREADING for a set of meter reading parameters. In the template’s XML, the process parameters are represented by a <_PROCESS> element. Each parameter section is displayed as an element inside the <_PROCESS> element, with each parameter as an attribute.

When you’re finished adding parameters, click . The wizard shows the Data Section Details screen.
You must define at least one data section for each template. The name you enter in the Data section name field will be used as the root tag for the data section in the XML output.
The options in the Data section type list are Standard and EmptyPlaceholder. Standard data sections are connected to Infor Public Sector business objects. You can create an EmptyPlaceholder data section if you want to include information in the output that isn’t drawn from the business objects, such as static text.
When you’ve entered a name and selected the type of data section, click . The wizard shows the Root Object screen.
The root business object is the one that supplies the data for the data section. To set the root object, begin typing the moniker of the object you want to use in the Object moniker field. The Template Editor shows a list of monikers that match the characters you’ve typed so far. If you see the object that you want to use, you can select it from the list.
Then click . The wizard shows the Child Object screen.
Click to add each child object. You can specify the object you want to use and its relationship to the parent object. The relationship is based on a keyword, so the necessary keywords must first be defined in the Keyword Manager.
You can also create child objects that iterate through collection objects. Specify the object moniker, select the Object is Iterator check box, and select the correct object from the Collection object in which it iterates list. The collection object must be one that you’ve already added to the template.
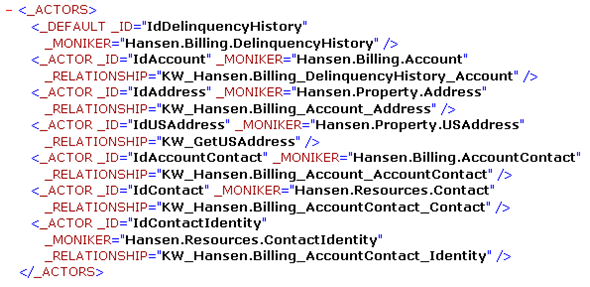
The root object and the child objects are represented by the <_ACTORS> element in the XML file. The <_DEFAULT> element specifies the root object, and each child object is represented by an <_ACTOR> element with attributes that specify the object ID, the moniker, and the keyword that defines its relationship to its parent.

When you’re finished adding child objects, click . The wizard shows the Error Reporter screen.
You can define a custom error tag that will be used if there is a data output failure for a particular object. To define the error tag, enter a name in the Output error tag field and select the business object and keyword that will identify the cause of the error. Then click . The wizard shows the Available Keywords screen.
The Available Keywords tree shows all the keywords that have been defined for the objects you’ve selected for this template. Select the check box for each keyword thaht you want to use. Then click . The wizard shows the Add Another Data Section screen.
To add another data section, select the check box and click . The process of adding another data section is the same as for the root data section, except that each additional data section also requires a parent.
When you’re finished adding data sections, click . The wizard shows the Start Data Section screen.
Finally, when you’ve entered all of the information for your export template, click . The wizard shows the standard Windows Save As dialog box, which you can use to save the XML file to a selected directory.