Sample scenarios
Now that the setup is complete, you can start creating the Data Rules for the DRExampleUserTasks IDO. Use this collaborative tasks IDO to create the user tasks that can be seen and shared across all departments. Mongoose is a three-tier application - Database, IDO tier, and Form tier.
One of the main benefits of the Data Rules is that they allow developers in Mongoose applications to pull back or promote logic that would have been traditionally in the Form tier up to the middle or IDO tier, reducing the number of places where business logic must be implemented as IDOs may be used across many forms.
Scenario Example 1: Enabling components based on data
This functionality in the past would have been implemented in Form Script in the form or with EnableWhen logic on each component in a form. Because the same components are often in the grid side and query side of a form, this doubles the amount of places where EnableWhen attributes would be required to be implemented. In addition, form script must be compiled before it can be used on a form causing a performance hit.
Forms having this requirement can now be implemented with Filter Conditions and Action Data Rules.
ue_ prefix.
- Open the form DRExampleUserTasks, notice that by default most of the properties, except for Seq and Department, are not enabled when the form is opened in New mode. The properties are Read-Only in the IDO.
- Next, open the IDOs form, and filter on IDO -
DRExampleUserTasks - Click Check Out to checkout the IDO.
- IIn this example, the properties on the form are enabled through a Data Rule after a department is specified. Click the Data Rules button to access the IDO Data Rule Wizard form.
- Specify these information:
- IDO Name
-
Specify
DRExampleUserTasks - Rule Name
-
Specify
DRExampleUserTasks_InsertOrUpdate_EnableProps - Operation Type
- Insert or Update, and leave default of checked on the checkboxes.
- Click OK.
Note: Ensure that you select or are on the correct rule before adding the Activation Conditions, Filter Conditions, or Actions.
- Populate the Filter Conditions tab with these information, add five rows:
- Property Name
- Specify dept as the Property Name for the five entries.
- Value
- Specify the value of 100 to 500 per row.
- Value Type
- Specify Literal for all of the entries.
- And With Next Clause
- Leave this column unchecked or not selected for all of the entries.
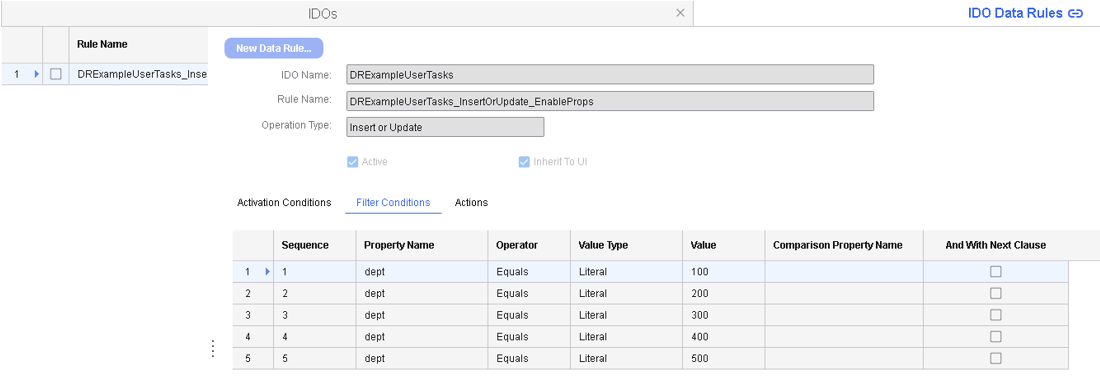
- Populate the Actions tab with these information, add five rows:
- Action Type
- Specify Set Property Enabled as the Action Type for the five entries.
- Property Name
- Specify StartDate, EndDate, Status, TaskType, and TaskDesc as the property name for each entry.
- Value Type
- Specify Literal for all of the entries.
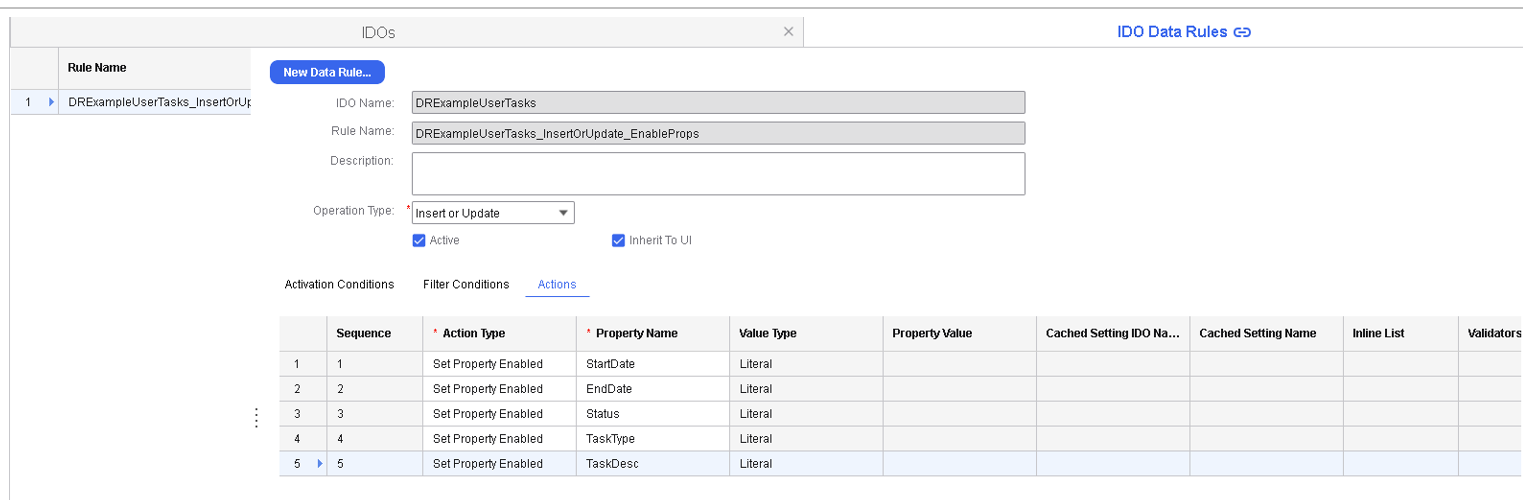
- Save the Data Rule after populating the tabs.
- On the IDOs form, click the Check In button.
- Navigate to
Note: This will also discard the IDO cache if is selected.
- Open the DRExampleUserTasks, and add a record for a user tasks.
Note: Notice that the properties are disabled except for Department.
- Select the value of the Department from the drop-down list. Select from 100, 200, 300, 400, or 500.
Note: Notice that once you populate the Department with a value, the other properties become available, such as Task Type and Task Status which you are required to populate as well.
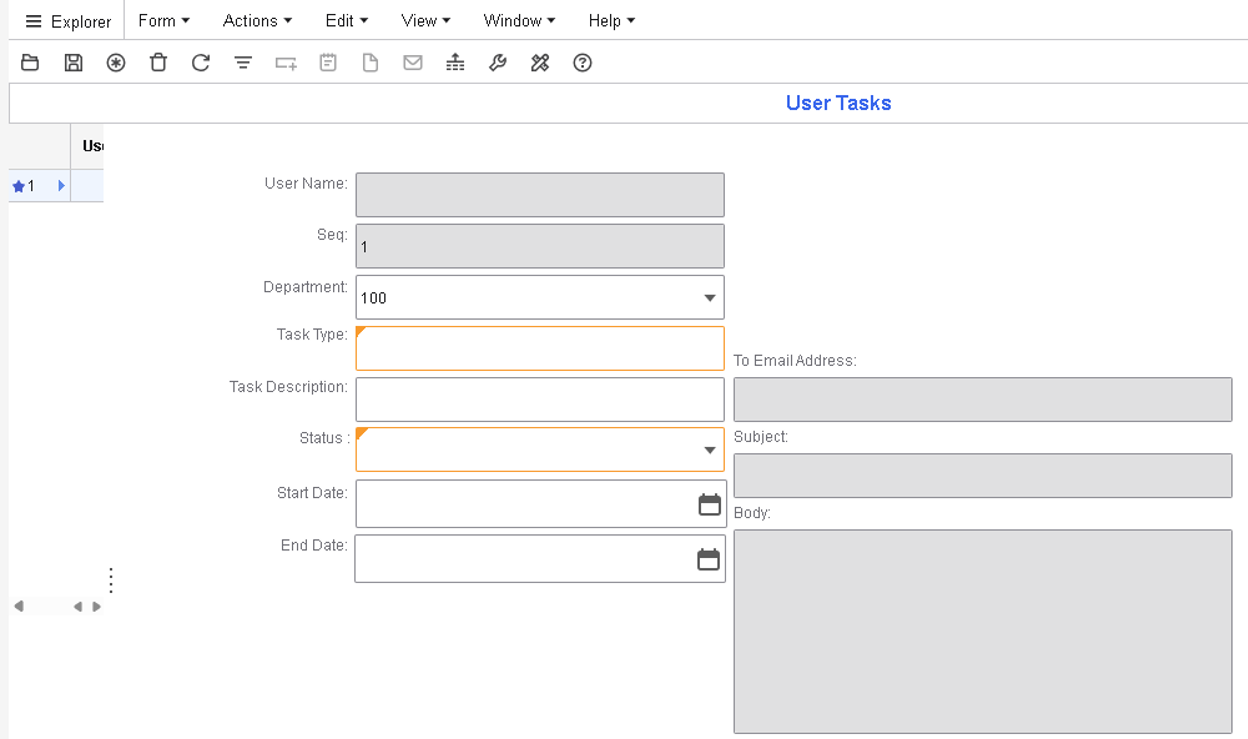
Although the rows are not ready to be saved, you can enable some properties on the form without form script or using the
EnabledWhenattributes on each component.
Scenario Example 2 - Setting a property value
Property values are often set in the MG Applications in form script or within form event handlers using the Sets Values EH Response Type. To elevate this functionality from the form up into the middle tier, you can use Data Rule. From the previous scenario, the username was not set in the User Name field based on who you are logged in as.
To resolve this, create a Data Rule as follows:
- On the IDOs form, check out the
DRExampleUserTasksIDO. - Click the Data Rules button.
- Click the New Data Rule and populate the wizard form with these information:
- IDO Name
- Specify DRExampleUserTasks.
- Rule Name
- Specify DRExampleUserTasks_Insert_SetUser.
- Operation Type
- Insert or Update, and leave default of checked on the checkboxes.
- Click OK.
Note: Ensure that you select or are on the correct rule before adding the Activation Conditions, Filter Conditions, or Actions.
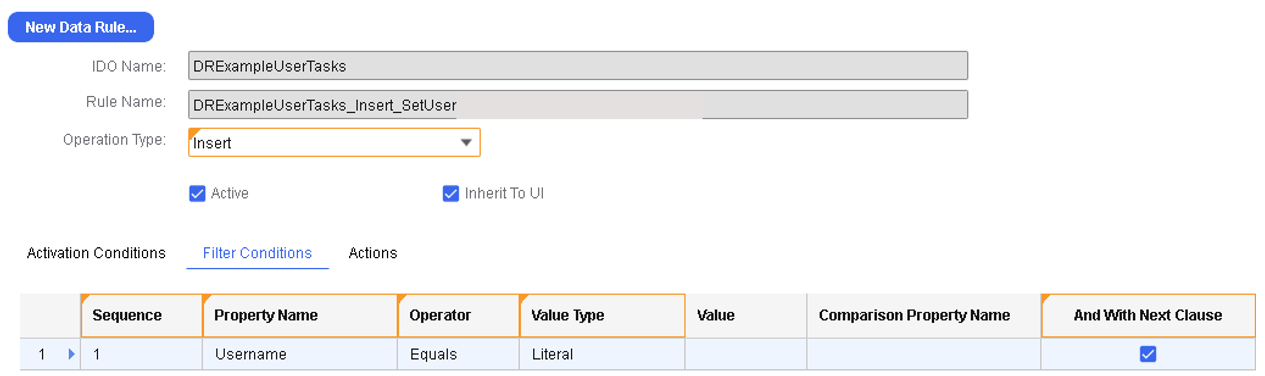
- Populate the Filter Conditions tab with these information:
- Property Name
- Specify Username.
- Operator
- Specify Equals.
- Value Type
- Specify Literal.
- Value
- Leave this column blank. Do not enter any value in this column.
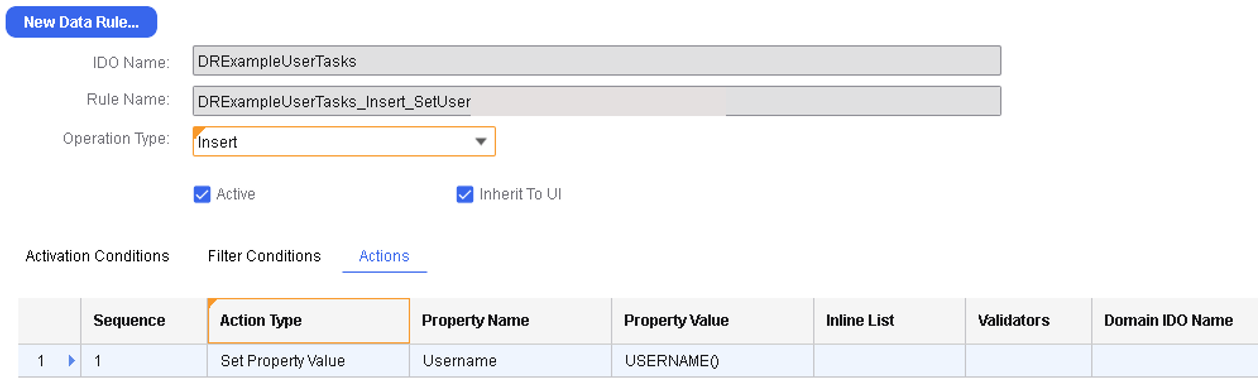
- Populate the Actions tab with these information:
- Action Type
- Specify Set Property Value.
- Property Name
- Specify Username.
- Property Value
-
Specify
USERNAME().USERNAME()is a Mongoose keyword that returns the value of the user that is logged in.
- Save the Data Rules after populating the tabs.
- Navigate to
Note: This will also discard the IDO cache if is selected.
- Open the User Tasks for, add a new task for
Department100 to500and Save.Note: Check if the Username is populated.
Scenario Example 3 - Setting up Domain and InLine List with validation
Many data elements on forms are sourced from database tables and validated during entry on a form or may come from a static list. In this scenario, you will set up a domain list from the DRExampleDepts IDO displaying the dept and description properties and create InCollection validation of the list to ensure that values entered do not go beyond records that exist for departments in the database. We will also create a static list for our Status property with choices of Open and Closed.
- On the IDOs form, checkout the
DRExampleUserTasksIDO. - Click the Data Rules button.
- Click the New Data Rule button and populate the wizard form with these values:
- IDO Name
- Specify DRExampleUserTasks.
- Rule Name
- Specify DRExampleUserTasks_InsertOrUpdate_SetLists.
- Operation Type
- Insert or Update, and leave default of checked on the checkboxes.
- Click OK.
Note: Ensure that you select or are on the correct rule before adding the Activation Conditions, Filter Conditions, or Actions.
- On the Actions tab, in the sub-collection grid, click on the Sequence column and right-click on the top left corner of the grid to add or delete records.
- Select New, and add three rows.
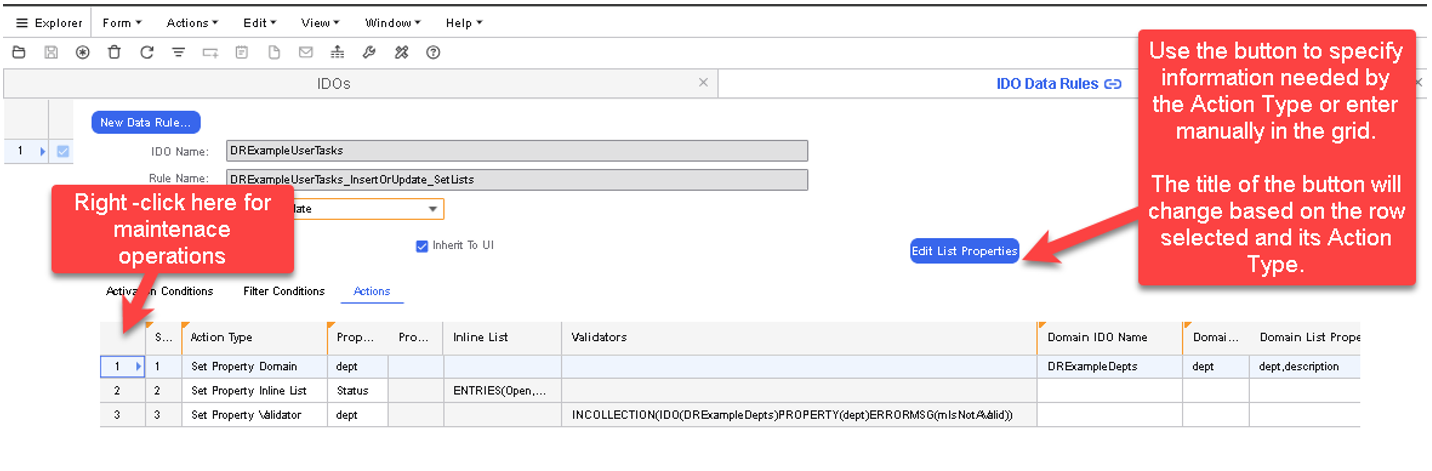
- Add these rows in the Sub-collection grid for Data Rules - Rule Actions:
- For the
Domain Listfor theDept, specify these columns:- Action Type
- Specify Set Property Domain.
- Property Name
- Specify dept.
- Domain IDO Name
- Specify DRExamplesDepts.
- Domain List Properties
- Click the Edit List Properties button and Ctrl+Click each property, or specify a comma separated list: dept,description
- For the
Inline Listfor theStatus, specify these columns:- Action Type
- Specify Set Property Inline List.
- Property Name
- Specify Status.
- Inline List
-
Click the Edit Inline List button. Open the first row and click Add Row. Specify Closed as the value for the second row, Column for
Valueshould be equal to 1 and the set the value forDisplay Columnsto 1, and click OK.Note: Optionally, you can manually paste this code in the InLine List column:ENTRIES(Open,Closed) DISPLAY(1) VALUE(1)
- For the validation of the Domain list to be
InCollection, specify these columns:- Action Type
- Specify Set Property Validator.
- Property Name
- Specify dept.
- Validators
-
Click the Edit Valiudators button. Click Add and select the In IDO Collection option. Click Next and specify these information:
- IDO:
DRExampleDepts - Property:
dept - Form Message String:
mIsNotAValid
Note: Optionally, you can manually paste this code in the column:INCOLLECTION(IDO(DRExampleDepts)PROPERTY(dept)STRINGMSG(mIsNotAValid)) - IDO:
- For the
- Save the Data Rule after populating the Actions tab. Saving the Data Rule will save the Actions in the sub-collection as well.
- On the IDOs form, click the Check In button.
- Navigate to
Note: This will also discard the IDO cache if is selected.
- Open the User Tasks form and add a new task. Use the combo box to choose the
deptsuch as 100, 200, 300, 400, or 500. - Populate the text for the Task Type and Description.
- Specify the Status. You can select between Open or Closed.
- Update the Department to 555 or any value that was not defined in the Departments form. You will encounter an error when you try to save.
Note: Consider making separate rules for validation, use the Filter Condition tab and have entries for IsModified as the Operator for the properties being validated.
Scenario Example 4 - Data Rules Pre and Post-Save Methods
- The first is a Pre-Save method that is called before the AES and other logic could be fired. It will look at the
Start DateandEnd Dateon the task. If theEnd Dateis earlier than theStart Dateit will change theEnd Dateto be the same as theStart Date. - The second method is a Post-Save method which in this case is tied to a Meeting. Create a task with: Meeting for the
Task Description. This will enable the Email To, Subject, and Body fields to the right that may be populated, and once filled in, when the task is saved it will send an email. There are other ways this could have been accomplished but this is an example of calling a Post-Save method.
Create the Data Rule to enable the necessary properties for Post-Save method. You will enable the ToEmailAddress, Subject and Body properties when the Task Description contains the literal value: Meeting
- On the IDOs form checkout the DRExampleUserTasks IDO.
- Click the Data Rules button.
- Click the New Data Rule button and populate the wizard form with the values below:
- IDO Name:
DRExampleUserTasks - Rule Name: DRExampleUserTasks_InsertUpdate_EnableToEmailAddressSubBody
- Operation Type: Insert or Update, and leave default of checked on the checkboxes.
- IDO Name:
- Click OK.
Note: Ensure that you select or are on the correct rule before adding the Activation Conditions, Filter Conditions, or Actions.
- Populate the Filter Conditions tab with these information:
- Property Name:
TaskDesc - Operator: Equals
- Value Type: Literal
- Value: Meeting
- Property Name:
- Populate the Actions tab with these information:
- Action Type: Set Property Enabled
- Property Name:
ToEmailAddress - Action Type: Set Property Enabled
- Property Name:
Subject - Action Type: Set Property Enabled
- Property Name:
Body
- Save the Data Rule.
- Next, create the Data Rule for the
Pre-Savemethod. - On the IDOs form checkout the DRExampleUserTasks IDO.
- Click the Data Rules button.
- Click the New Data Rule button and populate the wizard form with these values:
- IDO Name:
DRExampleUserTasks - Rule Name:
DRExampleUserTasks_InsertOrUpdate_PreSaveFilterEndLessThanStart - Operation Type: Insert or Update, and leave default of checked on the checkboxes.
- IDO Name:
- Click OK.
Note: Ensure that you select or are on the correct rule before adding the Activation Conditions, Filter Conditions, or Actions.
- Populate the Filter Conditions tab with these information:
- Property Name:
EndDate - Operator: Less Than
- Value Type: Property Name
- Comparison Property Name:
StartDate
- Property Name:
- Populate the Actions tab with these information:
-
- Action Type:
Call Action Method Pre Save - Action Method:
OnEDtEarlierThanSDtNote: This column is located all the way to the right of the grid.
- Action Type:
- Save the Data Rule.
- After creating the Data Rule for the
Pre-Savemethod, next is the Data Rule for thePost-Savemethod.Note: For thePost-Savemethod to run and deliver an email it is required that emailing be configured on the Intranets form and working with the AES Service or host running. - On the IDOs form checkout the DRExampleUserTasks IDO.
- Click the Data Rules button.
- Click the New Data Rule button and populate the wizard form with these values:
- IDO Name: DRExampleUserTasks
- Rule Name:
DRExampleUserTasks_InsertUpdate_PostSaveSendMtgEmail - Operation Type: Insert or Update, and leave default of checked on the checkboxes.
- Click OK.
Note: Ensure that you select or are on the correct rule before adding the Activation Conditions, Filter Conditions, or Actions.
- Populate the Filter Conditions tab with these information:
- Property Name:
TaskDesc - Operator: Equals
- Value Type: Literal
- Value: Meeting
- Property Name:
Body - Operator: Not Equals
- Value Type: Literal
- Property Name:
- Add the
Subjectproperty with these information:- Property Name:
Subject - Operator: Not Equals
- Value Type: Literal
- Property Name:
- Add the
ToEmailAddressproperty with these information:- Property Name:
ToEmailAddress - Operator: Not Equals
- Value Type: Literal
- Property Name:
- Populate the Actions tab with these information:
- Action Type: Call Action Method Post Save
- Action Method:
SendEmailOnSave
- Save the Data Rule after populating the Actions tab. Saving the Data Rule will save the Filter Conditions and the Actions in the sub-collection as well.
- On the IDOs form, click the Check In button.
- Navigate to
Note: This will also discard the IDO cache if is selected.
You can try to add a User Task where the EndDate is earlier than the StartDate and Save. You should notice that the EndDate gets set to the same value as that is in the StartDate. Try adding a User Task where the Task Description value is Meeting.
Notice that the ToEmailAddress, Subject, and Body properties become enabled. Populate them with a valid email address, a sample subject and body and then save the User Task. If SMTP and AES are configured and working in MG, an email will be sent.
Scenario Example 5 - Data Rules Licensed Module Status, Current User is Licensed for Module, and Current User Member of Group
There is an IDO and form for use with Cache Settings scenarios: DRExampleUserReqs similar to the User Tasks, you are required to choose a department. Therefore, a list and validator will be required on this IDO as well.
- Create the Data Rule for the
Departmentlist similar to the earlier IDO: - On the IDOs form checkout the
DRExampleUserReqsIDO. - Click the Data Rules button.
- Click the New Data Rule button and populate the wizard form with these values:
- IDO Name:
DRExampleUserReqs - Rule Name:
DRExampleUserReqs_InsertOrUpdate_SetLists - Operation Type: Insert or Update, and leave default of checked on the checkboxes.
- IDO Name:
- Click OK.
Note: Ensure that you select or are on the correct rule before adding the Activation Conditions, Filter Conditions, or Actions.
- In the sub-collection grid, click on the Sequence column and right-click on the top left corner of the grid to add or delete records.
- Select New, and add two rows.
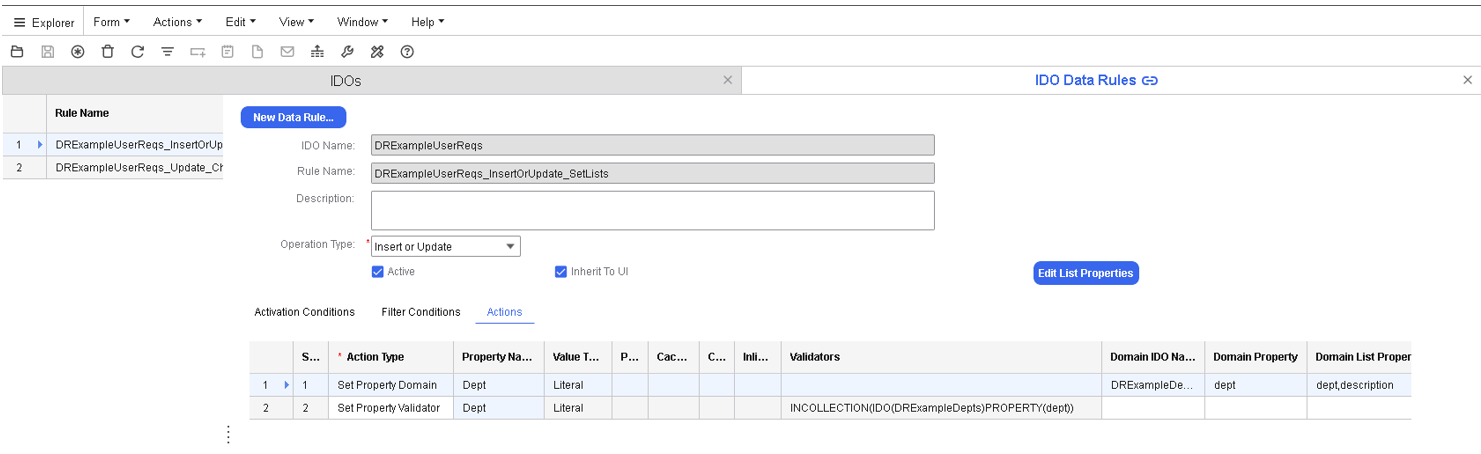
- Add these rows for the sub-collection grid for Data Rules - Rule Actions:
- For the
Domain Listfor theDept, specify these columns:- Property Name:
dept - Domain IDO Name: DRExampleDepts
- Domain Property:
dept
- Property Name:
- For Validation of the
Domain Listto beInCollection, specify these columns:- Action Type: Set Property Validator
- Property Name:
dept - Validators:
INCOLLECTION(IDO(DRExampleDepts)PROPERTY(dept))
- For the
- Save the Data Rule after populating the Actions tab. Saving the Data Rule will save the Actions in the sub-collection as well.
Enabling the User Req properties after the Department field is populated
Similar to the User Tasks IDO, we made some properties read-only at the IDO level and then will enable with a Data Rule when the Department is populated. You are required to create a new Data Rule to do this.
- On the IDOs form checkout the
DRExampleUserReqsIDO if it is not already checked out.In this example you will only enable properties on the form through a Data Rule once a department has been specified.
- Click the Data Rules button.
- Click the New Data Rule button and populate the wizard form with these values:
- IDO Name:
DRExampleUserReqs - Rule Name:
DRExampleUserReqs_InsertOrUpdate_DeptPopulatedEnableProps - Operation Type: Insert or Update, and leave default of checked on the checkboxes.
- IDO Name:
- Click OK.
Note: Ensure that you select or are on the correct rule before adding the Activation Conditions, Filter Conditions, or Actions.
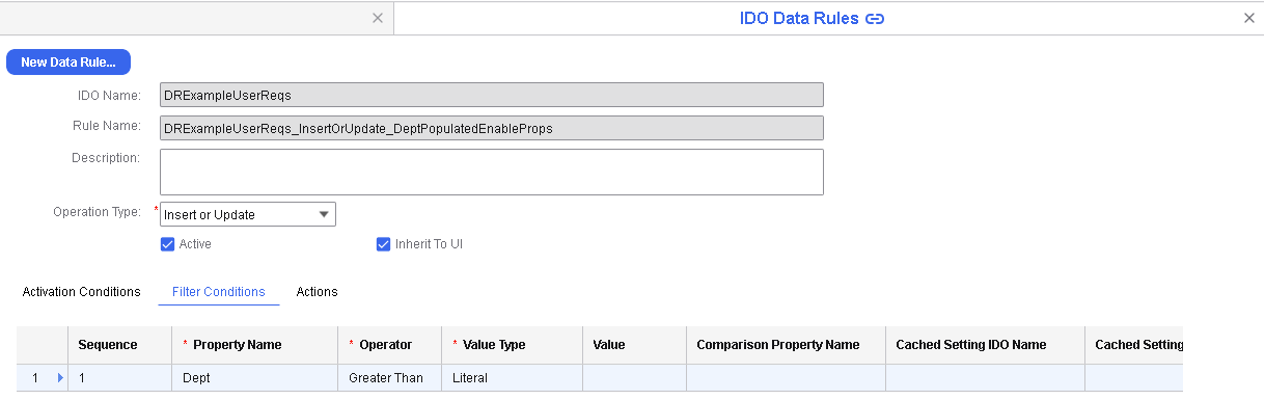
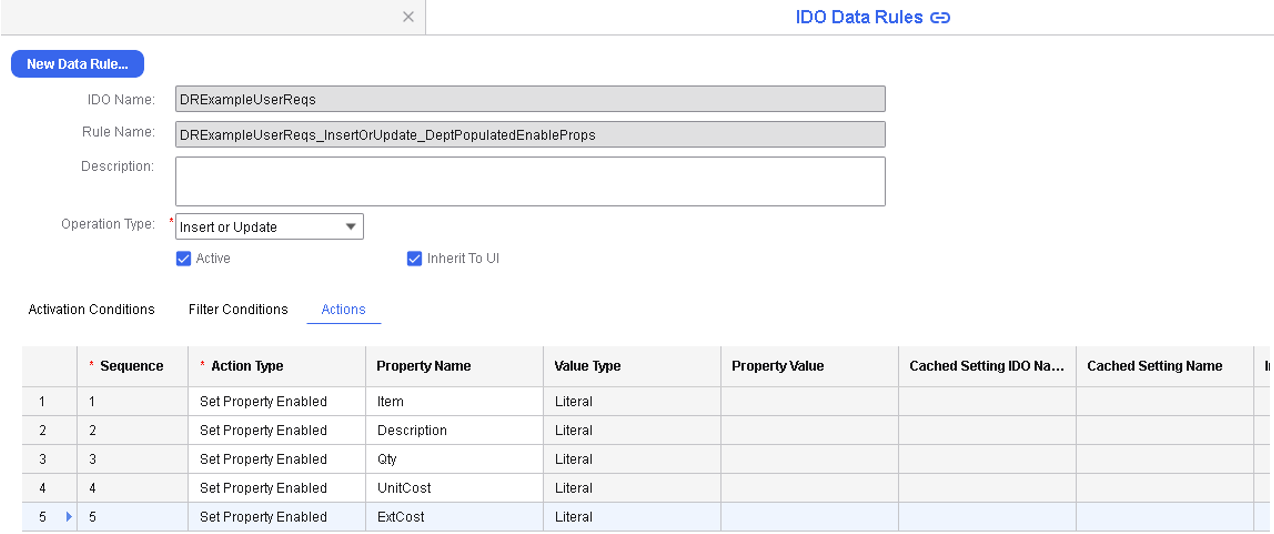
- Populate the Filter Conditions tab with these information:
- Property Name:
Dept - Operator: Greater Than
- Value Type = 1
- Value: No value or blank
- With Next Clause: Checked
- Property Name:
- Populate the Actions tab with five property names, with these information:
- Action Type: Set Property Enabled
- Property Name (One property name per row):
Item,Description,Qty,UnitCost, andExtCost.Note: You can navigate from row to row using the tab key.
- Save the Data Rule after populating both tabs.
- On the IDOs form, click the Check In button.
- Navigate to
Note: This will also discard the IDO cache if is selected.
- Log in as
ITUserand open the DRExampleUserReqs form. - Add a record for a User Requisition. Ensure that you specify 600 for the Department field for IT.
There is no calculation for
ExtCost, however you can specify the calculated value. Once you populate the Department field with a value the other properties will become available.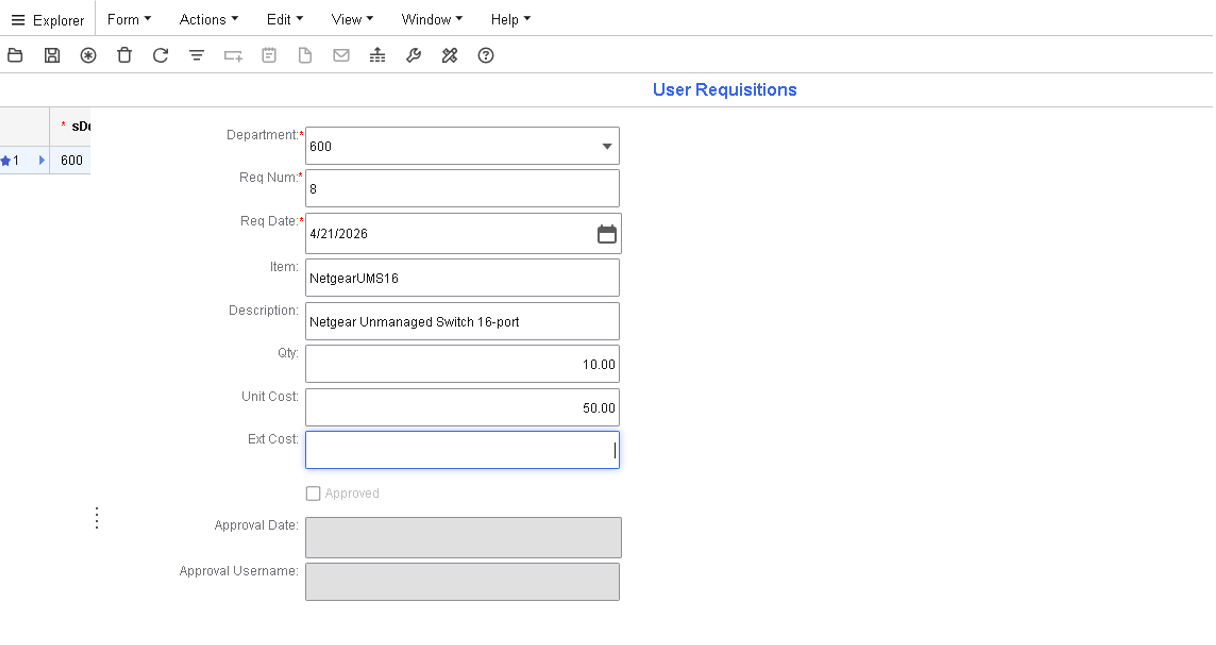
- Save the form and notice that the value for Ext Cost is populated.
We will now create a Data Rule that limits what an IT Manager can approve by filtering requisitions for the IT Department, department code 600.
The rule checks whether the Transactional module is licensed on the License Management form, whether the user is licensed for the Developer module as displayed for the ITMgr user under the User Modules button on the Users form, and whether the user is a member of the DREX_IT_ReqAppr group as displayed in the lower grid of the Users form for the ITMgr user.
We will also have an Action to enable the Approved property for the manager based on the Activation and Filter Conditions specified earlier.
Mongoose does not come with many additional feature modules, this is why we are using Developer. Other applications will have many more.
Therefore, we will test with the user having the Developer module and then after performing the test we will log out, and back in as user: sa.
- Open the Users form for the ITMgr user.
- Click the User Modules button and delete User Module: Developer.
- Save the user and Log out.
- Log in as ITMgr user.
- Discard our IDO Cache, and open the User Requisitions form.
- Change a date or the or description of a row with a Department value of 600 is set.
Notice that you no longer have access to the Approved checkbox.
Create the new data rule required for the test above on the DRExampleUserReqs IDO similar to the previous rules.
- Check out the IDO in the IDOs form.
- Select the IDO and click the Data Rules button.
- Click the New Data Rule button on the Data Rules form to access the IDO Data Rule Wizard form and specify these information:
- IDO Name:
DRExampleUserReqs - Rule Name:
DRExampleUserReqs_Update_ChkTrnModuleLic_ChkUserLic_ChkGroupITAppr - Operation Type: Update and leave default of checked on the checkboxes.
- IDO Name:
- Click OK.
Note: Ensure that you select or are on the correct rule before adding the Activation Conditions, Filter Conditions, or Actions.
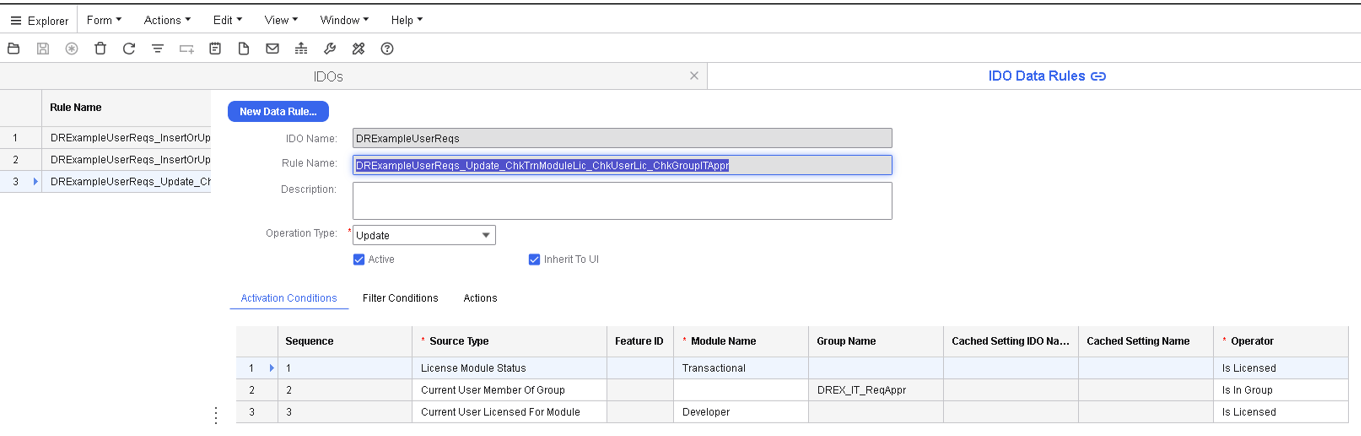
- Next, populate the Activation Conditions with three rows using these information:
Note: You can use the Tab key to navigate from row to row.
- For the first row, specify these columns:
- Source Type: License Module Status
- Module Name: Transactional
- Operator: Is Licensed
- For the second row, specify these columns:
- Source Type: Current User Member Of Group
- Group Name:
DREX_IT_ReqAppr - Operator: In Group
- For the third row, specify these columns:
- Source Type: Current User Licensed For Module
- Module Name: Developer
- Operator: Is Licensed
- For the first row, specify these columns:
- Save the Data Rule.
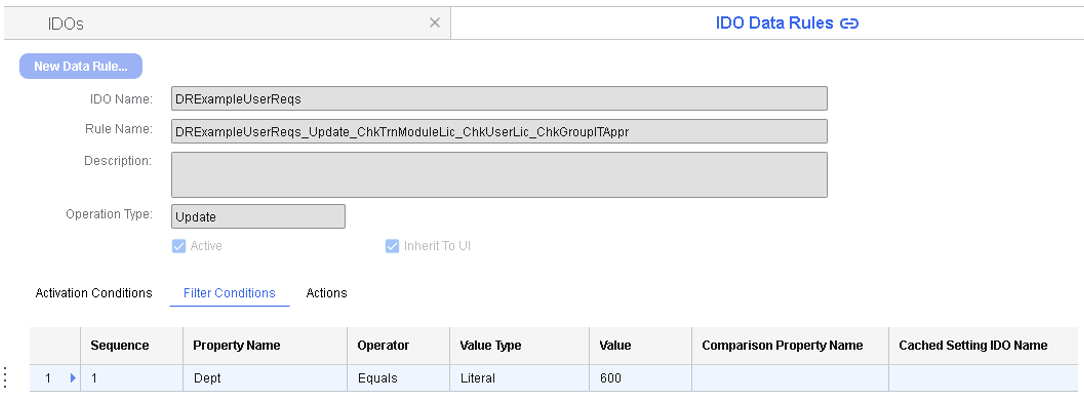
- Next, populate the Filter Conditions tab with these information:
- Property Name:
Dept - Operator: Equals
- Value Type: Literal
- Value: 600
- And With Next Clause column: Checked
- Property Name:
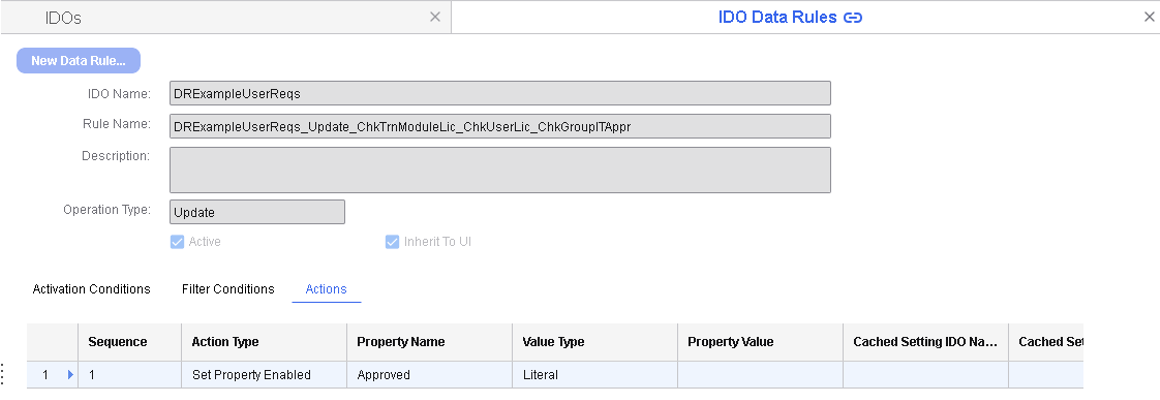
- Next, populate the Actions tab with these information to enable the
Approvedproperty so the IT Manager user can approve he IT Requisition:- Action Type: Set Property Enabled
- Property Name: Approved
- Value Type: Literal
- Save the Data Rule.
- Check In the IDO.
- Discard the IDO Cache.
- Log out and log back in as ITMgr, using the password DataRules1.
- Change the Requisition Date to a different date to force an update on a User Req for Dept 600 and try to access the Approved checkbox.
It should be available because Transactional Module is licensed, the ITMgr is a member of:
You could try to log out and log back in asDREX_IT_ReqAppr, as the current user has theDeveloper Moduleand finally theReqhas been updated andDept= 600.sauser, remove theDeveloper Modulefrom ITMgr. Log out and log back in test aDept600reqand see that Approval access has been removed.
Scenario Example 6 - Data Rules Set - Set the Current Username and Current Date when a property changes (Approved property)
Building on the previous Data Rule, we will create a data rule to populate the Approval Date and the Approval Username based on a User Requisition being approved.
Create the new data rule required to set the name and the date on Approval on the DRExampleUserReqs IDO similar to the previous rules.
- Check out the IDO in the IDOs form.
- Select the IDO and click the Data Rules button.
- Click the New Data Rule button on the Data Rules form to access the IDO Data Rule Wizard form and specify these information:
- IDO Name: DRExampleUserReqs
- Rule Name: DRExampleUserReqs_Update_ApprovedAssignUserAndDate
- Operation Type: Update and leave default of checked on the checkboxes.
- Click OK.
Note: Ensure that you select or are on the correct rule before adding the Activation Conditions, Filter Conditions, or Actions.
- Next, populate the Filter Conditions tab with two rows, using these information:
- For the first row, specify these columns:
- Property Name: Approved
- Operator: Is Modified
- Value Type: Literal
- And With Next Clause: checked
- For the second row, specify these columns:
- Property Name: Approved
- Operator: Equals
- Value Type: Literal
- Value: 1
- And With Next Clause: checked
- For the first row, specify these columns:
- Next, populate the Actions tab with four rows, using these information:
- For the first row, specify these columns:
- Action Type: Set Property Enabled
- Property Name:
AppUsername - Value Type: Literal
- Property Value: No value or blank
- For the second row, specify these columns:
- Action Type: Set Property Enabled
- Property Name:
AppDate - Value Type: Literal
- Property Value: No value or blank
- For the third row, specify these columns:
- Action Type: Set Property Value
- Property Name:
AppUsername - Value Type: Literal
- Property Value:
USERNAME()
- For the fourth row, specify these columns:
- Action Type: Set Property Value
- Property Name:
AppDate - Value Type: Literal
- Property Value:
CURDATE()
- For the first row, specify these columns:
- Save the Data Rule.
- Discard the IDO Cache.
- Log out, and log back in as ITMgr user, change the date on a
User ReqforDept600and try to access the Approved checkbox.Notice the Approval Date and Username populate.
Note: If you tested previously removing theDeveloperModule from the ITMgr user, ensure that you put it back under the Users form for the ITMgr, and the User Modules button and log back in as ITMgr to test Scenario Example 6
Scenario Example 7 - Creating a site-wide cache setting for third-party application (Vendor Controlled Maintenance Materials) to limit approval requisitions
In this scenario you are required to create a Cached Setting on the DRExampleReqParms IDO where the VendorControlledMaintMatls property exists. This is a tinyint property that will hold a value of 1 when a given site will be using Vendor Controlled Maintenance Materials or VCMM.
The premise here is that if VCMM is being used that a Kanban process is being utilized for maintenance materials and maintenance department requisitions should not be approvable by the MntMgr user. The supplies will be filled automatically by the vendor, and the company will be invoiced for maintenance materials usage.
Due to this process, we do not want to allow the MntMgr user to approve User Reqs, as they are not necessary. So, the only time that the Mnt. Dept. should be able to approve Reqs is when VCMM is not in use.
The Cached Setting: CS_VendorControlledMaintMatls will be created for this purpose.
- Sign in as
sauser and open the IDOs form. - Check out the
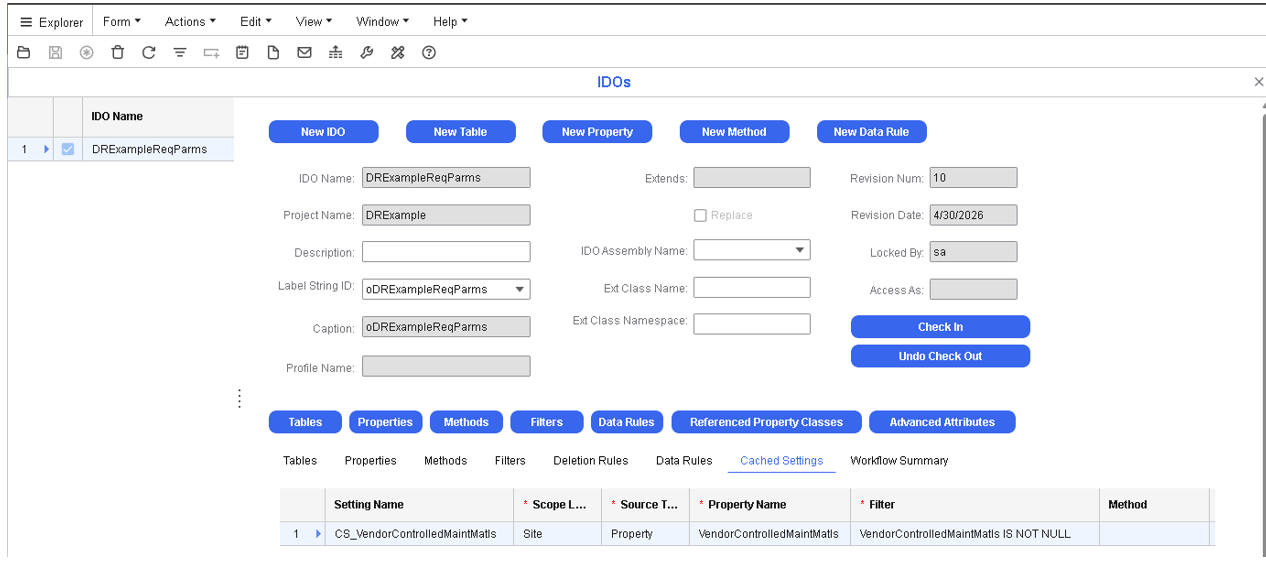
DRExampleReqParmsIDO. - Click on the Cached Settings tab in the bottom center and a new Cached Setting with these information:
- Setting Name:
CS_VendorControlledMaintMatls - Scope Level: Site
- Source Type: Property
- Property Name:
VendorControlledMaintMatls - Filter:
VendorControlledMaintMatls IS NOT NULL
- Setting Name:
- Save and check in the
DRExampleReqParmsIDO. - Next, create a Data Rule on the
DRExampleUserReqsto look at the cached setting. - Check out the
DRExampleUserReqsIDO. - Click on the Data Rules button.
- Click the New Data Rule button to create a new Data Rule on the
DRExampleUserReqsIDO with these information:- IDO Name:
DRExampleUserReqs - Rule Name:
DRExampleUserReqs_Update_CheckDept300AndVCMMUsage - Operation Type: Update and leave the defaulting checkboxes checked
- IDO Name:
- Click OK.
Note: Ensure that you select or are on the correct rule before adding the Activation Conditions, Filter Conditions, or Actions.
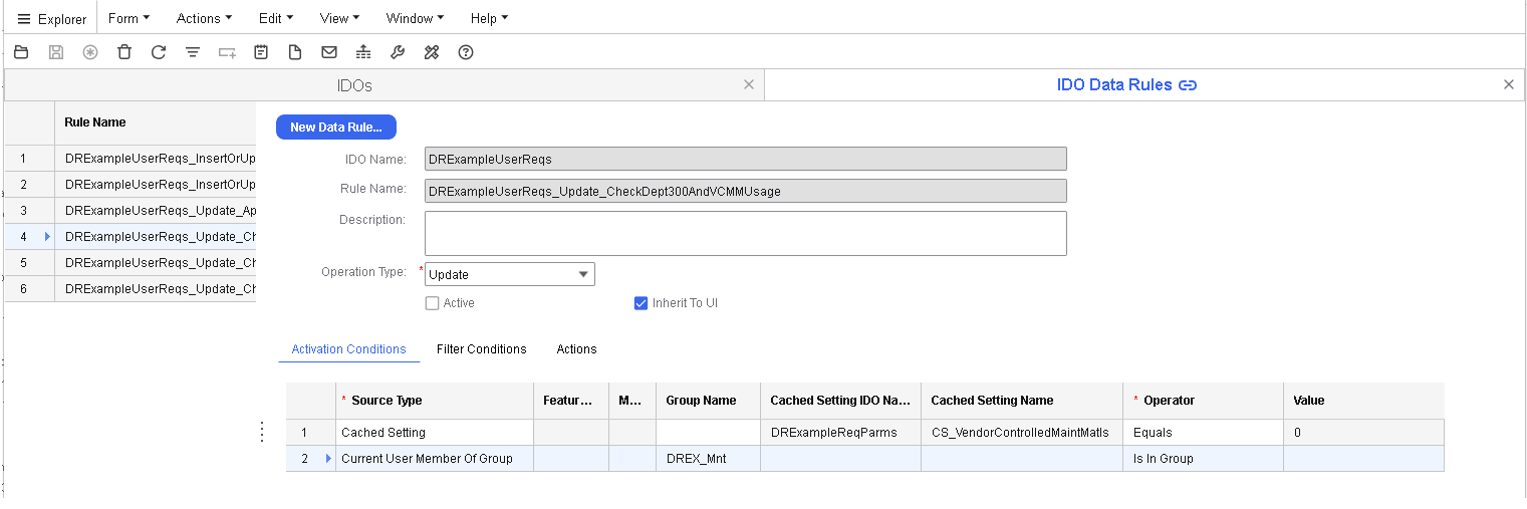
- Select the Activation Conditions tab to add two conditions.
- Click in the Sequence column or any editable column, and right-click New to add conditions with these information:
- For the first activation condition, specify these columns:
- Source Type: Cached Setting
- Cached Setting IDO: DRExampleReqParms
- Cached Setting:
CS_VendorControlledMaintMatls - Operator: Equals
- Value: 0
- For the second activation condition, specify these columns:
- Source Type: Current User Member Of Group
- Group Name: DREX_Mnt
- Operator: Is In Group
- For the first activation condition, specify these columns:
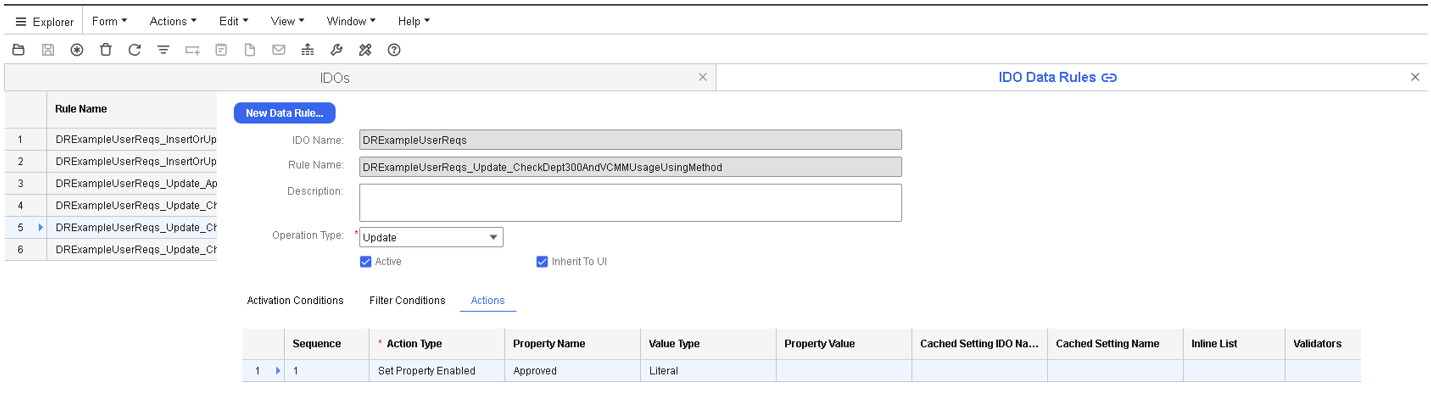
- Select the Actions tab and add an action with these information:
- Action Type: Set Property Enable
- Property Name:
Approved - Value Type: Literal
- Save the Data Rule.
- Check in the IDO.
- Discard the IDO Cache.
- Log out and log back in as MntMgr user with the password: DataRules1
- Open the DRExampleUserReqs form and update a requisition for
Dept 300and see if you can approve the requisition.You should notice that you are unable to because when we set up the
Req. Parmswe enabled the Vendor Controlled Maint. Mtls. - Log out and log back in as sa user and open the DRExampleReqParms form.
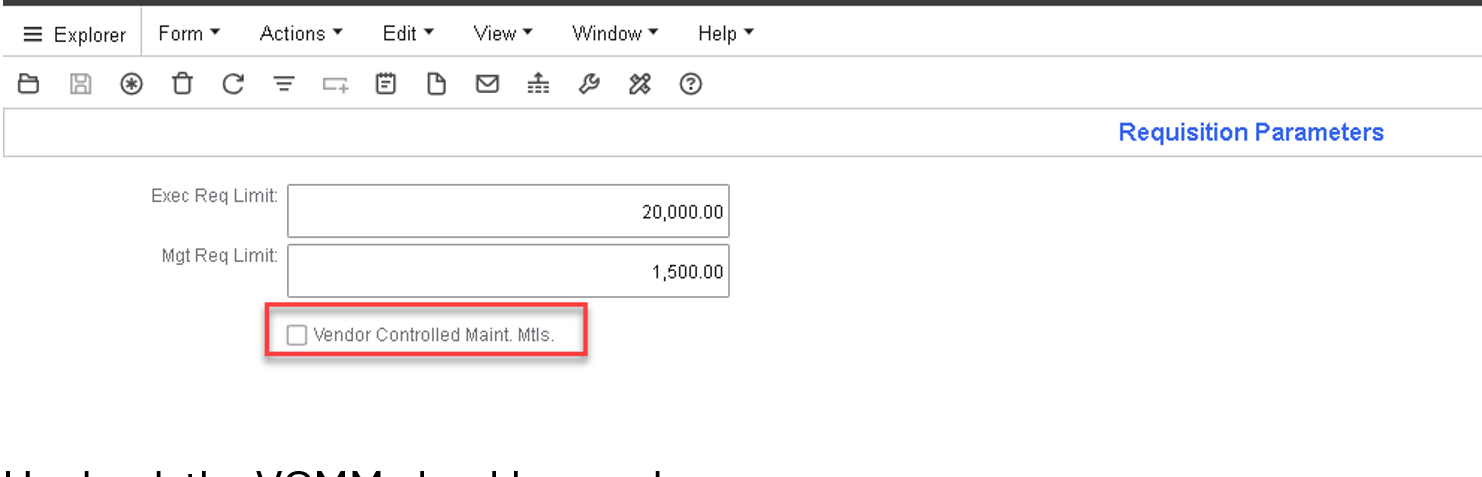
- Clear the Vendor Controlled Maint. Mtls. checkbox and save.
- Log out and log back in as MntMgr user with the password: DataRules1.
- Open the DRExampleUserReqs form and update a requisition for
Dept 300and see if you can approve the requisition. You now should be able to.
Scenario Example 8 - Create a Site-wide cache setting for third-party application (Vendor Controlled Maintenance Materials) to limit approval of requisitions using a C# method instead of a property-based Cached setting
In this example, create a Cached Setting on the DRExampleUserReqs IDO that fires a method to look at the cached setting on the DRExampleReqParms, retrieve it in code and control the same access to approve requisitions for the Maintenance Dept. (300) based upon Vendor Controlled Maintenance Materials (VCCM) not being used.
Typically, you would use the method if a more complicated logic were necessary. We are using a method to accomplish the same check from Scenario Example 7, but this time through code. The goal here is just to illustrate the how to retrieve a Cached Setting from C# code.
- Sign out and sign back in as the sa user.
- Open the IDOs form and check out the
DRExampleUserReqsIDO. - Locate the
DRExampleUserReqs_Update_CheckDept300AndVCMMUsagedata rule. - Clear the Active checkbox.
- Save the data rule, and discard the IDO cache.
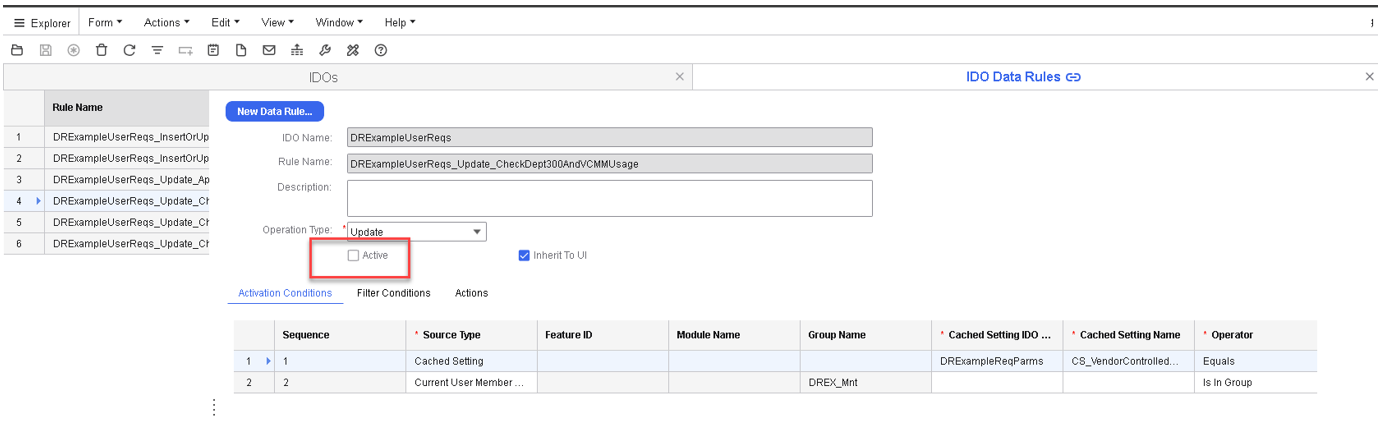
Next, create a Cached Setting on the DRExampleUserReqs IDO that will call a method, and in C# assembly code check the cached setting on the DRExampleReqParms IDO, named: CS_VendorControlledMaintMatls.
- Check out the
DRExampleUserReqsIDO. - Click on the grid on the Cached Settings tab and click the New button.
- Create a Cached Setting with these information:
- Setting Name: CS_VendorControlledMaintMatlsFromReq
- Scope Level: Site
- Source Type: Method
- Method: CheckVCMMUsage
- Method Parameters: None
Note: If a method is used for Cache Settings, only literal values can be passed as parameters (csv list of literal values) in the Method Parameters field. The properties from the IDO cannot be passed as input parameters as no row level context is available. This work is all done at the IDO level.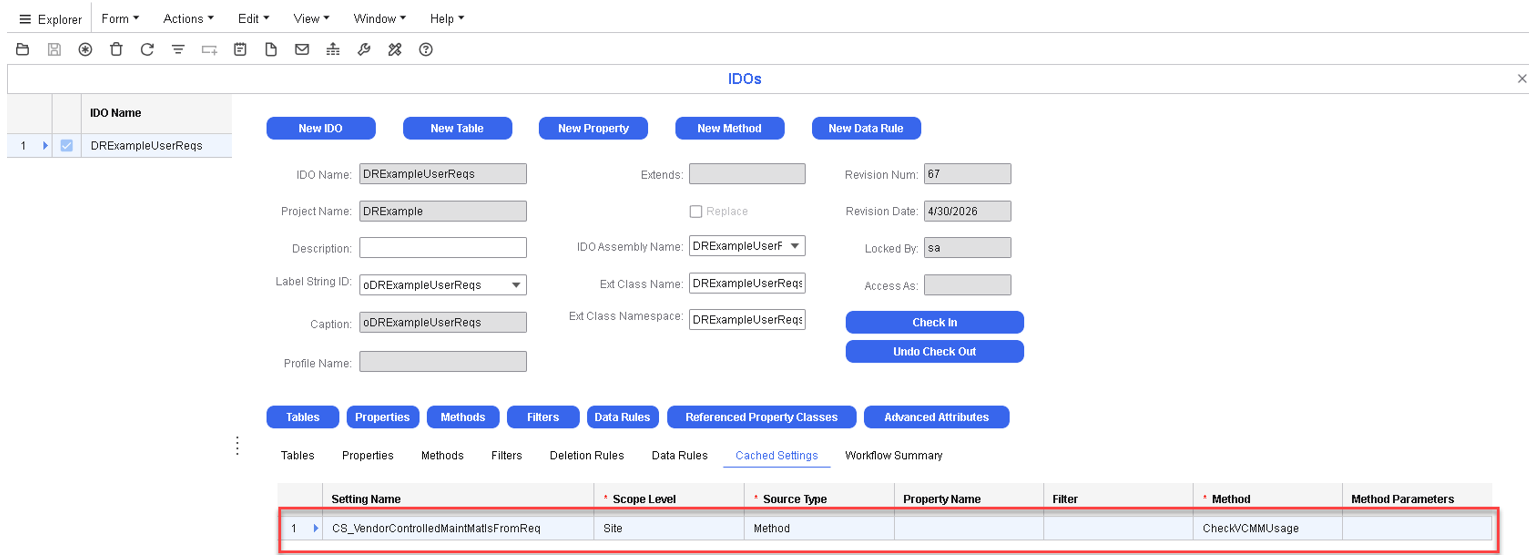
- Save the IDO and click the Data Rules button.
Next, we need to create a new Data Rule on the DRExampleUserReqs IDO to use a method based cached setting.
- Click on the Data Rules button.
- Click the New Data Rule button to create a new Data Rule on the
DRExampleUserReqsIDO with these information:- IDO Name: DRExampleUserReqs
- Rule Name:
DRExampleUserReqs_Update_CheckDept300AndVCMMUsageUsingMethod - Operation Type: Update and leave the defaulting checkboxes checked
- Click OK to create the rule.
Note: Ensure that you select or are on the correct rule before adding the Activation Conditions, Filter Conditions, or Actions.
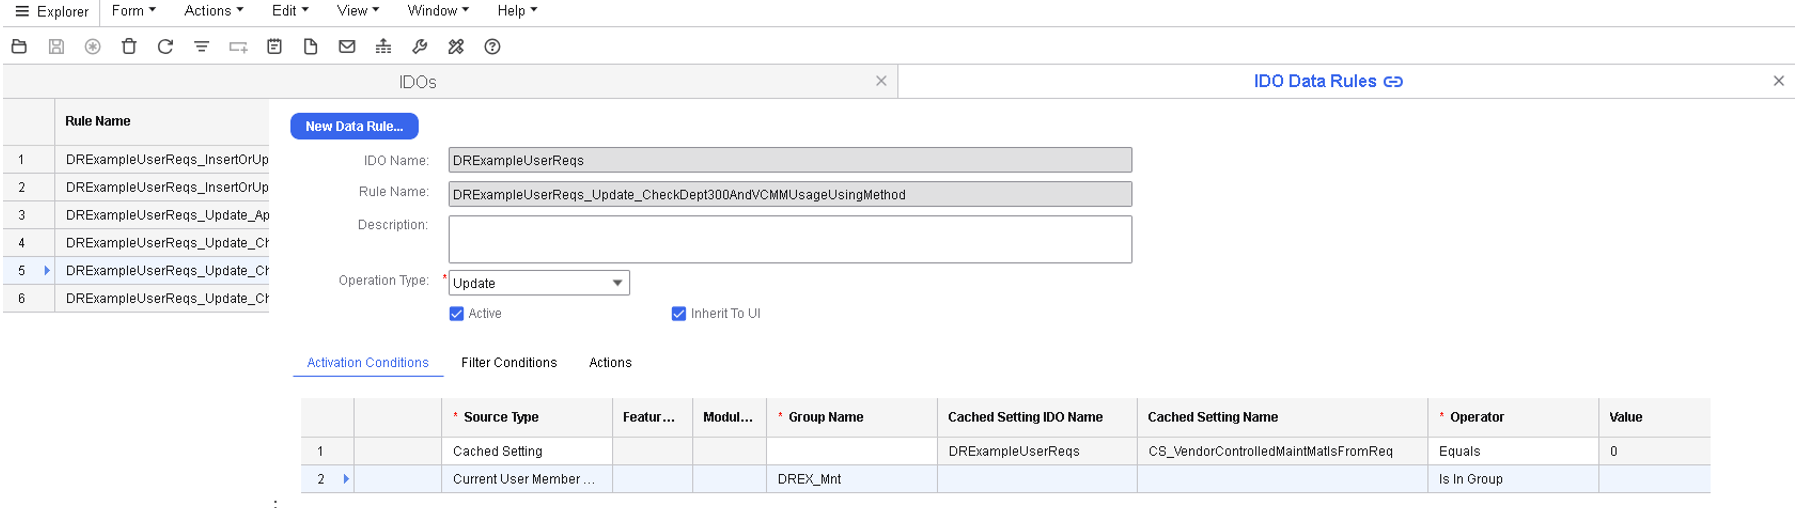
- Select the Activation Conditions tab to add two conditions.
- Click in the Sequence column or any editable column, and right-click New to add conditions with these information:
- For the first Activation Condition, specify these columns:
- Source Type: Cached Setting
- Cached Setting IDO: DRExampleUserReqs
- Cached Setting Name: CS_VendorControlledMaintMatlsFromReq
- Operator: Equals
- Value: 0
- For the second Activation Condition, specify these columns:
- Source Type: Current User Member Of Group
- Group Name:
DREX_Mnt - Operator: Is In Group
- For the first Activation Condition, specify these columns:
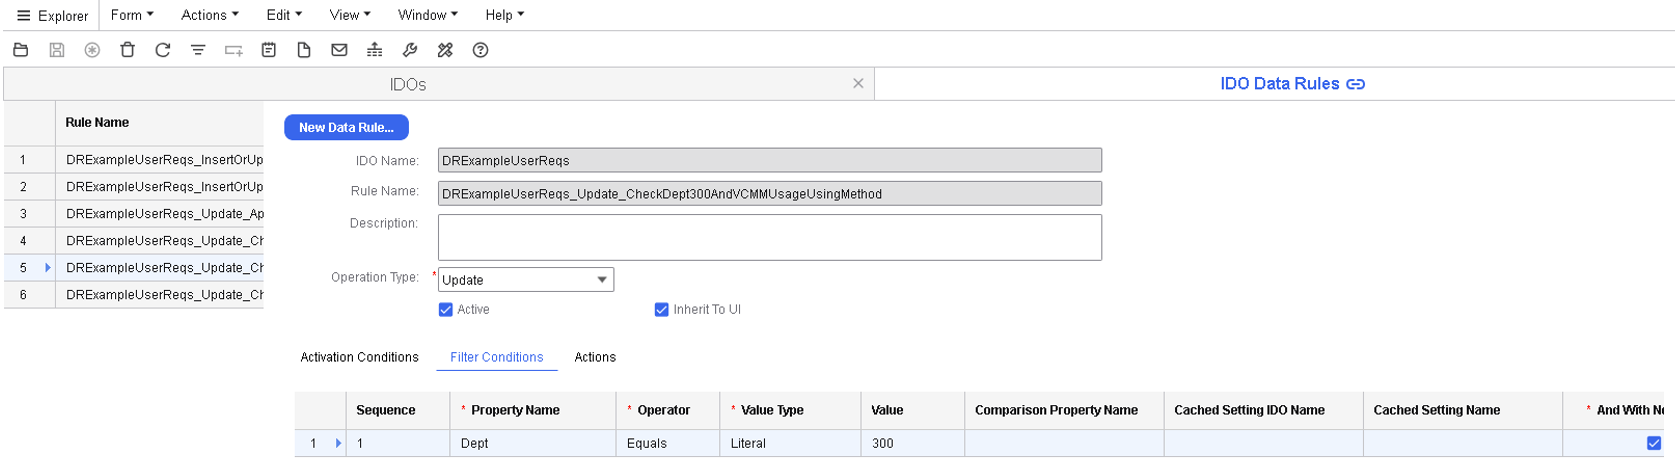
- Next, add a condition in the Filter Conditions tab with these information:
- Property Name:
Dept - Operator: Equals
- Value Type: Literal
- Value: 300
- Property Name:
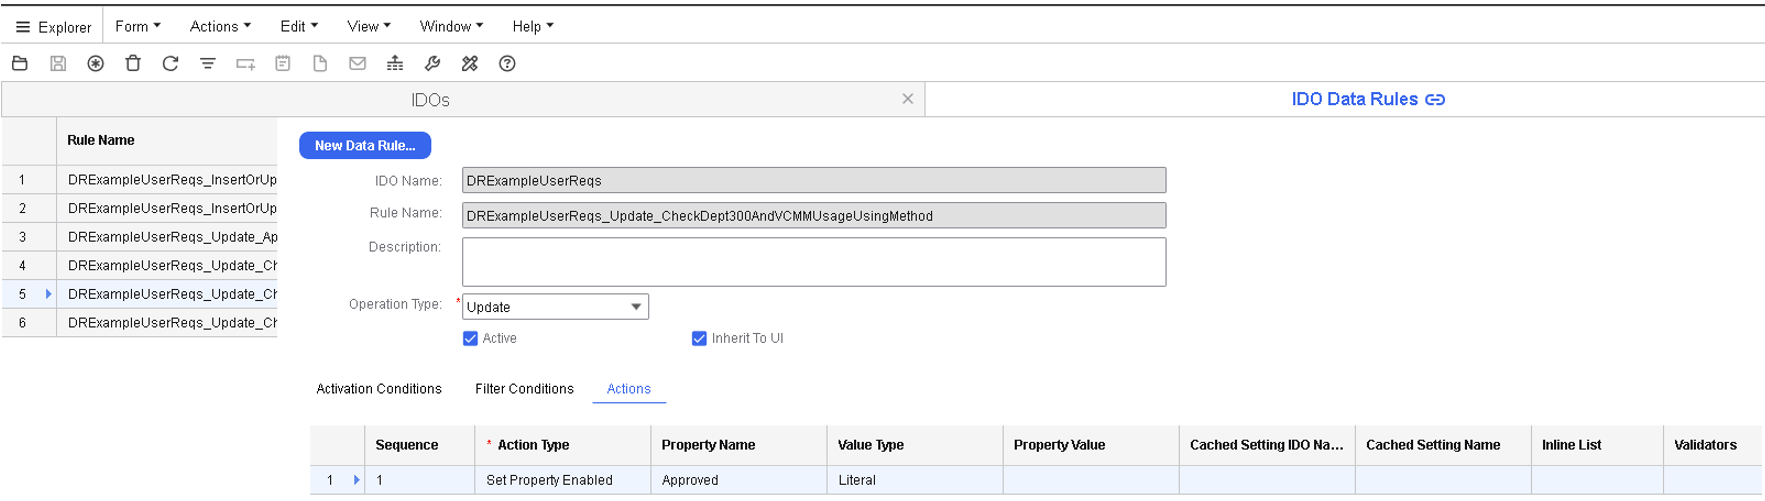
- Next, add an action in the Actions tab with these information:
- Action Type: Set Property Enabled
- Property Name:
Approved - Value Type: Literal
- Save the Data Rule.
- Check In the IDO.
- Discard the IDO Cache.
- Log back in as MntMgr user.
- Open the DRExampleUserReqs form and update a requisition for
Dept 300and see if you can approve the requisition.You should notice that you are able to, since we had already updated Requisition Parameters and disabled the VCMM.