Adding an M3 Web Services Server

The M3 Web Services Server location provides the path to an M3 Web Services Server. One or more M3 Web Services Server locations must be defined for the M3 Web Services Designer to operate. Server locations are displayed and maintained on the Server tab in the M3 Web Services Designer.

Note: When you access the Server for the first time, you will be asked to provide the server user name and password. The credentials will be used when accessing the M3 back-end systems tied to the M3 Web Services Server. Login information will be persisted during your Designer session, and you will not need to log in again.

If you want to reset the cached user information and log in as a different user, go to Window > Preferences > MWS Designer > Communication Settings and click Clear Cached Password. See Specifying communication settings.
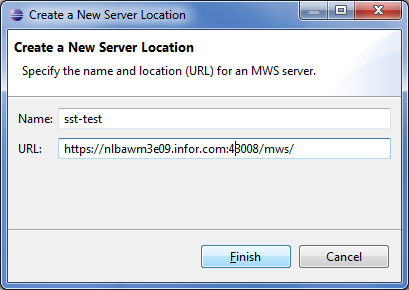
  1. In the Server tab, click +.

    The Create a new Server Location window is displayed.

  2. In the Name field, specify the name of the M3 Web Services Server. This can be a name of your choice.
  3. Provide the M3 Web Services Server location in the URL field.

    The URL format should follow the http://Host:Port/Context_Root format.

    For example, http://seliw136:9080/MWS

  4. Click Finish.

    The M3 Web Services Designer contacts the M3 Web Services Server.

    • If the M3 Web Services Server is online, the M3 Web Services Server location is added to the list of servers.

    • If the M3 Web Services Server is offline, a message displays:

      The selected server seems to be offline, add it anyway?

      Click OK if you want to add the M3 Web Services Server location or click Cancel if you do not want to add the server location.