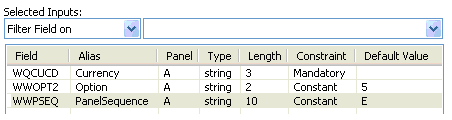
Specifying the input fields
- 
        Select the field that you want as an input field from
the Available Inputs table.
        
You can select multiple fields by holding the Ctrl key and the left mouse button.
 - 
        Click the >> button to add an input
          field in the Selected Inputs table.
        
All the selected fields are displayed in the table.
Click the << button to remove a field from this Selected Inputs table.
         - 
        Select a constraint type for from the list:
        
- 
              
Mandatory
For fields that are part of primary keys or required input
 - 
              
Optional
For fields that can be input or left out
 - 
              
Constant
For fields that should always be a specific known value and not input by the user
 
 - 
              
 - 
        Double-click the Default Value column to provide a default value for the field.
        
The fields ‘WWOPT2’ (Option) and ‘WWPSEQ’ (Panel Sequence) should be provided with a default value.
The common values for option are:
- 
              
1 = Create
 - 
              
2 = Change
 - 
              
3 = Copy
 - 
              
4 = Delete
 - 
              
5 = Display.
 
The field WWPSEQ (Panel Sequence) should match that of the flow you want to reproduce from Infor Smart Office. Refer to Infor Smart Office for the correct values.
Note: Panels A-D should not be used in the Panel Sequence input even if they occur in the flow. -