Creating a MAK project with new settings
Use this procedure to create a new simple or Java M3 Adaptation Kit (MAK) project.
- Start Eclipse.
- Select File > New > Project. The New Project wizard window is displayed.
- Select MAK > MAK Project and click Next. The Create new MAK project window is displayed.
- Select New Settings.
- Click Next. The System window is displayed.
-
Specify this information:
- Address
-
Specify the M3 server Address, for example, seli4002.
- Port
-
Specify the M3 server port.
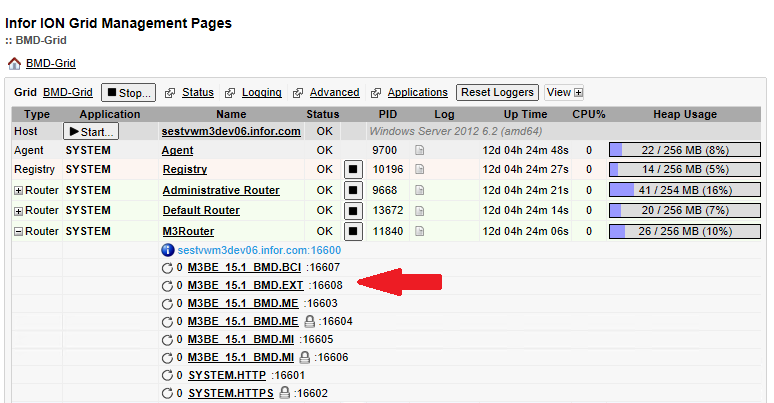
To get the port number, access LCM and open the Grid Home Page. Expand the view of the router M3Router. Find the port for the property xxx.EXT. Use this port number for M3 server.

- Root path
-
Specify or browse to the folder location of M3 BE installation on the M3 BE application server.
The path can be mapped to a network drive or to a shared folder, for example K:\M3Root or \\10.20.9.214\M3Root
- Configuration
-
Select a system configuration from the Configuration list that contains all the system configurations available under the particular M3 BE Server settings.
You cannot select a system configuration that has been used by an existing project, with the same environment in the current workspace.
- Click Next to set the general properties for the project.
-
Specify this information:
- Project type
-
Select the type of project: Simple or Java.
- User ID
-
Verify that this is your M3 BE user ID. This ID is used to activate the debug server and to authenticate a user while deploying to a sandbox.
- Preferred language code
-
Select the language code to use in the editors such as Database Interface Editor, Out Editor, and Screen Designer. This list contains both the language codes and the country codes. Select one of the codes to set your preferred language.
The default language code is the language of the system.
- Custom language file prefix
-
Optionally, type a three character prefix to use when working with a new custom language file. The prefix should be the same as the custom component that you are working with.
Any combination of three characters is acceptable except for MVX, HUM, and Mxx, where xx is a valid language code.
-
Click Finish.
The project is now created and is viewable in the MAK Navigator tab.
The full project name is concocted from the server address, server port, and system configuration details. The project node contains the Local folder and project entities grouped according to component. For example, MVX, MSE, and others.