Defining accounting units with a template

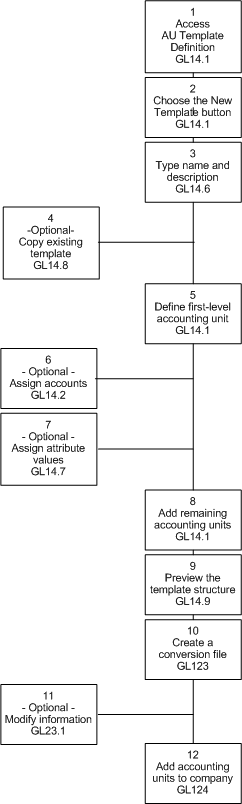
Templates provide an efficient way to add accounting units, enabling you to copy a portion of your company to another spot within the company or to another company. You can use a template to add up to five levels of accounting units dynamically. This procedure describes the process for using a template to add accounting units.

Procedure flow: defining accounting units with a template
  1. Access Accounting Unit Template Definition (GL14.1).
  2. Click New Template to access Define Accounting Unit Template (GL14.6).
  3. Specify the template name and description on GL14.6 and select the add form action.
  4. To copy and modify and existing template, click Copy on GL14.6 to access Copy Accounting Unit Template (GL14.8) and select the template that you want to copy.
    Note: When defining a template with multiple levels, start with the first level accounting unit, which becomes the parent accounting unit for the second-level accounting unit. The second-level accounting unit becomes the parent for the third.
  5. Define the first-level accounting unit in the template using GL14.1. Use these guidelines to specify the field values:
    Accounting Unit

    Specify a name and description for the accounting unit that you want to add to the template. You can define up to five levels of accounting units within a template, one at a time.

    Parent Accounting Unit

    If you are using a template that contains accounting units at multiple levels, then select the name of the parent accounting unit. The parent accounting unit is one depth level higher than the accounting unit that you are adding. If the accounting unit being defined is at the top level in the template, then it is automatically the parent accounting unit and this field should be left blank. This field is used to establish a roll-up structure in the template.

    Level Address

    You can specify an address to be assigned at the level depth defined for the accounting unit. The application must assign a temporary level address for each template record. If you leave this field blank, then a value of 1 is set as default. You can override this level address on Accounting Unit Template Conversion Load (GL123).

    Chart Name

    If you are defining a posting accounting unit, then you must specify or select the name of the associated chart of accounts.

  6. To assign accounts to the accounting unit, click Accounts and use Posting Accounts (GL14.2) to define posting accounts.
  7. To assign attribute values to an accounting unit within a template, click Attributes to access Attributes (GL14.7).
  8. Add the remaining accounting units to the template using the same process.
  9. Click Preview on GL14.1 to preview the structure of the template that you defined using Preview Accounting Unit Structure (GL14.9).
    Note: You can also use this form to delete an accounting unit template conversion record. Select Delete in the Action field.
  10. Use Accounting Unit Template Conversion Load (GL123) to create a conversion of accounting unit template data to be attached to a company, and, optionally, generate automatic variable addresses and accounting unit names.
    Note: You must run Accounting Unit Template Conversion Load (GL123) once in update mode to create the conversion the report is extracted from. Once this is created, you can run the program with No selected in the Update field to create just the report.
    1. Use the Main tab to define the parameters for the conversion load. Select Yes in the Update field the first time you run the report.
    2. Use the Accounting Unit Name tab to override the accounting unit names defaulted from the template. Select Yes in the Automatic field to indicate that the system should automatically insert, overlay, or append the accounting unit names from the template.
    3. Use the Description Naming tab to override the accounting unit descriptions defaulted from the accounting unit template. Select Yes in the Automatic field to indicate that the system should automatically insert, overlay, or append the text to the description from the template.
      Note: You must enter a level address here or on GL14.1 or all accounting units will have the same address.
    4. Use the Address Generation tab to assign a new level address to a template accounting unit. Select Yes in the Automatic field to indicate that the system must automatically override the defaulting address starting at the address that you define and increment by the number that you define in the Index field.
  11. To modify accounting unit information, use Template Accounting Unit Maintenance (GL23.1) to view and maintain the pending accounting units in the conversion file. Use these guidelines to specify the field values:
    Run Group

    You must specify or select the run group that uniquely identifies (in combination with the company and template) the conversion record that you want to display.

    Accounting Unit

    This field displays the accounting unit name that was used as default from the template or generated automatically if you selected automatic name generation on GL123. You can modify the accounting unit name.

    Level Address

    This field displays the address to be assigned at the level depth defined for the accounting unit. You can modify the address on this form. If you selected automatic generation on the Address Level form tab of GL123, the address that you specified on GL123 displays. If you did not select automatic generation, then the address defaults from the accounting unit template.

    Mass Info Button

    To add accounting unit information applicable to all the accounting units displayed on GL23.1, click Mass Info to access Mass Add Accounting Unit Information (GL23.3). Use this form to add a person responsible, an attribute template, address code, and user fields to all accounting units within a run group, company, and template.

  12. Use Mass Accounting Unit Addition (GL124) to add the accounting units to the company. Use these guidelines to specify the field values:
    Run Group

    You must specify or select the run group that you used when running GL123.

    Update

    You can use this field to determine how much of an update to perform.

    • Select N (No Report Only) to generate a report of what records will be updated, without actually performing the update.

    • Select A (All) to update all records once they are all error-free. This option produces a report of records that contain errors and does not update any records.

    • Select P (Partial) to update all error-free records and produce a report of records not processed.

    Note: To avoid errors when using the accounting unit template, be careful of these:
    • If an accounting unit already exists at the address that you have specified, then the template will not overwrite it with a new accounting unit.

    • You cannot add more levels of accounting units than you have defined for the company.

    • You cannot exceed the level size defined for a level. For example, if you have a level size of 2, then you will not be able to increment level addresses by 100.

Related reports and inquiries

To Use
List the detail lines of each accounting unit within a template Accounting Unit Template (GL214)
List accounts associated with posting accounting units within an accounting unit template Accounting Unit-Accounts Template Listing (GL216)
List the accounting unit records created in the template conversion for a run group, company, and accounting unit template Template Conversion Listing (GL223)