Creating and processing reportable income reports, printed forms, and CSV or XML files for IRIS filing
- Create a 1099 reportable income report
- Adjust a 1099 reportable income or invoice
- Create reportable income reports, printed forms, and CSV or XML files for IRIS filing
- Create 1099 corrected returns for printed forms or XML files
Before processing reportable income, you must follow these steps:
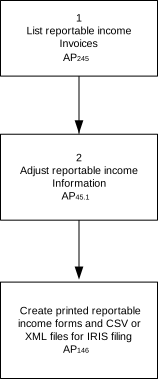
To verify reportable income tracking throughout the year and create and process reportable income reports, printed forms, CSV files, and XML files for regulatory reporting, follow these steps:
- To create a list of all invoice payments that includes a vendor's reportable income balance for a specified payment date range, run Reportable Income Report (AP245):
- On the Main tab, specify this information:
- Reportable Income Group
- Select a valid reportable income group that represents a group of companies and process levels in the Accounts Payable application.
- Vendor Class
- To include invoice payments with an assigned specific vendor class, specify or select a vendor class.
- Currency
- Specify or select a valid currency code for the 1099 reportable income invoice reports.
- Payment Dates
- To include reportable income invoices for a specific range of payment dates in the vendor's 1099 reportable income report, specify or select the starting and ending payment dates.
- Income Code
- To include invoice payments with a specific income code in the reportable income, specify or select the income code.
- Report Sequence
- Select whether to sort the 1099 reportable income reports in vendor, process level, or vendor class. The default report sequence is V.
- Vendor Sequence
-
Select whether to sort vendors in vendor number, search name, or tax ID order. The default vendor sequence is N.
Note: When you run the report with the Vendor Sequence field set to T, all vendors without a tax ID are printed at the beginning of the report.
- Include Comments
- Select whether to include vendor and invoice comments on the list of all invoice payments. The default include comments is Y.
- Include Voids
- Select whether to include voids on the list of all invoice payments. The default include voids is N.
- Include Archive Records
- Select whether to include archived payments on the list of all invoice payments. The default include archive records is N.
- Report Type
- Select whether the type of 1099 reportable income report to create is miscellaneous, interest income, dividend, government payments, merchant card and third-party network payment, or non-employee compensation.
- Hide Vendor Pmt Records
- Select whether to include Vendor payment records with values less than the defined minimum amount in the box number. The default value is N.
- IRIS Filing
-
Select whether to validate payee information for IRIS filing. If you set this field to N, the report generates based on the current functionality without additional validation.
When set to Y, the system validates Vendor/Non-AP Vendor payee information based on TIN Type and validates TTOC when Cash Tip is reported:Error messages are generated if required payee information or TTOC is missing.
- TIN Type is defined as EIN or SSN.
- If TIN Type is SSN, the Payee First Name field and Payee Last Name field must contain values.
- If Cash Tips are reported, TTOC must be assigned in Vendor Setup or CB Payment.
- If there is a required minimum amount to create values on the 1099 reportable income report box fields, then specify the minimum amount in the numbered Box fields on the Misc, Interest, Dividend, Gov't Payments, and NEC tabs.
- On the Merchant Group tab, specify this information:
- Program
- Select which P-Card program to use when creating the 1099 reportable income report.
- Merchant Group
- Select which merchant group to limit the 1099 reportable income report.
- Merchants
- Select which merchant to limit the 1099 reportable income report.
- Click Submit.
- On the Main tab, specify this information:
- To add, change, or delete an income code from an invoice or change the reportable income amount applied to an invoice, run Reportable Income Adjustment (AP45.1).
- To create reportable income forms, run 1099 Output Creation (AP146):
- On the Main tab, specify this information:
- Reportable Income Group
- Select a valid reportable income group that you previously set up using Reportable Income Group (AP02.1).
- Currency
- Specify or select a valid currency code for the 1099 reportable income forms.
- Report Type
-
Select the type of forms to create:
- Miscellaneous
- Interest income
- Dividend
- Government payment
- Merchant card and third-party network payment
- Non-employee compensation
- Payment Dates
- To include reportable income invoices for a range of payment dates, specify the starting and the ending payment dates.
- Print Sequence
-
Select the 1099 reportable income forms to sort:
- Vendor number
- Tax ID
- Search name order
- Name Option
- Select to print the vendor name or the legal vendor name on the 1099 reportable income forms.
- Filing Option
- Select P to create Print output.
- Print Type
-
Select the type of 1099 reportable income form you want to create:
- G - 1-Step Correction
- Z - 2-Step Correction - Step 1
- C - 2-Step Correction - Step 2
Note: You can create an Original (blank) and Correction form. If you leave this field empty, the default print type is <blank>. - Alignment Forms
- Specify the number of alignment forms required before printing reportable income forms. If this field is left blank, then there are no alignment forms used.
- Truncate Tax ID
-
Select Y to show only the last four digits of the reportable income group (payer) tax ID on the AP146 control report. Otherwise, select N.
Note: This option does not change the tax IDs printed on the 1099 forms. To mask the recipient TIN on printed forms, use Mask Recipient TIN.
- Mask Recipient TIN
-
Select Y to display only the last four digits of the recipient's tax ID on the printed forms. Otherwise, select N.
Note: This field only applies to printed forms.
- On the Misc tab, specify this information:
- Box
- Each box corresponds to a box with the same number on the 1099 form. Specify an amount in the corresponding numbered box field to indicate the minimum amount required to create a form.
- On the Int tab, specify this information:
- Box
- Each box corresponds to a box with the same number on the 1099 form. Specify an amount in the corresponding numbered box field to indicate the minimum amount required to create a form.
- On the Dividend tab, specify this information:
- Box
- Each box corresponds to a box with the same number on the 1099 form. Specify an amount in the corresponding numbered box field to indicate the minimum amount required to create a form.
- On the Gov’t Payments tab, specify this information:
- Box
- Each box corresponds to a box with the same number on the 1099 form. Specify an amount in the corresponding numbered box field to indicate the minimum amount required to create a form.
- On the NEC tab, specify this information:
- Box
- Each box corresponds to a box with the same number on the 1099 form. Specify an amount in the corresponding numbered box field to indicate the minimum amount required to create a form.
- On the Merchants tab, specify this information:
- Program
- Select the P-Card program to use when creating the 1099 reportable income forms.
- Merchants
- Select which merchant to limit the 1099 reportable income forms.
- On the Options tab, specify this information:
- Vendor
- Select up to 10 vendors so that you can limit the 1099 reportable income forms to specific vendors.
- Click Submit.
- On the Main tab, specify this information:
- To process reportable income CSV files for upload to the IRS IRIS Taxpayer Portal, run 1099 Output Creation (AP146).
- On the Main tab, specify this information:
- Reportable Income Group
- Select a reportable income group that you previously set up by using Reportable Income Group (AP02.1).
- Currency
- Select a valid currency code for the 1099 reportable income output.
- Report Type
-
Select the type of 1099 reportable income file to create:
- Miscellaneous
- Interest income
- Dividend
- Government payments
- Merchant card and third-party network payments
- Non employee compensation
- Payment Dates
- To include reportable income invoices for a range of payment dates, specify the start date and end date.
- Print Sequence
-
Select the sort sequence for the 1099 reportable income forms:
- Vendor number
- Tax ID
- Search name order
- Name Option
- Select whether to use the vendor name or legal vendor name on the 1099 reportable income output.
- Filing Option
- Select C - CSV IRIS to create a CSV file for upload to the IRS IRIS Taxpayer Portal.
- On the Misc tab, specify this information:
- Box
- Each box corresponds to the box with the same number on the 1099 reportable income form. Specify an amount in the corresponding box field to indicate the minimum amount that is required to create a reportable income file.
- On the Int tab, specify this information:
- Box
- Each box corresponds to the box with the same number on the 1099 reportable income form. Specify an amount in the corresponding box field to indicate the minimum amount that is required to create a reportable income file.
- On the Dividend tab, specify this information:
- Box
- Each box corresponds to the box with the same number on the 1099 reportable income form. Specify an amount in the corresponding box field to indicate the minimum amount that is required to create a reportable income file.
- On the Gov't Payments tab, specify this information:
- Box
- Each box corresponds to the box with the same number on the 1099 reportable income form. Specify an amount in the corresponding box field to indicate the minimum amount that is required to create a reportable income file.
- On the NEC tab, specify this information:
- Box
- Each box corresponds to the box with the same number on the 1099 reportable income form. Specify an amount in the corresponding box field to indicate the minimum amount that is required to create a reportable income file.
- On the Merchants tab, specify this information:
- Program
- Select the P-Card program for which to create the reportable income files.
- Merchants
- Select the merchant for which to create the 1099 reportable income files.
- On the File Name tab, specify this information:
- 1099 Filename
- Specify a user-defined filename for the CSV output file.
If this field is blank, the system uses this default filename format:
<TAXYEAR>_1099<FORM>_<YYYYMMDD>_<HHMMSS>_<SEQ>.csvIf you specify a user-defined filename, the system uses this format:
<Filename>_<YYYYMMDD>_<HHMMSS>_<SEQ>.csv - On the Options tab, specify this information:
- Maximum number of records per CSV or XML file
- Specify the maximum number of records per CSV or XML file. If the total number of records exceeds this value, the system splits the output into multiple files. Each additional file contains the next set of records. If no value exists, the system uses 250 records per file, which is the IRS IRIS Taxpayer Portal limit.
- Vendor
- Select up to 10 vendors to limit the 1099 reportable income files to specific vendors.
- Click Submit.
- On the Main tab, specify this information:
- To process reportable income XML files for submission through IRIS Application-to-Application (A2A), run 1099 Output Creation (AP146).
- On the Main tab, specify this information:
- Reportable Income Group
-
Select a reportable income group that you previously set up using Reportable Income Group (AP02.1).
- Currency
-
Select a valid currency code for 1099 reportable income output.
- Report Type
-
Select the type of 1099 reportable income file to create:
- Miscellaneous
- Interest income
- Dividend
- Government payments
- Merchant card and third-party network payments
- Non employee compensation
- Payment Dates
-
To include reportable income invoices for a range of payment dates, specify the start date and the end date.
- Print Sequence
-
Select the sort order for the 1099 reportable income forms:
- Vendor number
- Tax ID
- Search name order
- Name Option
-
Select whether to use the vendor name or the legal vendor name on the 1099 reportable income files.
- Filing Option
-
Select the XML IRIS filing option:
- T - XML IRIS (Test) creates an XML file for submission to the IRS IRIS Test environment.
- X - XML IRIS (Prod) creates an XML file for submission to the IRS IRIS Production environment.
Note:
Use T (Test) to validate the XML files with the IRS before submitting to the production environment. After testing is complete, use X (Prod) for IRS filing.
- XML Type
-
Select the XML type to indicate the XML transmission submitted to IRS IRIS through Application-to-Application (A2A).
- O - Original creates an original transmission.
- R - Replacement creates a replacement transmission for a previously rejected IRIS transmission. The Receipt ID field on the Options tab is required to identify the transmission being replaced.
- G - 1-Step Correction creates a correction transmission that uses the IRS 1-Step Correction process. The Receipt ID, Vendor, and Record ID fields on the Options tab are required to identify the records being corrected.
- Z - 2-Step Correction - Step 1 creates the first-step transmission of a 2-Step Correction process. All payment amounts in the transmission are reported as zero to remove previously reported information. The Receipt ID, Vendor, and Record ID fields on the Options tab are required to identify the records being corrected.
- C - 2-Step Correction - Step 2 creates a new transmission that contains the corrected information for the second step of a 2-Step Correction process.
Note: XML Type is applicable only when Filing Option is set to X - XML IRIS (Prod) or T - XML IRIS (Test).
- On the Misc tab, specify this information:
- Box
- Each box corresponds to the box with the same number on the 1099 reportable income form. Specify an amount in the corresponding numbered box field to indicate the minimum amount required to create a reportable income file.
- On the Int tab, specify this information:
- Box
- Each box corresponds to the box with the same number on the 1099 reportable income form. Specify an amount in the corresponding numbered box field to indicate the minimum amount required to create a reportable income file.
- On the Dividend tab, specify this information:
- Box
- Each box corresponds to a box with the same number on the 1099 reportable income form. Specify an amount in the corresponding numbered box field to indicate the minimum amount required to create a reportable income file.
- On the Gov't Payments tab, specify this information:
- Box
- Each box corresponds to the box with the same number on the 1099 reportable income form. Specify an amount in the corresponding numbered box field to indicate the minimum amount required to create a reportable income file.
- On the NEC tab, specify this information:
- Box
- Each box corresponds to the box with the same number on the 1099 reportable income form. Specify an amount in the corresponding numbered box field to indicate the minimum amount required to create a reportable income file.
- On the Merchants tab, specify this information:
- Program
- Select the P-Card program for which to create the reportable income files.
- Merchants
- Select the merchants for which to create the 1099 reportable income files.
- On the File Name tab, specify this information:
- 1099 Filename
-
Specify a user-defined file name for the XML output file.
If you leave this field blank, the system uses this default file name format:
<TAXYEAR>_1099<FORM>_<YYYYMMDD>_<HHMMSS>_<SEQ>.xmlIf you specify a user-defined file name, the system uses this format:
<User-Filename>_<YYYYMMDD>_<HHMMSS>_<SEQ>.xml
- On the Options tab, specify this information:
- Maximum Number of Records per CSV or XML File
-
Specify a user-defined maximum number of records per CSV or XML file. If the total number of records exceeds this limit, the system automatically splits the output into multiple files. Each additional file contains the next set of records.
If you do not specify a value, the system uses the IRS IRIS maximum of 30,000 records per file.
- Vendor
- Select up to 10 vendors to limit the 1099 reportable income files to specific vendors.
- Click Submit.
- On the Main tab, specify this information:
Related reports and inquiries
| To | Use |
|---|---|
| List income codes or income withholding codes | Accounts Payable Code Listing (AP205) |