Create service properties for the new AD FS service
- From the View Summary form of the service for AD FS that you created in the previous procedure, click the Service Properties tab.
- From the toolbar, select Action->Create.
-
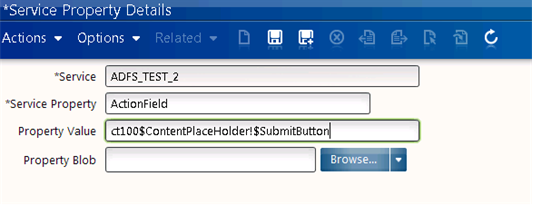
On the dialog box that appears, add the "Action Field" service property by populating the fields shown below. Be sure to type the Service Property and Property Value information exactly as shown.
-
Service Property: ActionField
-
Property Value:
ctl00$ContentPlaceHolder1$SubmitButton

-
- Click the Save New icon when you are finished typing information for the ActionField service property.
-
Add all service properties in the following table in the same way that you added ActionField.
Property name Property value ActionField Type the following exactly as shown here:
ctl00$ContentPlaceHolder1$SubmitButtonUsernameField Type the following exactly as shown here:
ctl00$ContentPlaceHolder1$UsernameTextBoxPasswordField Type the following exactly as shown here:
ctl00$ContentPlaceHolder1$PasswordTextBoxActionFieldValue Sign In DbField __db EventValidationField __EVENTVALIDATION ViewStateField __VIEWSTATE SSOProtocol WS-Federation FQDN Supply the fully qualified name of your AD FS server HTTPPort This is the HTTP port for your AD FS server.
If you server does not have an HTTP port, set this to "-1".
HTTPSPort This is the HTTPS port for your AD FS server
If you server does not have an HTTPS port, set this to "-1".
HomePageURL This is the AD FS IdP URL. For example:
https://YourServer.YourDomain.com:port/adfs/ls/LoginPageURL Supply the same URL that you used for HomePageURL. DomainControllerFQDN Supply the domain name for your installation in the format YourDomain.com - When you complete typing data for the last property, click Save (not Save New). You are done adding service properties and can exit Infor Rich Client.