Update the Infor System Console server-side component
The Infor System Console install program requires a configuration protection passkey.
You must know this passkey before you attempt to run the installation program. If this is the first time you are running the install program, you will be required to define the passkey following passkey complexity rules. For more information, see Administering the Configuration Protection Passkey.
- Navigate to where you downloaded the SystemConsoleWebServices.jar file.
- At the command line, type
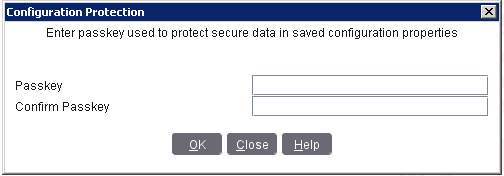
java -jar SystemConsoleWebServices.jar - At the Configuration Protection dialog box, enter the configuration passkey for the install program, confirm the passkey and then click OK. Click the Help button to view the passkey complexity rules.

- Select Update an existing SysConsole and click Next.
- Select Update and click Next. (If the update fails, you can re-run the installation/update program and select either Restart or Reload at this point.)
- Click Update (or Reload or Restart if you are re-running the program. If you select Reload or Restart, select Update again and then click Next).
- If you do not need to make any changes to the current values, simply click Next repeatedly to proceed through the remaining screens.
You can also make edits if necessary as you move through the screens.
- If you are still using the Derby database with the Infor System Console, you will be presented with the choice of switching to using an RDBMS. You will be presented with this choice whenever you run the update program until you switch to an RDBMS. Once you switch to an RDBMS, you will not be presented with the choice of switching and you will not be able to switch back to the Derby database. The following steps assume you selected Yes when asked if you want to use an RDBMS:
- On the Configure RDBMS form, for the database server, specify SQL Server, IBM DB2, or Oracle. It must be the same as your Infor Lawson System Foundation database server.
- If you selected SQL Server, specify values for the following fields:
- Server Name
- The Microsoft SQL Server instance name.
- Database Name
- The name of the database created for the Infor System Console.
- Schema Name
- The name of the schema for the Infor System Console in the database.
- User
- The name of the user with login credentials for the Microsoft SQL Server database.
- Password
- The password for the user.
- If you selected IBM DB2, specify values for the following fields:
- Platform
- Select DB2 Enterprise Edition 10.5/11.1.
- Hostname
- The fully qualified hostname of the DB2 server.
- Port
- The connection port of the DB2 server.
- User
- The name of the user with login credentials for the IBM DB2 database.
- Password
- The password for the user.
- Database Name
- The name of the database created for the Infor System Console.
- Schema Name
- The name of the schema for the Infor System Console in the database.
- If you selected Oracle, specify values for the following fields:
- Hostname
- The fully qualified hostname of the Oracle server.
- Port
- The connection port of the Oracle server.
- User
- The name of the user with login credentials for the Oracle database.
- Password
- The password for the user.
- Connection Type
- TNS or SID only. The Oracle server connection protocol.
- SID or Service Name
- If the connection type is TNS, provide the Oracle service name. If SID, provide the Oracle SID.
- Click Finish.
- If you switch to using an RDBMS with the Infor System Console, run the program to migrate the data from the Derby database to the RDBMS. See Migrating the ISC database data from Derby to an RDBMS.
- Deploy the lsmm.ear file.
- Regenerate plugins for WebSphere.
- Restart the application server.
- Verify the update. See Verifying the Infor System Console and the Infor Lawson System Mobile Monitor.