Working with Application Data
The subsections that follow contain information about ways to select and update application data.
Understanding Select tools
A select tool is an icon that is displayed to the right of some fields, usually as a small button with a triangle. Its presence means that you can select values for the field rather than only typing values directly.
Various types of tools for selecting data is displayed on Lawson forms, depending on the kind of data you are required to select. Typical tools are:
-
Drop-down list
-
Calendar
-
Select dialog box
-
Drill
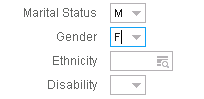
When you click the select indicator, a drop-down list shows if the field is one that you can use to select from a limited set of valid values—for example, yes/no, male/female, or hourly/salaried.
Defining Calendar and Date fields
Calendar fields are sometimes used for date fields. When they occur, you can click the select indicator to bring up a calendar. The current date is highlighted.
If you enable this capability, you can type six digits of a date and additional digits for year and any required formatting are automatically provided. For example, you could specify "062706" and the result would automatically be "06/27/2006", if the field you are typing into requires the separators. This capability is called Advance on 6-Digit Date Entry and is enabled through the User Options menu. From the toolbar, select Preferences (checkmarks) and then select User Options.
Defining a Name field
Users of Lawson Portal might see an alternate language name field. This depends on if the client has done the necessary setup and configuration for alternate names.
Defining Line action codes
Line action codes represent the functions available for working with detail records on detail forms and on the detail area of a header/detail form. You enter these codes in the line action code field for each detail line to indicate what you want to do with each detail record. The line action code field is the left-most field on the detail line and is typically labeled "FC."

Examples of typical line action codes include:
| Code | Description |
|---|---|
| Add (A) | For adding new detail records. |
| Change (C) | For changing existing detail records. |
| Delete (D) | For deleting existing detail records. |
| Select (X) | For selecting detail records (such as when you want to transfer the data to another form). |
Defining Drill Around
You can use the Drill Around® feature to view information without having to transfer to the form or forms where that information is maintained. For example, you could use the Drill Around feature if you were currently on a Benefits form updating benefit records, and your supervisor asked you to find an employee's salary history. From any Benefits form with a Company field, you could enter the number of the employee's company in the Company field and then use the Drill Around feature to view information about that employee.
The Drill Around feature is not available from all fields. It is available for a field if, when you right-click on the field, Drill Around appears as a choice.
The Drill Around feature uses the Drill Around form. The Drill Around form contains a Printable View option and an Explorer View option.
Defining Select form
When you click the select indicator, the Select form appears if the valid values for the field come from another form. For example, the valid values for a vendor field come from the vendors set up through the application form for vendors. If you access the form for vendors, you can define additional vendors or you can delete vendors.
Use the Select form to select a value for a form field rather than view information about an item. The Select form appears when you use the Select indicator or right-click on a field and then click Select. It is not available for every field. It is available for a field if the Select indicator appears next to the field and if the field is one whose valid values come from another form.
When the Select form first appears, it contains a list of the valid values for the field or a list of lookup methods. For example, as in the case of employees, the lookup methods are employee by number, by name, by social number, and so on. Depending on which lookup method you select, a list of employees by number, name, and so on is displayed.
The Select form usually includes additional data about each item and thus helps you select the correct value. In addition, you can use the Customize option to list additional data associated with each item in the Select form.