Creating a Wizard: A step-by-step example
This section is a series of examples of how to create a wizard, starting with an example and building on it to add more complexity.
Example 1: Automating a Form Action
Suppose you want to create a wizard that would inquire on a specific field. You would:
-
Run the Wizard Designer and select the data area, system code, and form.
-
Select the field you want to inquire on by clicking its name in the list on the left side of the Wizard Designer form.
-
Select Inquire in the form action select tool on the right side of Wizard Designer form.
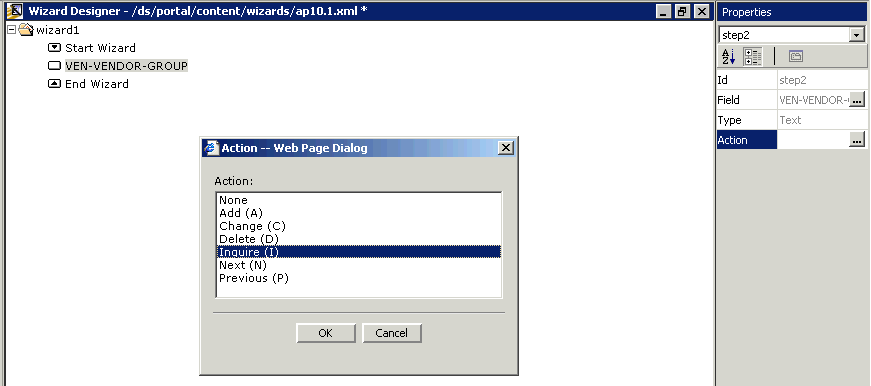
If the inquire is the only action you need for the wizard, you can use the File menu to save and close the wizard.
Example 2: Adding Explanatory Text to a Step
Application help text that is created by Lawson is intended for all customers and pertains to the application as shipped. You might have procedural instructions to convey to your users that apply only to your company. You might also have made modifications to a Lawson application that are not covered by the Lawson help text. You can use the Wizard Designer to provide information for these situations.
The previous section showed how to create a wizard to run an inquire on a field. Suppose you want to create a wizard that would inquire on a specific field, and then tell the user what to do based on the results of the inquire. You would:
-
Run the Wizard Designer and select the data area, system code, and form.
-
Select the field you want to inquire on by clicking its name in the list on the left side of the Wizard Designer form.
-
Select Inquire in the form action select tool on the right side of Wizard Designer form.
-
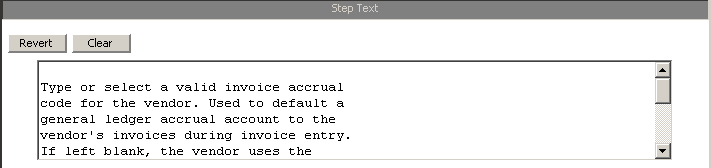
Click in the Text box, which contains the help text that has already been created for the form. (If the text box is blank, it means Lawson has not delivered help text for this field. This would be normal, for example, for a hidden field.) Type the information you want to add. You can add new text anywhere by clicking in the new section. You can also delete any text that is not relevant at your site. Use the Clear button to remove all help text currently appearing in the text box. Use the Revert button to reinstate the Lawson field help.
Example 3: Creating a Conditional Branch Step (Basic Steps)
You can create a wizard that, based on data that is present in a field, performs an action for the user. If the condition is met, the branch step is performed.
The previous section showed how to create a wizard to run an inquire with specific instructions about what the user should do based on the results of the inquire.
You could further modify this wizard so that, instead of telling the user what to do, the wizard could perform the action for the user, depending on what the user typed in the field. To create a branch in a wizard:
-
Run the Wizard Designer and select the data area, system code, and form.
-
At the prompt, assign a name to the wizard.
-
Select the field you want to inquire on by clicking its name in the list on the left side of the Wizard Designer form.
-
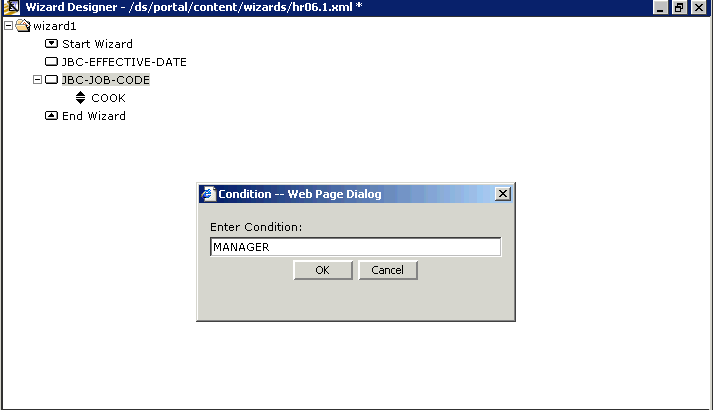
Click Branch.
-
On the Wizard Branch dialog box, type the Test Condition, that is, the value that causes the branch step to be performed. Click OK when you are finished typing the value.
-
With the new branch selected, click the field that represents the first step in the branch.
-
Add other steps, as required.
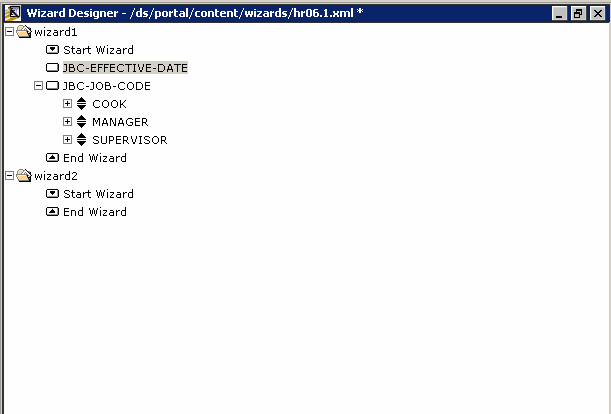
Example 4: Branching Step Details
The example wizard in this section is not intended to be a real-world example. It describes in detail how branching might used for a hypothetical wizard (for form HR06.1).
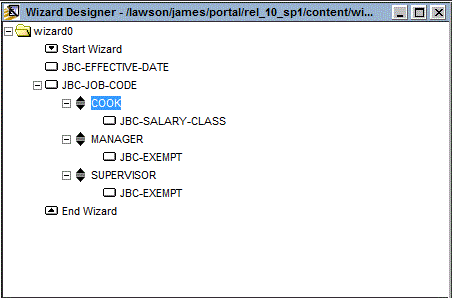
The example wizard has three branches from the JBC-JOB-CODE field that check for types of job codes, COOK, MANAGER, and SUPERVISOR. If the user types or selects COOK in the field, the wizard prompts the user to make a selection in the JBC-SALARY-CLASS field (a field that determines if an employee is salaried or hourly). If the user types or selects MANAGER or SUPERVISOR in the JBC-JOB-CODE field, the wizard prompts the user to make a selection in the JBC-EXEMPT field (a field that determines if an employee is exempt from overtime).
Example 5: Adding Another Wizard to a Form
Because a form can be used for more than one purpose, you can create multiple wizards for a form.
If multiple wizards exist for a form, users are prompted to select the wizard they want to run when they select Form Wizard from the Lawson Portal help menu. This form clip show the pop-up box that is displayed when multiple wizards exist for a form.

When you create an additional wizard for a form where at least one wizard already exists, you must take care to create the new form in such a way that you do not overwrite existing wizards. As a first step, check to see if a wizard already exists. You can do this by viewing the location .../content/wizards to see if an XML definition already exists for the form for which you want to create a wizard. For example, if you want to create a wizard for the form Vendor (AP10.1) and a file called ap10.1.xml exists in .../content/wizards, it means a wizard has already been created for Vendor.
If a wizard exists for the form, open the wizard and use the Wizard tool to create your new wizard. Do not create the new wizard by selecting New from the Design Studio File menu. When you save a wizard created in this way, you overwrite any previously created wizards.
When you are ready to create an additional wizard, ensure your cursor is positioned after the last step in the current wizard and then click the Wizard tool. Now you can create steps for the new wizard. When you save the new wizard, it is stored in the appropriate location so that it can be accessed with the form.