To add a new attribute to Lawson Schema
- From the Schema Editor main menu, right-click on RM Attributes and then select Create Attribute Definition.
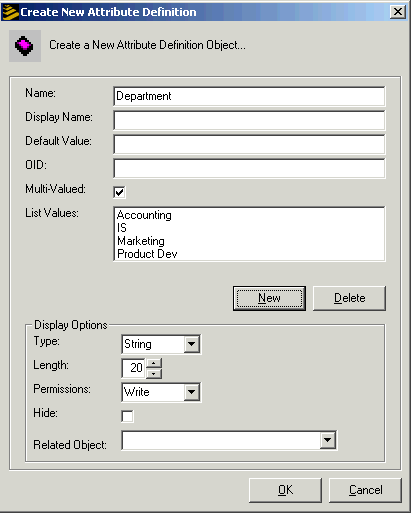
You will be at the Create New Attribute Definition dialog box.

- Make selections for the following:
Property Description Name Name for your new attribute. This is the unique name that you will use to reference the attribute in security rules. Display Name If the Display Name attribute appears, type the same name that you used for the Name attribute. Default Value You can supply a default value for the new attribute. This value will populate the attribute any time you add a new resource. OID OID (Object Identifier) creates an attribute that uniquely identifies object classes and attributes within the LDAP schema. They are represented as strings of period-delimited sets of numbers. All LDAP object classes and attributes have short names, such as "cn" and OIDs, such as "2.5.4.3." There are two methods for creating the unique identifiers. You can:
-
Leave the property blank. This number is generated.
-
Supply your own ID number. This method applies only to experienced LDAP administrators. If you use this method, you must ensure that the OID is unique. If the OID is not unique, the LDIF import will not be successful. You might choose to supply OID if, for example, you want to use an OID that is registered with an official issuant such as IANA or ANSI.
Multi-Valued If the new attribute can have multiple values (that users who add attributes can separate with a comma), select this property. List Values If you want users who add this attribute to select values from a list rather than typing them, add the items to the list here. You do this by clicking the New button, typing the value and then clicking OK. (If you have added a list value that you want to remove, you can select it and then click Delete.)
A value list can be Multi-Valued. If you select both Multi-Valued and List Values for an attribute, it means the user can select more than one property from the list for the attribute.
Type This is the type of data that the attribute contains. Options are:
-
String: alpha-numeric data. This is the default and most commonly used type.
-
Boolean: Used for true or false, and, in some cases, yes or no data.
-
Date: Data is stored in a date format.
-
Number: Data is stored as a number; used primarily for calculated data.
Length The expected length of the longest piece of data. For example, if you are creating an attribute called Department that will store names of departments at your site, and the longest department is "Product Development" (19 characters), you could assign 19 for the length of the attribute data. Permissions Permissions are assigned to the attribute when you create it. By default, permissions are set to Write, which means that the user who works with the attribute has full access. You can also set permissions to Read, which means that the user can view the data but cannot update the attribute.
When an attribute is set to Read, it cannot be updated by the Resource Management Administrator tool. If you plan to set an attribute to Read eventually, you might need to leave it set to Write until you are finished populating it.
Hide If you don't want the attribute to be visible on the dialog box when someone creates or updates a resource, select this option. The data for the attribute remains in the LDAP directory but is not visible. Related Object You can select an object to which this object will be related. This means that from your new attribute, you can select objects that have already been defined. -
- Click OK when you are finished adding properties. You should receive the message "Add Successful."
Note: Attributes that you have created can be modified later. If you modify an attribute for which LDIF has already been uploaded to a server, you will have to run the ldifgen / ldif load process again to activate the change.
You are now ready to link the new attribute to a resource.