Creating multiple tax connectors

If there is a need to handle multiple tax connectors in the same document flow, the file connection point for these tax connectors is added into the same document flow. For example, if there need to be a different tax connector per accounting entity.

After you configured a document flow in Uploading a document flow, you can create multiple file connection points for the tax connectors.
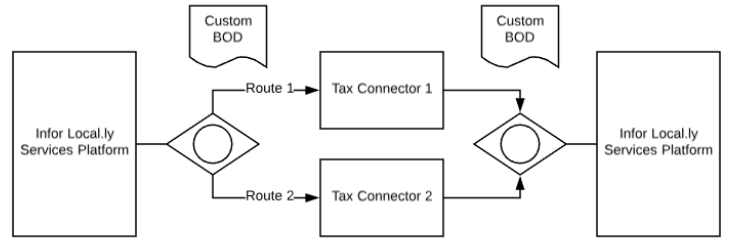
  1. Open a document flow.
  2. Drag the Routing icon in between LSP out and Tax Connector.
  3. Move the Tax Connector Box to the first branch of the Routing.
  4. Add a new File connection point to the second branch of the Routing. Drag File to the empty branch.
  5. Specify the Name on the new file connection point. For example, Tax Connector 2.
  6. Under File Connector list, select your desired 2nd tax connector.
  7. Click the document icon after the 2nd tax connector
  8. Click plus (+) sign to add the correct BOD.
  9. Select the check box beside the document displayed
  10. Click OK to add them to the document flow.
  11. Optionally, perform these steps if three or more tax connectors are needed:
    1. Right-click inside the Router.
    2. Click Add Branch.
    3. Repeat steps 4 - 10.
  12. Click the Router to get access to the properties.
  13. Under Routing Properties, click Attributes.
  14. Click plus (+) sign.
  15. Under Select Attributes, click the plus (+) sign.
  16. Drill down into the BOD and select your routing attribute.
  17. Click OK.
  18. Under Routing Properties, click Conditions.
  19. Create one condition per branch.
  20. Click plus (+) sign.
  21. Specify the Name to keep the conditions unique. For example, name it after the BOD value to be compared, the accounting entity value, or similar values.
  22. Under Attribute, select the BOD element or attribute previously selected in the Attributes tab.
  23. Under Operator, select a value. For example, =.
  24. Specify the Value to be found in the BOD, for the selected BOD element/attribute. For example, the AccountingEntityID that is expected – AE_ID1
  25. Click OK.
  26. Repeat steps 19 – 25 to correspond to the number of branches made.
  27. Under Used Condition, select which condition every branch should be using.
  28. When done, click Save. The condition names will now be displayed for the corresponding branch it is valid for
    See this diagram for more information:
    Multiple_tax_connectors