Workbench Navigation
Toolbar
This section is used to save, refresh, revert, convert and filter the data.
The details of the various options used are as follows:
- : Submits the workbench changes to the application.
- : Reverts the changes made to the selected requisition lines.
- : Updates the purchase requisition lines from the the application.
- : Converts the selected requisition lines to purchase order or purchase requisition based on the value set in the Conversion Type column.
- Add to Existing RFQ: Adds the selected RFQ Lines to the existing RFQ Order. An information message is displayed in the Workbench message pane after the converted lines are added to the specified RFQ .
Note: The Conversion Type field must be set to RFQ for all the selected RFQ lines to be added to an existing RFQ.
- Requested Date: This field is used to filter the data based on the date of request of the purchase requisition. Based on the requisition filter, the requisition lines are displayed.
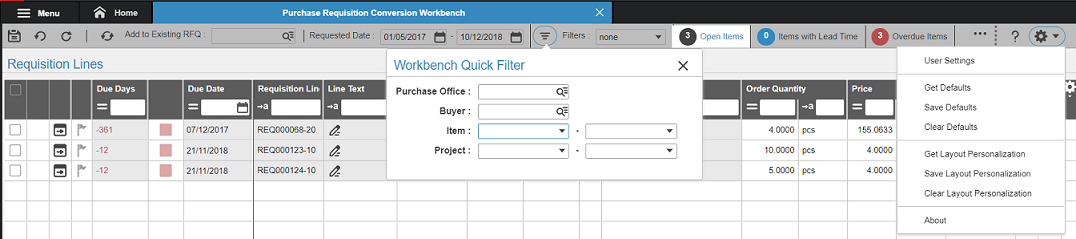
- Filters : You can click the Filter icon to access the Workbench Quick Filters. You can filter the data based on:
- Purchase Office: The purchase office to search the requisition lines.
- Buyer: The buyer to search the requisition lines.
- Item: The range of items to search the requisition lines.
- Project Range: The range of projects to search the requisition lines.
- Personalized Filters: The users can define the filter based on the requirement.
- Open Items: Displays the number of open requisition lines. When you click this button, the requisition lines are filtered based on the open items.
- Items with Lead Time: Displays the number of requisition lines with lead time. When you click this button, the requisition lines are filtered based on the items with lead time.
- Overdue Items: Displays the number of requisition lines with overdue items. When you click this button, the requisition lines are filtered based on the overdue items.
- The Grid based and Card based icon: This icon is used to change the view from the default grid view to the card view.
- Settings and Help: The settings menu includes options such as default/layout persistence. The help opens the online help.
Note:
The requisitions are displayed based on the Purchase Office and Buyer. The possible scenarios are:
| Purchase Office | Buyer | Displayed requisitions |
|---|---|---|
| Yes | No | The application displays all approved requisitions for all Buyers linked to the specified Purchase Office. The application also considers the requisitions for which a buyer is not specified. |
| Yes | Yes | The application displays all approved requisitions linked to the specified Buyer and Purchase Office. |
| No | No | The application displays all approved requisitions. |
Icons
- The
 detail icon allows the user to modify the REQ line data from the Grid/List view.
 - The
 icon indicates, for an item/supplier combination, that there are approved suppliers and/or supplier(s) from whom the item is bought. If the icon is not enabled, the new item has no procurement history and no specific suppliers is available. This icon on the Card view is used to add groups in the Card grouping section.
 - The
 icon allows the user to access the supplier related information. Click the icon to access the Supplier Selection window that displays list of approved and available suppliers along with the pricing information.