Workbench Navigation
Toolbar
The following option are available: 
- Unassign : You can use this option to un-assign an engineer from the selected serialized item.
- Items to show: This displays a list of map layers. When you select/unselect an item, the item hides/displays the respective layer on the map. By default, all the layers are selected.
- Item Filter: This value can be set to Assigned and/or Unassigned. By default both Assigned and Unassigned are selected. When the user unselects an item, for example Assigned, only the unassigned items are visible on the workbench (on map and also on Grid).
- Refresh: Refreshes the data for the selected territory plan(s).
- Zoom To Fit: This option allows you to increase the map size to the optimum level, so that all the serial items on the map are visible.
- Zoom in, Zoom out : This option is used to zoom in and zoom out the map.
- Pushpins size: This is used to increase and decrease the size of the pushpins on the map.
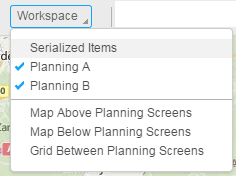
- Workspace Menu: This includes various menus relating to the UI layout of the workbench.
- Settings and Help: The settings menu includes options related to default settings and layout settings.
Territory Planning Icons
The following icons are used in the territory planning workbench.
| Icon | Explanation |
|---|---|

|
This icon represents the location of the engineer (if specified in territory planning). All the serialized items assigned to the engineer are in the same colour and the icon must have the color of the serialized items that are assigned to the engineer. Note This icon also displays the picture of the engineer, if available. You can add a picture using the drag-and-drop option. |

|
This icon represents the reference point that is specified for the engineer. This reference point must have the same color as that of the engineer assigned. |

|
This icon represents the center of gravity of the items that belong to the same territory. |

|
This icon
indicates a serialized item
|

|
This icon represents the serialized item specified in the Plan A of the work bench. The serialized item is not linked to a preferred engineer or territory in Plan B. |

|
This icon represents the serialized item, with only one territory planning is selected either in the Plan A or in the Plan B. |
- The employee image that is uploaded must have a 500x500 dimension
- Resolution must be 300 dpi and above. A Lesser Dpi can scatter the image.
- The images can have these extensions: .jpg, .gif, or .png.
Workspace Menu

The Serialized items, Planning A and Planning B are the various sections in the workbench. The toggle menu and the docking control, allows you to minimize or maximize these sections.
The other options are the default layouts for the workbench. For example, when you select the Map Above Planning Screen option, the map is placed above the planning A and B section and the serialized items grid is placed on the right side of the map. You can further customize this view by arranging the section using the drag and drop options of the docking control. The user can save the new setting using the Save Settings option in the Settings Menu . The same view is available every time you access the workbench.
Multi-Screen scenario and Default views
The Workspace menu provides three default views. With the help of these views, users can build their settings. For example, if you want to have a multi-screen environment and the map must be placed on one monitor and the rest of the planning screens on a second monitor, you must:
- Select a default view.
- Customize the view as per your requirement
- Save the view using the Save Settings option.
- Next time when you open the workbench, the last saved view is available.
- You can resizes the browser and stretches it to the width such that one portion appears on monitor 1 and the second one appears on monitor 2.