Mapping options
For this purpose, make selections from the PLM and Creo sections and click the button that describes the direction you want the mapping to take place.
- The button maps the selected attributes from PLM to Creo.
- The button maps the selected attributes from Creo to PLM.
- The button maps the selection to both PLM and Creo. This mapping rule goes in both directions, which means the values remain in sync.
In Creo, if you are working with a part file and you enter a value for an attribute that is mapped to both, a dialog box is displayed when you save the part file to PLM.
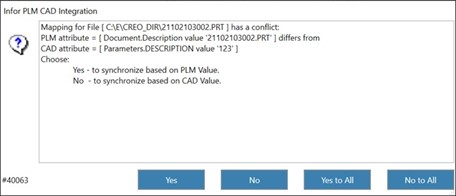
This dialog box prompts you to indicate which value you want to keep: the value just entered in Creo or the value entered in PLM.
If you map an attribute for a business process step, the following dialog box appears if you click the , , or button.
In this dialog box you can select the relevant business process step.
You can map one Creo attribute to one PLM attribute, one Creo attribute to many PLM attributes, or many Creo attributes to one PLM attribute.
For example, if you mapped a second Creo attribute, to the item’s description in PLM and you save to PLM, the value of the item’s description in PLM will be the two values you mapped from the Author and Date attributes in Creo separated by a comma.