Selecting design variants
-
Select Capture Design Variants from
the PLM menu. The PLM -Select Design Variants dialog box is
displayed.
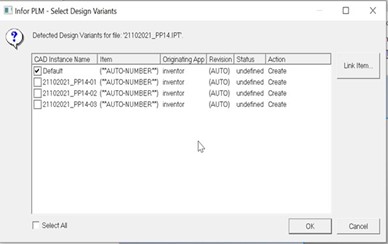
- Select the check boxes of the variants to be linked or select the Select All check box.
- Click OK to create the new items.
-
Save the file to PLM to link the items to the part. For further information,
see Saving to PLM.
When you save to PLM, links are formed between the "document" and the items created by means of the Capture Design Variants and Link to Item features.
Note: Regardless of manual or automatic preference settings for item generation, the PLM CAD Integration will always automatically create a new item for a captured and saved design variant.CAD "instance" name for a configuration of a Part or Assembly should not be given as “Default”. Because this name is given to the Part Factory file when Capture Design Variants is performed
Each item’s CAD instance name in PLM matches the name used in Autodesk Inventor. If you change the CAD instance name for an item in Autodesk Inventor that will be treated as new "instance" and it has to be captured before save to PLM. So, once a variant is captured, user should not change it's file name.
Note: The option Capture Design Variants is enabled only for ipart factory and ipart instance files.