Activity Explorer view
You can use the Activity Explorer to perform these tasks:
- Open, close and view an activity.
- Check in, (un)checkout a software component (if Configuration Management is applicable).
- Open a component in the corresponding editor.
The Activity Explorer is part of the Application perspective.
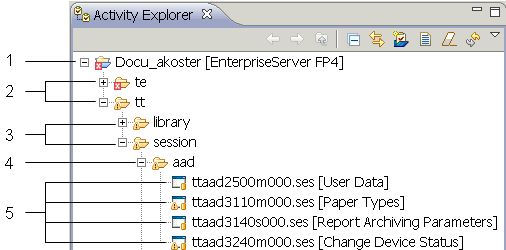
This figure shows the Activity Explorer view:
Double-click a software component to open the component in the corresponding editor.
You can add other software components to your activity through the Component Explorer, and through the command in the LN Studio toolbar.
This table describes the different nodes in the previous figure:
| Nr. in figure | Description |
|---|---|
| 1 | Name of an open activity, with the Project Name between square brackets. |
| 2 | LN package code, displayed in ascending order (for example: td, tf, tp). |
| 3 | Main Component Type, displayed in ascending order. For example: domain, report, session, or table. |
| 4 | LN module code, displayed in ascending order.
The module code is displayed for all component types, except domains, labels, messages, and questions. |
| 5 | LN software component, with the component description between brackets, displayed in ascending order.
To open a software component in the corresponding editor, double-click the component. |
Toolbar
The toolbar of the Activity Explorer view includes these buttons:
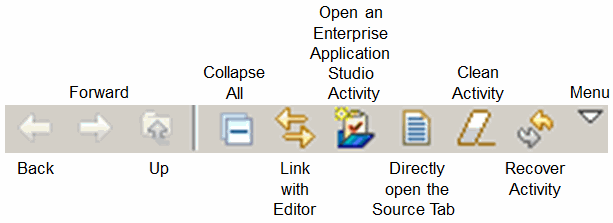
| Link with Editor | Toggles whether the Activity ExplorerActivity Explorer selection to the resource being edited. selection is linked to the active editor. When this option is selected, changing the active editor will automatically update the |
| Open an LN Studio Activity | Starts the Open an Activity wizard, where you can select an activity that is assigned to you. |
| Directly open the Source Tab | If this option is selected, the multipage editor directly opens the Source selection is linked to tab (if the source code is available) when you open a component.
If this option is not selected, the editor opens the Overview tab. See Multipage Editors. |
| Clean Activity | Removes unchanged components from your activity. The command only removes files that are not checked out, created, or modified.
See Cleaning an activity. This command is useful when your activity contains a lot of unchanged components, such as when you have frequently used the command. |
| Recover Activity | Restores the components in your activity from the Configuration Management System on the server to your local workspace. Optionally, unchanged components are removed from the workspace. |
| Menu | Provides, among other things, menu items that allow you to do the following:
See the Workbench User Guide. |
Shortcut menu
To open the shortcut menu, right-click a resource in the view.
This menu provides, among other things, the following commands:
| New | Allows you to open a new activity in the root node, or to create a new component in the current activity.
To open an activity, on the submenu, select . The Open an Activity wizard starts. When you open an activity, the following occurs:
To create a new component, on the submenu, select . The Create a New Infor LN Software Component wizard starts. |
| Open | Opens the selected software component in the LN Studio in the corresponding multipage editor. |
| Open With | You can use this command to open the selected software component in an editor other than the component's default editor. Select the desired editor from the submenu. |
| Copy | Copies the selected resource to the clipboard. |
| Paste | Pastes resources on the clipboard into the selected project or folder. The resource is not added to the Revision Control System. If a resource is selected, the resources on the clipboard are pasted as siblings of the selected resource. |
| Delete | Deletes the selected resource from the workspace.
Note: This command can only delete components that are not checked out, created, or modified in the current activity. These components have a  decorator in the bottom right corner of the software component image. decorator in the bottom right corner of the software component image.
|
| Move | Moves the selected resource to another location. A dialog is displayed, requesting the location to which the resource must be moved. |
| Rename | Allows you to specify a new name for the selected resource. |
| Import | Opens the import wizard and allows you to select resources to import into the Workbench. |
| Export | Opens the export wizard and allows you to export resources to an external location. |
| Refresh | Refreshes the Workbench's view of the selected resource and its children. For example, when you create a new file for an existing project outside the Workbench and want the file to appear in the Activity Explorer view. |
| Duplicate Component | Starts the Duplicate an Infor LN Software Component wizard, where you can duplicate the selected component. |
| Verify Component | Performs quality control on the selected software component(s). The command executes various checks based on the Infor LN design principles.
When you verify software components, a list of warnings is generated. You can decide to accept each warning, or to solve the problem. |
| Link Run Configurations | Starts a dialog where you can link existing run configurations to the selected activity.
See Linking run configurations to an activity. This command is only displayed if you select an activity. |
| Run As | This menu contains these commands:
See Running LN sessions. |
| Debug As | This menu contains these commands:
|
| Team | This menu provides various Configuration Management functions.
See "The Team submenu". |
| Compare With | Provides a mechanism to compare the selected software component with other versions of that component in the workspaces’ local history. |
| Replace With | Provides a mechanism to replace the selected software component with other versions of that component in the workspaces’ local history. |
| Restore from Local History | Restores deleted Workbench resources with a state from the local history. See "Restoring deleted resources from local history" in the Workbench User Guide. |
| Properties | Starts the property page of the selected item. |
| Refactor | If you select an InContext Table Model, the command is available.
This command starts the Dependent InContext Models view. You can use that view to refactor the table model's dependent models. Related topics:
|
- Some commands in the shortcut menu, such as and , are also available as buttons in the toolbar in the Application perspective.
- The previous list does not describe all commands in the shortcut menu. The remaining commands are standard Eclipse commands. For details on these commands, see "User interface information" in the Workbench User Guide.
The submenu
The submenu provides various Configuration Management functions.
If you select an activity, these commands are available:
-
Starts the Reassign Activity dialog, where you can assign the activity to another user.
-
Use this command to undo all changes in an activity.
-
Closes the activity and releases the changed components to the Project VRC.
In the Preferences - Infor LN Configuration Management dialog, you can set the default behavior for this command.
If you select a software component, these commands are available:
-
Restores the selected component, which was saved on the LN server, to your local workspace.
-
You must lock (check out) a component before it can be changed. When a check out is performed, the latest version of the software component is retrieved from the development repository. It is then made editable in the workspace.
Note: This option is not available for components already checked out. -
Use this command when you finished editing a component, to unlock a component and store the changes in the development repository.
- You are prompted to save any outstanding changes in the component.
Note: If you cancel the “modified source” dialog, the check in is canceled.
- Then, you are asked to specify a revision text: The updated version of the component is sent to the development repository and the component is made read-only in the workspace.
Note: This option is unavailable for components not checked out. - You are prompted to save any outstanding changes in the component.
-
Use this command when you have finished editing the component, and you do not want to send the changes to the development repository.
- The component is unlocked (and changes are discarded).
- You are prompted to confirm the command: If the command is confirmed, then the current local representation of the software component is replaced by the latest remote representation.
Note:- If you check out a component for the first time and then perform an uncheckout, the component is considered as unchanged. The component has a
 decorator in the bottom right corner of the software component image.
 - You cannot perform an uncheckout in the following situations:
- If SCM is disabled.
- If the component does not support SCM, for example if the component is a label, message, question, domain, or additional file.
-
Starts the Compare Package VRC's (ttadv6450m000) session. The session prints the differences between the latest version and the previous version of the component.
The differences can be printed in detail, if required.
See the session help.
-
Starts the History view. This view shows all revisions of the selected component, which are present in the derivation path of your Activity VRC.
See History view.
-
Performs a check out of the component, sets the Expired flag, and performs a check in. A
 decorator is displayed over the component image.Note: A session can only be expired if there is no reference to it from another not-expired session.
See Session Editor.
-
Performs a check out of the component, unsets the Expired flag, and performs a check in. The
 decorator disappears.Note: A session cannot be unexpired if it has a session reference to an expired session.
See Session Editor.
-
Removes the selected component.
Note: This command can only delete components that are created or modified in the current activity. These components have a decorator in the bottom right corner of the software component image.
Icons and decorators
Icons
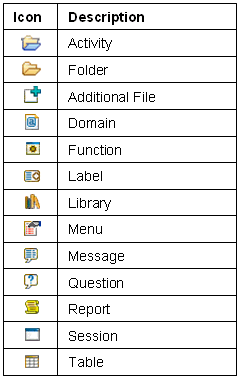
The following icons are displayed in the Activity Explorer view:
Decorators
CM decorators
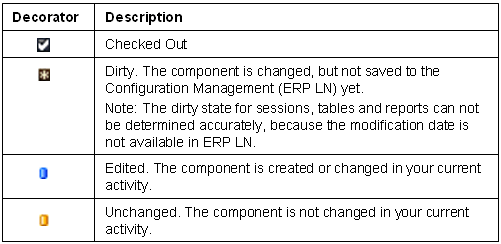
The following decorators are used to show Configuration Management related status information, which is mutually exclusive. The decorators are displayed in the bottom right corner of the software component image.
Compiler decorators
The following decorators are used to indicate errors and warnings. The decorators are displayed in the bottom left corner of the images of the involved nodes.

The decorators are displayed for the involved software component and for all parent nodes.
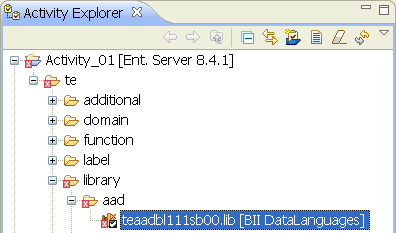
For example, if a library contains invalid code, error decorators are displayed for the library itself, and also for the module, the main component type, the package, and the activity to which the library belongs. See the following figure:
VSC decorators
The following decorators are used to indicate the VSC status of a software component. The decorators are displayed in the upper right corner of the software component image.

For details on VSC, see Verifying software components.
"Expired" decorator
The following decorator is used to indicate a software component is expired. The decorator is displayed over the software component image.
