Markers and Marker bar
A marker is like a yellow sticky note stuck to (a line in) a script or library. On a marker you can record information, such as location and severity, about a problem or a task to be performed. Or you can simply record a location for a marker as a bookmark.
The Marker bar is the vertical bar located at the left of the editor area.
This bar is used to display various types of markers, for example: error markers, warning markers, breakpoint markers, task markers, and so on.
This figure shows an example:
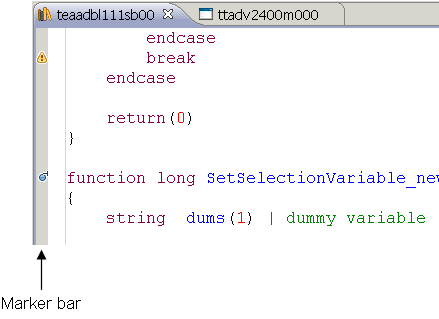
Each marker is related to the line next to which it is displayed. When you hover over a marker, the description of the corresponding error, warning, breakpoint, etc. is displayed in a ToolTip. For example, when you hover over the warning marker in the previous figure, the following description is displayed: "Statement not reached".
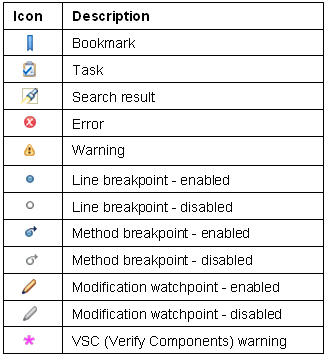
The following markers can appear in the marker bar:
For details on breakpoints and on the corresponding breakpoint markers, see these sections:
For details on VSC warnings, see Verifying software components.
For details on the other marker types, see the Markers topic in the Workbench User Guide.
- The markers are not only displayed in the marker bar, but they are also shown in various views, such as the Problems view, the Breakpoints view and the Tasks view. From these views, you can quickly jump to the marked location within the corresponding source. For example, when you double-click a problem in the Problems view, the script editor opens the corresponding source on the involved line.
- The appearance of the different markers in the marker bar depends on the settings in the Annotations preferences page. You can access this preference page via the Preferences dialog.
Marker bar shortcut menu
Right-click the marker bar to display the marker bar's shortcut menu. This menu contains the following commands:
| Command | Description |
|---|---|
| Add /Remove Bookmark Add /Remove Task | Adds or removes a bookmark or task for a line.
To define a bookmark or task for a specific line in your source code, right-click on the marker bar next to that line, and click the relevant command on the context menu. A dialog appears where you can enter the bookmark or task properties. When finished, a new bookmark or task marker appears in the marker bar.
Note: You can also view (and modify or remove) the new bookmark or task in the Bookmarks view or in the Tasks view.
To remove a bookmark or task, right-click the corresponding marker in the marker bar, and click the relevant command on the shortcut menu. |
| Show Quick Diff | Enables / disables the QuickDiff feature. QuickDiff automatically adds color-coded change indicators in the marker bar while you are typing. The colors show additions, deletions, and changes to the editor buffer as compared to a reference, for example, the contents of the file on disk. When you hover the mouse cursor over a change indicator in the marker bar, the original content is displayed.
You can configure QuickDiff settings, such as colors for the change indicators, in the Quick Diff - Preferences page. You can access this preference page via the Preferences dialog. See Script Editor Preferences and the Workbench User Guide.
Note: This command is not only used to enable the QuickDiff feature, but is also used to disable QuickDiff.
|
| Show Line Numbers | Toggle to display line numbers. |
| Show Mark Occurrences | Enables/disables the Mark Occurrences feature.
See Mark Occurrences. |
| Highlight Matching Brackets | Enables/disables the highlighting of matching brackets in the source code.
If this option is selected, the corresponding bracket is highlighted automatically when you place the cursor directly behind a bracket. This functionality applies to the following types of brackets:
|
| Show Whitespace Characters | Enables/disables the whitespace characters. |
| Preferences | Opens the Eclipse Text Editors preferences page. See the Workbench User Guide.
Note: To change the LN Studio script editor preferences, start the Preferences - Editor page.
|
| Folding/Collapse All | Collapses all expanded code elements such as functions.
See Folding. |
| Folding/Expand All | Expands all folded code elements such as functions.
See Folding. |
| Toggle Breakpoint | Adds or removes a line breakpoint for the current line.
If the current line is part of a function header, the command adds or removes a method breakpoint.
Note:
|
| Error and warning markers | These markers are system-generated. You can view the corresponding error and warning details in the Problems view. |
| Search result markers | These markers are generated by the search command. The corresponding search result details are displayed in the Search view. |