PMC recipient procedure (OP)The PMC recipient procedure contains:
Setup PMC recipient is fully configured by the Infor Installation Wizard during the installation of the base Infor products such as LN and Infor Enterprise Server. This setup and how to make changes to the setup are described. The setup consists of these sections:
Procedure The recipient setup procedure steps in a flowchart. 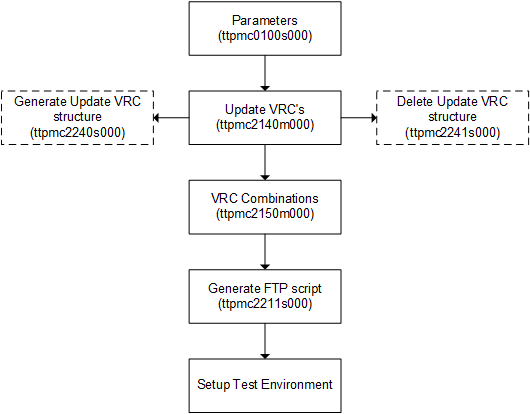 Recipient Setup procedure Infor Installation Wizard and PMC The PMC Tool has a seamless integration with the Infor Installation Wizard. If you install updates using the Infor Installation Wizard, the wizard activates the PMC Tool in the background. You can use both the PMC Tool and the Infor Installation Wizard to install updates in an existing environment. Both tools serve their own specific goal in the update installation process. The Infor Installation Wizard is primarily intended to:
The PMC Tool is primarily intended to:
You can also install individual solutions, collections, and patches using the Infor Installation Wizard. This can have these drawbacks:
For these reasons, to install individual solutions, collections and patches, ensure to use the PMC Tool directly. On the other hand, you can install Feature Packs directly using the PMC Tool. After you have installed the Feature Pack you must also perform a number of additional steps manually. These steps include running the Convert to Runtime Data Dictionary (ttadv5215m000), Compile Labels (ttadv1243m000) and Create Tables (ttaad4230m000) sessions. If you use the Infor Installation Wizard, all required steps are executed automatically in the installation process. In addition, the Infor Installation Wizard offers some extra features that can be very useful during installation of Feature Packs. For example, the automatic creation of new VRC structures and creation of Package Combinations in which the Feature Pack can be installed. You cannot perform the initial installation of initial master media using the PMC Tool. To perform this installation, you must use the Infor Installation Wizard. During installation of the master media, the Infor Installation Wizard initializes the PMC Tool in such a way that the environment is immediately ready for installing updates. You can also initialize the PMC Tool manually with the PMC Tool itself. Parameters The very first step in the Recipient setup procedure is to define the PMC parameters. These parameter groups are available:
For details see the Parameters (ttpmc0100s000) session. Note Because parameter definition is a one-time step, you must be aware of the impact if you change the parameters afterwards. If you change the operating system paths, you must move the directories and files according to the new path specifications. Hint If you have more than one ERP environment running, for example, a Production and a Test environment, you can share the solution dump directories on the ERP environments, which reduces disk-space consumption. Update VRCs PMC uses update VRCs. The software of an initial standard master product is installed in a root VRC that is predefined by the software supplier. The update VRC is created on top of this root VRC. Feature Packs and individual solutions that you download from the Infor Support Web site http://www.infor.com/inforxtreme are also installed in this update VRC. The update VRCs are created automatically during the installation of the master product. You can use the Generate Update VRC Structure (ttpmc2240s000) session to generate these update VRCs. In addition, you can define update VRCs using the Update VRC's (ttpmc2140m000) session. In general, the VRC structure for standard LN resembles this diagram: ![[...]](../images/pmc_update_vrc.png) B61_a is the VRC that contains the baseline, which is the very first shipment of LN 6.1. From this point on, Individual solutions and Service Packs are installed in the B61U_a_stnd VRC. For the Infor Enterprise Server (packages tt, tl, tm, da and nt) no new update VRCs are created and used. After a fresh installation of LN, these update VRCs are present in PMC: The heading of the first column in the table, Pack., refers to the package to determine the VRC structure. ![[...]](../images/pmc_recipient_procedure_1.png) VRC combinations In PMC you use a VRC combination to control co-requisite dependencies between solutions of various base VRCs. Update VRCs that must be updated simultaneously, for example, an update VRC for standard LN and an update VRC for a localization, must be grouped in a VRC combination by the VRC Combinations (ttpmc2150m000) session and the Update VRC's (ttpmc2140m000) session. This diagram shows a VRC structure, including a localization: ![[...]](../images/pmc_localization_vrc.png) The table shows the possible Update VRCs in LN when applying a localization. The heading of the first column in the table, Pack., refers to the package to determine the VRC structure. ![[...]](../images/pmc_recipient_procedure_2.png) To create a test environment Best practise is to test the software updates in a test environment before you implement the updates in your live environment. To test the software updates, create the update VRCs and the VRC combination for your test environment. Note For the Infor Enterprise Server (Tools), no update VRC is created. Therefore, you cannot create an update VRC for testing purposes. To test the Infor Enterprise Server software updates before installation in your live environment, you require a separate installation of LN. Create the update VRC for a test environment parallel to the VRCs in your live environment. This diagram provides an example: ![[...]](../images/pmc_test_vrc.png) The update VRCs that are grouped in a VRC combination, for example, B61U_a_stnd and B61U_a_loca are updated simultaneously. The B61T_a_stnd and the B61T_a_loca are updated in the same way. These VRCs represent a test environment. Note If you do not have a localization and/or extension installed, no VRC combination is required. The only update VRC you need for your test environment is B61T_a_stnd. To create a PMC test environment:
FTP/HTTP to download software updates If the dumps of the solutions you want to install are located on an FTP/Web server, you can use the Download, Scan and Connect Solution (Multi-Level) (ttpmc2210s000) session to download the dumps. Before you start the download, ensure the correct download settings are specified. To specify the download settings:
The Download, Scan and Connect Solution (Multi-Level) (ttpmc2210s000) session uses either method to make the connection to the FTP/HTTP server and to download the solution dumps. To install updates This section describes the procedures for the recipient of updates to manage the PMC administration. The procedure consists of:
Procedure steps This section provides a summary of the procedure steps to install and uninstall software updates through PMC. The following sections provide a detailed explanation of the procedure. To install updates:
To uninstall updates:
Download updates To download updates you can use the Download, Scan and Connect Solution (Multi-Level) (ttpmc2210s000) session. The session automatically scans the downloaded solutions, and connects the solutions to the specified update VRC. The purpose of scanning the solutions is to make the solutions known to the system, and to identify installation conditions. After the solutions are scanned, you might find that the solutions cannot be installed unless other solutions are downloaded and installed as well. In that case, the session also downloads, scans and connects these solutions. This step is repeated, until all required solutions are downloaded, scanned, and connected. If the related solutions are already present on your system, but connected to another VRC, the solutions are not downloaded again, but are only connected to the specified update VRC. You can also download solutions manually, in which case you must also complete the following steps in this section. These steps are integrated in the Download, Scan and Connect Solution (Multi-Level) (ttpmc2210s000) session, and can be skipped if you downloaded the solutions using this session. Note You can only use this session can only be used for downloading if the solution dumps are published on the FTP server defined in the Generate FTP Script (ttpmc2211s000) session. Scan updates The first step to make the solutions available to the PMC registry is to scan the solution files by using the Scan Solution/Patch File (ttpmc2200s000) session. The solutions receive the status Available in the update VRC for which the scan is carried out. All the relevant PMC data is stored in the PMC registry. Connect update to update VRC Use the Connect Solutions/Patches to VRC (ttpmc2201s000) session to make the solutions available in other update VRCs. You can disconnect the solutions with the Disconnect Solutions/Patches from VRC (ttpmc2202s000) session. Check to install All the following functionality is controlled by the Process Solutions (ttpmc2101m000) session and the Process Patches (ttpmc2102m000) session. The solutions with the status Available that are connected to the update VRCs must be checked with the Check Solution/patch to Install (ttpmc2203s000) session. The related solutions are checked as well. The solutions, including the related solutions, which must be installed receive the status To Install. Optionally, detailed information is given on customized components and components that exist in non-supported languages. Install You can install the solutions with status To Install, with the Install Solution/Patch (ttpmc2205s000) session. If the PMC registry was changed after the solution received the To Install status, the solution must be checked again before the solution can be installed. The related solutions are installed as well. After the solutions are installed, the status of the solutions is Installed. Check to uninstall All the following functionality is controlled by the Process Solutions (ttpmc2101m000) session, the Process Patches (ttpmc2102m000) session and the Installation runs (ttpmc2503m000) session. If a solution must be uninstalled, for example, because the solution was a bad fix, use the Check Solution/Patch to Uninstall (ttpmc2206s000) session. The solution status and the status of related solutions becomes To Uninstall. Note You can use Check to uninstall from the Installation runs (ttpmc2503m000) session if you want to uninstall all solutions that were installed together in one run, for example, a solution including all prerequisite solutions or solutions of a collection that were installed in a range. Uninstall Run the Uninstall Solution/Patch (ttpmc2208s000) session to set the status of the solution, including the related solutions, back to 'Available'. Note If during installation or uninstallation the process is stopped, for example, due to a system crash, process kill, and so on, the solution that was being processed at that point still has the status Installing or Uninstalling. With the next start of a processing session from the Process Solutions (ttpmc2101m000) session, PMC recognizes this situation and starts the stopped process again for the interrupted solution. If a sequence of solutions was to be installed or uninstalled, you must restart the process for the remaining solutions. Miscellaneous topics These topics are described:
Update policy A procedure to install, test and make a new Feature Pack operational in your live environment is described. The procedure minimizes the impact in terms of system downtime for the operational environment. Scenario Suppose you have installed the master product in VRC B61_a and Feature Pack 1, including a number of individual solutions, on top of Feature Pack 1 in update VRC B61U_a_stnd. This update VRC is linked to package combination b61au. Customizations are available in the B61U_a_cus VRC that is linked to the b61cus package combination. Various operational companies are linked to package combination b61cus. Now you can install Feature Pack 2. But first you want to explore the new Feature Pack in a separate environment without disturbing the operational business. Two methods are available to explore the new Feature Pack in a test environment:
This the recommended update procedure for Feature Packs: ![[...]](../images/pmc_update.png) Procedure Steps 1 through 7 are identical in both methods. Step 8 contains different instructions for method 1 and method 2.
Advantages and disadvantages of both methods Method 2 has the disadvantage that you must install Feature Pack 2 twice. As a result the system downtime is greater if you use Method 2. The system downtime for Method 1 consists of these elements:
The system downtime for Method 2 consists of these elements:
Open a patch Only in exceptional situations you can decide not to carry out a complete installation of a patch, but to install a selection of one or more of the individual solutions contained in the patch. Therefore, you can open a patch to select individual solutions. To open a patch, you will require a password. To obtain a password contact Infor Support. You can start the Open Patch (ttpmc2105s000) session from the appropriate menu of the Process Patches (ttpmc2102m000) session. Note You cannot open a Feature Pack. PMC cleanup Cleaning up PMC is useful for saving disk space. To run the cleanup start the PMC Cleanup (ttpmc2220m000) session. This session can clean up three types of PMC data:
To remove an update VRC Removing an update VRC can be useful for saving disk space and for a clear VRC structure. To remove an update VRC run the Delete Update VRC Structure (ttpmc2241s000) session.
| |||