To create dashboardsTo create a dashboard you must:
Important! The sections below describe the sessions that you must use to create a dashboard. However, they do not describe all details of these sessions. For detailed session information, refer to the Infor Web Help. To create the session The dashboard session uses the main table of the entity that you want to select. The session is similar to an overview session. However, an overview session usually has a synchronized dialog to its details session. A dashboard session controls the synchronization to the various details sessions within the program script. Example- Items Dashboard You need to create a dashboard session that uses the Items as the main entity. When you select an item, the dashboard will show the item, description, purchase price, stock on-hand and stock on-order for the item. Next to the purchase price, it will calculate the last purchase price. Next to the stock on-hand, it will display the inventory value (valued at purchase price). Next to the stock on-order, it will show the latest order date for orders that have not been delivered. A document button is available to view purchase orders for the item. You create an items dashboard session, using the Items table. The session is a display session type. This table shows the session properties:
To create the form This diagram shows a dashboard session: 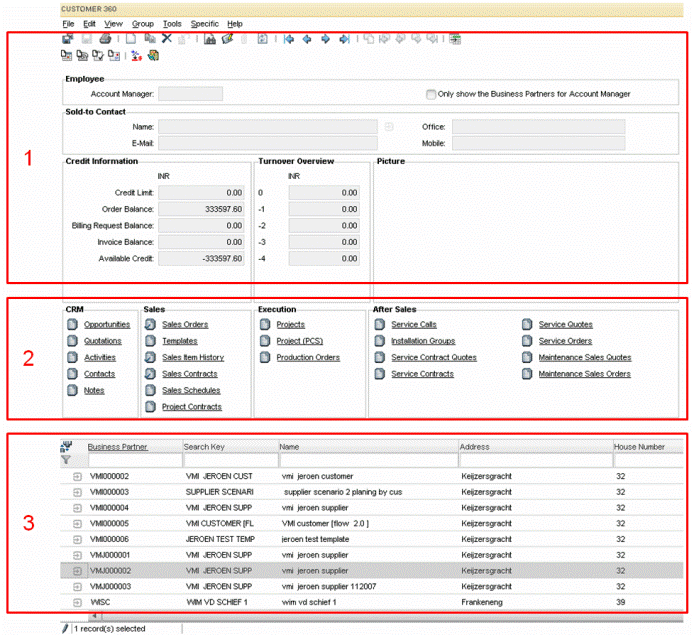 Dashboard session - form sections The form of a dashboard session consists of these sections:
The form contains group boxes and field buttons. Therefore Rich View should be selected in the Session Properties of the form. Example- Items Dashboard You create an items dashboard session using the Items table. The session is a display session type. 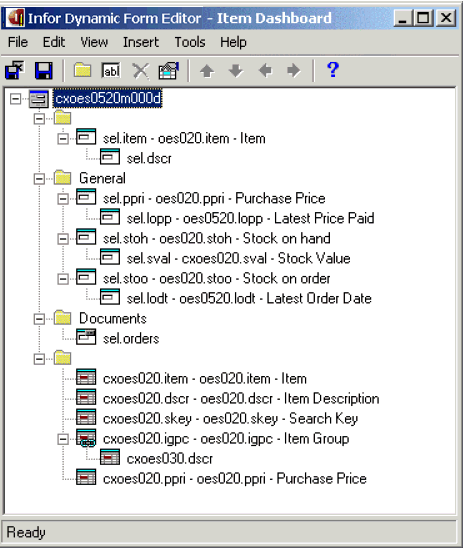 Dashboard Form Editor In the Dynamic Form Editor you must specify the session properties, the field properties and form commands. Specify these properties in the Session Properties dialog box:
Fields in the view area are variables that are defined in the session's program script, such as "sel.item". See the sample script in this section for more examples. Specify the following properties in the Position tab in the Field Properties dialog box:
The field properties for the Documents check box fields do not have a label code. The button next to each document check box is defined as a field level form command, which is linked to the corresponding check box field. The form command executes a function that will be defined in the program script. This table shows the properties of the field level form command that is linked to the "sel.orders" check box:
You can use the Show Overview Session command in the Dynamic Form Editor to start the session. 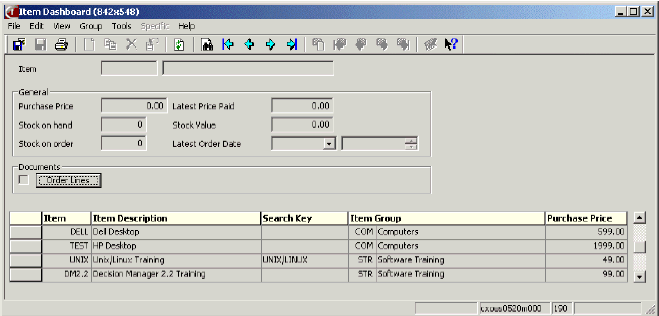 Show Overview Session Result To create the program script The program script controls most of the actions, including the selection, calculation and starting the details sessions. The actions that occur when the user selects a row are programmed in a mark.occur event. This event will gather the information for the selected value, and enable the form commands. It will also re-synchronize the details sessions. The detail sessions are started via a form command. Since the script will control the synchronization, it is preferred that the form commands call a function in the script. This function is defined as an extern function. Example- Items Dashboard The Items dashboard needs to:
See the following code for an example: |*********************************************************
|* cxoes0520 0 VRC B61U a dv00
|* Items Dashboard
|* Development User
|* 2005-02-10
|*********************************************************
|* Main table cxoes020 Items, Form Type 1
|*********************************************************
|****************************** declaration section ******
declaration:
table tcxoes020 | Items
table tcxoes022 | PO Headers
table tcxoes023 | PO Lines
extern domain cxitem sel.item
extern domain cxdscr sel.dscr
extern domain cxprice sel.ppri, sel.lopp, sel.sval
extern domain cxquan sel.stoh, sel.stoo
extern domain cxdate sel.lodt
extern domain cxyeno sel.orders
long orders.session.child.id, dummy.ret
|****************************** program section **********
|****************************** group section ************
|****************************** choice section ***********
choice.mark.occur:
after.choice:
if number.of.marks = 1 then
|use a pre-defined var to test that only
|one item is selected from the list
fill.sel.values()
sync.open.session()
else
clear.sel.values()
endif
| need to display values because they are not
| displayed automatically
display.all()
|****************************** function section *********
functions:
function fill.sel.values()
{
sel.item = cxoes020.item
sel.dscr = cxoes020.dscr
sel.stoh = cxoes020.stoh
sel.stoo = cxoes020.stoo
sel.ppri = cxoes020.ppri
sel.sval = sel.stoh * sel.ppri
get.last.order.info.for.item()
}
function clear.sel.values()
{
sel.item = " "
sel.dscr = " "
sel.ppri = 0.0
sel.lopp = 0.0
sel.sval = 0.0
sel.stoh = 0
sel.stoo = 0
sel.lodt = 0
sel.orders = cxyeno.no
}
function get.last.order.info.for.item()
{
|* last purchase price is latest order, no matter of status
select cxoes022.*, cxoes023.*
from cxoes022, cxoes023
where cxoes023.orno refers to cxoes022
and cxoes023.item = :sel.item
order by cxoes022.odat desc
as set with 1 rows
selectdo
sel.lopp = cxoes023.ppri
sel.orders = cxyeno.yes
selectempty
sel.lopp = 0
sel.orders = cxyeno.no
endselect
|* last purchase order date is latest open order
|* stat <> delivered
select cxoes022.*, cxoes023.*
from cxoes022, cxoes023
where cxoes023.orno refers to cxoes022
and cxoes023.item = :sel.item
and cxoes022.stat <> cxstat.delivered
order by cxoes022.odat desc
as set with 1 rows
selectdo
sel.lodt = cxoes022.odat
selectempty
sel.lodt = 0
endselect
}
function extern exec.orders()
{
if sel.orders = cxyeno.yes then
| document is checked, start the child process
if orders.session.child.id then
| already started the session, so re-use it
| but refresh with new item values
| if closed, will set child.id to 0
dummy.ret = synchronize.with.child(orders.session.child.id)
endif
if not orders.session.child.id then
| need to start the session
session.zoomindex = 1
| if there is a alt key by item, we could use it
orders.session.child.id = start.synchronized.child(
"cxoes0523m100",
"cxoes020.item",
"cxoes020.item")
|* start orders by item. Send parent var of cxoes023.item,
|* and child var of cxoes020 for query extension to
|* work in child session.
endif
endif
}
function sync.open.session()
{
| have the dashboard sync the open sessions when a new
| item value is selected
if orders.session.child.id then
| already started the session, so re-use it
| but refresh with new item values
dummy.ret = synchronize.with.child(orders.session.child.id)
endif
}
When you compile this script, the session can compute values. 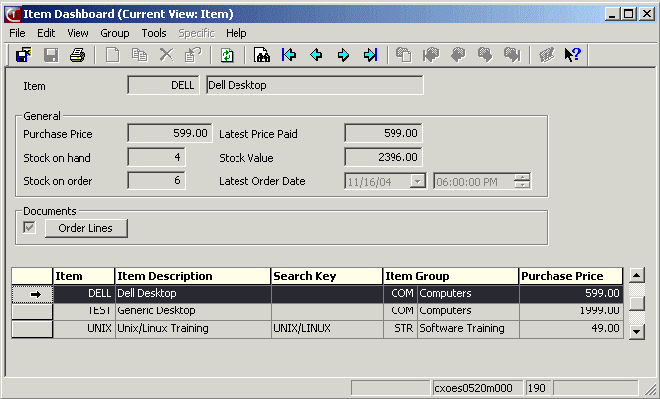 Item Dashboard with Computed Values Select another item to show the values for that item. 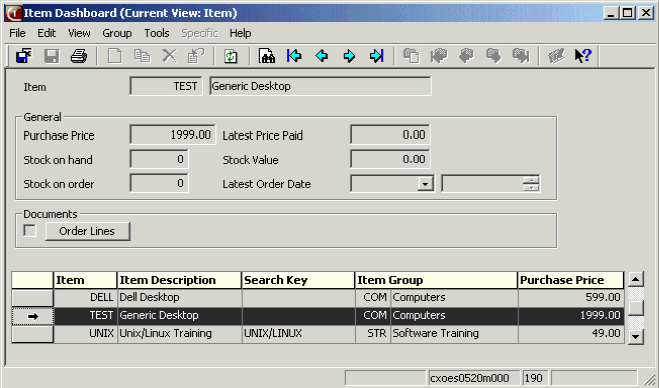 Item Dashboard To create the details sessions The details sessions allow the dashboard user to drill-down into the details of the overview presented in the dashboard. A details session will typically import the values from the dashboard session, and start or limit the display to those records. The program scripts of the details sessions can be modified to import these values and in some cases, extend the query so that only the desired rows are displayed. Example- Items Dashboard You have created an Items dashboard session using the Items table. The order lines for the Item must be shown in a details session. The Purchase Order Lines (cxoes0523m100) session uses the Purchase Order Lines (cxoes023) table to show purchase order lines. You edit the form of this session to insure that the Item field is a view field. 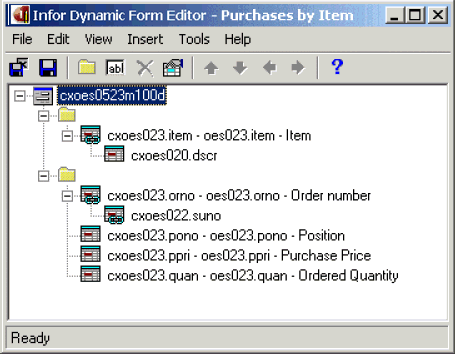 Purchases by Item Form The program script extends the query in the before.program section. The query extension is required because there is not an index on the field that contains the filter. |*************************************************************
|* cxoes0523 0 VRC B61U a dv00
|* Purchases by Item
|* Development User
|* 2005-01-07
|*************************************************************
|* Main table cxoes023 Purchase Order Lines, Form Type 1
|*************************************************************
|****************************** declaration section **********
declaration:
table tcxoes020 | Items
table tcxoes023 | Purchase Order Lines
|****************************** program section **************
|* import item from calling session
|* query extension to create filter
before.program:
query.extend.where(" cxoes023.item = :cxoes020.item")
|****************************** group section ****************
When this session is started from the dashboard, the session will show only the orders for the item that is selected in the dashboard. 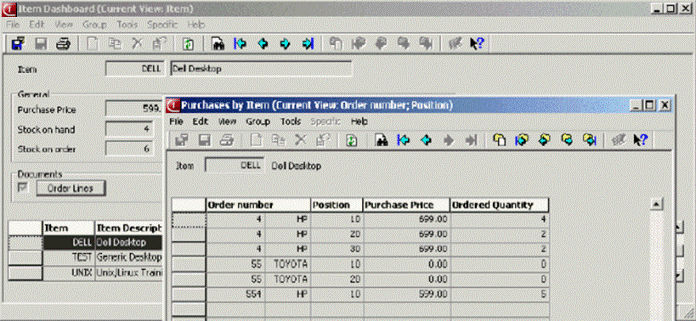 Dashboard with Detail Session When you select another item, and click the Documents button, the details session will synchronize. The item from the dashboard session will be sent to the details session, and the purchase orders for that item will display. 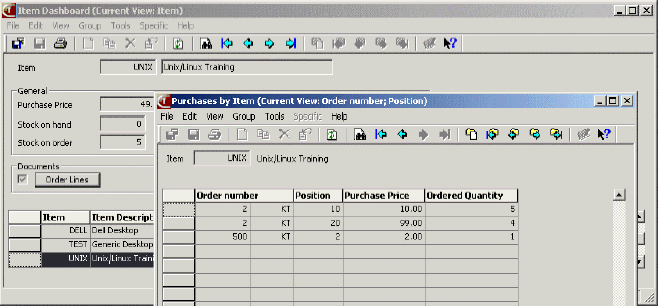 Select Item on Dashboard with Detail Session
| |||||||||||||||||||||||||||||||||||||||||||||||||||||||||||||||||||||||||||