Quick access to system information and tools using Ctrl-Shift-Click
You can use shortcut keys to access detailed information about your system without navigating away from the application you are currently using.
This topic explains how to access the -- group of options and provides details about the available data and tools.
Locating component information
When you press -- the white space next to the title of a component, that is, application, menu, list, report, form, field, and so on, the Component Information page displays.
Tools for power users
Users who create and update reports, personalizations, and configurations can use Component Information to view and, in some cases, navigate to the tools.
From Component Information, users can access:
- Technical information about fields, for example, actual field IDs, as opposed to field labels. Knowing the field ID makes it easy to perform a search to locate a field for a custom report.
- Business classes.
- Delivered versus configured status of a component: "Delivered" means no changes have been made to the component since it was delivered by Infor. "Configured" means it was updated at your site. From Component Information, you can navigate to Configuration Console to create or update a configuration or to compare a configuration against the version delivered by Infor.
- Personalization status: Whether the component has been personalized. From Component Information, you can click the link to the personalization to view it.
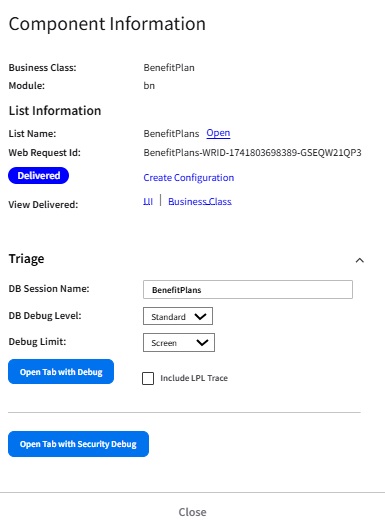
Triage tools for system administrators and developers
When the Triage section of the Component Information page is open, you can turn on and configure debug mode.
- To configure a DB debug session:
- Select the debug level:
- Standard: This is the default that captures the level of detail that is typically required to triage issues. Retain this setting unless instructed to use a different level by Infor Customer Support.
- Minimal: This setting captures only timing statistics for database related activity. Use this setting if recommended by Infor Customer Support for issues related exclusively to performance.
- Basic: This captures less detail than Standard, but more than Minimal. This may be recommended by Infor Customer Support for issues related to LPL business logic since it is cleaner for business analysts to read.
- Verbose: This captures the most detail and should only be used when recommended by Infor Customer Support or Infor Development. It often attempts to record so much that necessary details are omitted due to limits on the log file size.
- Select the Debug Limit:
- Screen: Opens the application in DB session debug mode in a new tab and starts capturing all activity.
-
Data Only: Captures the specific data call and then automatically navigates you to the DB session record.
- Optional. If you are debugging, you can select . This setting causes additional information related to LPL level execution boundaries to be logged. It may be recommended by Infor Customer Support if that additional detail is suspected to be helpful.to include session debug information as the process moves through LPL.
- Select . Session debug logging is active.
- If you selected Screen for "Debug Limit," the top of the page shows "DB Session Debug logging is active (standard)" where "(standard)" is the debug level. When you are ready to view the log, navigate to the DB session log. You can perform a search to locate the log file.
- If you selected the Data Only option, you are taken automatically to the debug report page where you can click to open the log file for the comonent.
- Select the debug level:
- To configure a security debug session, click . Security debugging is active. The top of the page shows "Security Debug logging is active (standard)" where "(standard)" is the debug level. You can access the security debug log to review the information. For more information, see Viewing security logs online from the Security Session Debug list.