Configuring an ActionEventMessage push webhook

This section explains how to configure an HTTP-based push function, or webhook, to enable event-driven communication between Landmark and an external server.

This diagram shows two methods for sending data to the Landmark server: push and pull.

Webhooks

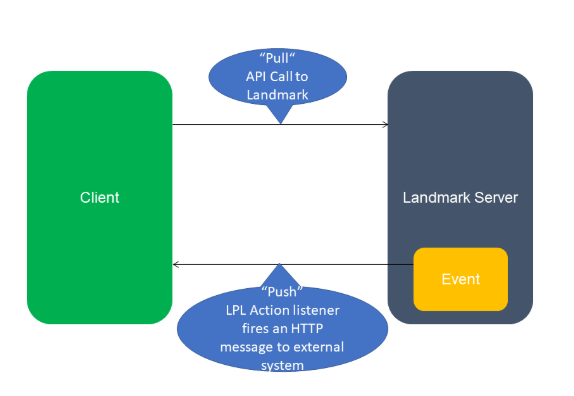
Pull API calls are used to check the state of a specific data instance. For example, a customer might issue an API call to Landmark as an incoming request to check a state. If the data is not in the required state for the action, the customer's API call would need to continually issue web service calls until the state is met (polling). In this client-server scenario, the customer's API call acts as the client, and Landmark serves as the server. This scenario is represented by the top arrow in the diagram.

Push calls allow customers to subscribe to specific business class action events through the ActionEventMessage business class. When an event (LPL Action) occurs, an HTTP-based, customer-configured message is sent to the endpoint. When the state of the instance is changed by the business class action, an outgoing message is pushed from Landmark to an external system. In this client-server scenario, Landmark acts as the client, and the server is the external target endpoint configured by the customer. This scenario is represented by the bottom arrow in the illustration.

The rest of this section outlines the steps for configuring an ActionEventMessage push webhook.

Perform all configurations in the data area from which the calls are run.

Before performing the steps in this section, ensure you have created a UserTemplate in JSON, XML, or text format that contains the outgoing message to be sent when the specified scenario in the call is encountered.

  1. Add the configuration parameter. Navigate to the Configuration Parameters page. Select Create and specify these information:
    Predefined or Ad Hoc
    Select Predefined.
    Predefined Component
    Select webservs.
    Predefined Component
    Specify webservs.
    Predefined Name Key
    Specify ws.fire.action.event.message.
    Type
    Select Boolean.
    Length
    Defaults to 1 per selected Type.
    Value
    Specify true.
  2. Add the UserTemplate record, an HTTP-based message that is posted to the external target endpoint to be transformed at runtime. Navigate to UserTemplate and select Create and specify these information:
    User Template
    Specify a unique name for the template.
    Business Class
    Select the business class that this webhook is listening to.
    Description
    Optionally, provide a description to add more details about the webhook.
    Template
    Browse to the location of the JSON, XML, or text file containing the outgoing message and attach the file.
    File Name
    Specify the name of the template file.
    MIME Type
    Select the MIME type from the list.
  3. If the external target endpoint is secure, add the HTTPAuthentication record. Navigate to HTTPAuthentication and click Create. On the HTTPAuthentication page, configure settings such as authentication type, credentials, and other requirements of the external target server.
  4. Add the ActionEventGroup, which logically groups ActionEventMessage records.
    1. Navigate to ActionEventGroup.
    2. If the group you plan to use already exists, make note of its name. If no group exists, create one.
  5. Add the ActionEventMessage record. In this step, configure the event-based callout mapping.
    1. Navigate to ActionEventMessage.
    2. Select Create.
    3. Optionally, provide a Description to to add more details about the message.
    4. Select the ActionEventGroup created or identified in step 4a.
    5. Add the business class that contains the action event that you want to listen to, for example, PayablesInvoice.
    6. Select the ActionName. This is the business class linked to the UserTemplate message and the external target endpoint. For example, for the PayablesInvoice business class, this might be the Release action.
    7. Client Type: Most customers performing this configuration should retain the default setting of HTTP.
    8. Condition Builder: This text box allows further refinement of event criteria. For example, if you are using the PayablesInvoice business class, you can specify a condition such as 'only when HROrg=7400.' You can click Preview to verify the condition syntax.
    9. When you are ready to run the webhook, select the Active field.
    10. Select the PayloadTemplate. This is the UserTemplate record added in step 2. The template is transformed using the selected business class.
    11. Specify the TargetURL. This is the external target endpoint where the transformed PayloadTemplate is posted
    12. If the external endpoint is secure, select the TargetAuthentication created in step 3.
    13. It is a good idea to test the webhook before running it live. Click the Test Connection button to run the query behind the scenes and verify the configuration settings. Test results will display in the Test Connection Response dialog box.
  6. When you are ready to run the webhook in production, configure it on the ActionEventMessage page.
    1. Verify that the Async server is running. The webhook runs in background.
    2. Run the Business Class Action linked to the ActionEventMessage record. In the example used in this section, this would be the PayablesInvoice business class and the Release action.
  7. Check the status of the HTTP webhook event.

    Navigate to WSMessageGroup and view the WSMessage for your event. If multiple ActionEventMessage records exist for the same business class and action, there might be several WSMessage records.