Simple drag and drop example: Combining a list of vendors and adding a call to a search engine
The following simple, and not particularly useful, mashup shows how to add controls to your designer canvas and manage the grid.
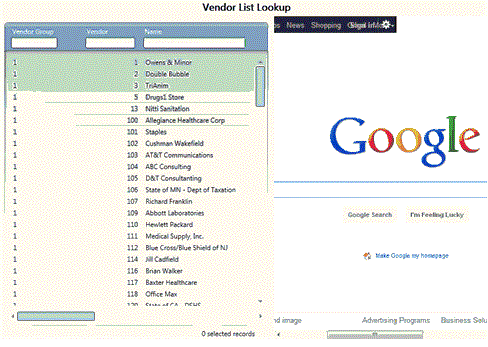
This mashup displays a list of vendors, from the Lawson AP10.1 application, and lets users run a Google search to locate additional information about a vendor without leaving the mashup.
The following sections describe the actions needed to create this mashup.
Create a new XAML file
Select and then add a name for the new mashup.
By default, files are stored in: My Documents\XAML\name of XAML file.
Select preview mode
By default, when you start a new XAML application, the Mashup Designer canvas is in XAML source editing mode.
Click the icon on the toolbar. A pencil icon for toggling editing mode is displayed on the toolbar. When you click it, the default screen changes so that you can begin adding controls.
The pencil icon must be selected in order for you to directly edit items on the canvas.
Editing a control
For our example mashup, we want the TextBox that currently displays Application Template to say Vendor List Lookup.
You can use the drag and drop feature to move controls to other positions on the Designer. For our example, we will move the title TextBox Application Template which has been in the middle of row 2 to row 1. This works the same as when you add through drag and drop. Just click the TextBox and drag it to correct position.
To change the text on the TextBox from the default of Application Template to Vendor List Lookup, right-click the text box. From the context menu, click and then specify the correct text.
Delete unneeded controls
By default, the Designer includes a status bar that our sample mashup does not need. In Preview mode, you can right-click a control to open up a context menu that includes a Delete option. When you click Delete, the currently selected control is removed.
Edit the grid for required number of rows and columns
See Infor Mashup Designer grid.
By default, the Designer allows for a single column. The field for changing number of columns is in the top right of the Designer. Specify the number of rows that you want to use or use the arrow key to scroll up or down.
For our example, we need two columns one for the for the ListPanel and one for the WebBrowser.
By default, the Designer allows for three rows. The field for changing the number of rows is in the bottom right of the Designer. Specify or select the number of rows that you need.
For our example, we need two rows, one for the TextBox that shows the application title, Application Template by default, and one for the side-by-side ListPanel and WebBrowser controls.
For column width, we will keep things simple for this example. We willsSpecify 400 for the number of pixels that should be used for each column.

Dragging and dropping controls
Now we are ready to add the ListPanel and WebBrowser controls.
For the ListPanel:
- From the Properties pane on the right side of the Designer canvas, select and drag the ListPanel to the canvas. The ListPanel settings dialog box is displayed.
- Specify a name to the ListPanel.
- Select or specify the name of the Token, form, that contains the list you want to use.
- Specify or update other properties as needed. You can return later to make updates; only Name and Token are required in this case.
- Click when you are finished setting properties.
For the WebBrowser:
- From the Properties pane on the right side of the Designer canvas, select and drag the WebBrowser to the canvas. The WebBrowser settings dialog box is displayed.
- Specify a name to thebWebBrowser.
- Specify the URL. In some cases, you might need to add protocol, for example, http://.
- Specify or update other properties as needed. You can return later to make updates.
- Click when you are finished setting properties.