Step 3: Activating IRC Services

Before activating IRC Services, ensure that the IRC Service account has the Content Manager role assigned on the reporting server. Unless this is done, reports cannot be published to IRC.

IRC Services activation will automatically set the IRC Services to Automatic (delayed start).

Note: You must have access to the reporting server, as during activation files have to be copied to the reporting server. So a user will need access to the reporting server.

Refer to the section Report Server Deployment Options - Application server and database server on same machine and report server on different machine

Activate IRC Services as follows:

  1. Click Start > Infor Risk and Compliance > Infor Risk & Compliance Services Activation to start the IRC Services Activation wizard. The system displays the Welcome screen of the IRC Services Activation wizard.
  2. Click Next. The Authentication Server screen is displayed.

    Caution: 
    If the Next button is not displayed on the Welcome screen of the IRC Services Activation wizard, you must set the text display size on Windows 7 (Control Panel > All Control Panel Items > Display ) to Smaller. You must log off to make the change effective and then proceed with the installation.
  3. From the Select Authentication Scheme drop-down list, select the authentication scheme to be used:
    • IRC Application Security(IRCAS): Select this option if you do not use Microsoft Active Directory, or do not wish to integrate with the existing infrastructure. In this case, IRC will maintain a separate user account. If you select this option, the rest of the fields on the screen will be disabled.
      Note: To use ADFS authentication, you must select IRCAS in the Select Authentication Scheme field.
    • Microsoft Active Directory(AD): Select this option to use your existing account (Microsoft Active Directory) for IRC authentication.
    Note: Select the Use Integrated Windows Authentication check box to configure IRC to automatically authenticate users based on Windows login. In this case, you will not need to access the IRC Sign on screen. Once you login to your network, you will be taken directly to the Preferences page.
    Caution: 
    During activation, if you get an error message that says the user (IUSR_MachineName) does not have the required privileges to perform the operation, set the Anonymous Access for IRC and Core virtual folders to OFF.

    Anonymous Access must be turned on again after activation.

  4. If you select Active Directory, provide the machine name or a domain name in the Machine/Domain DNS Name field.
    Note: Providing a domain name allows IRC to access the nearest domain controller (based on the geographical location, load and other similar factors) for the domain as determined by Windows. Additional domains may be added as required through the Domain Management Utility, which is installed as a part of IRC Services.
  5. Provide the User Name and Password of the account used to access Microsoft Active Directory.
    Note: The IRC service account specified must have:
    • Permissions to read users on the domain specified during IRC Services activation
    • Permissions to retrieve AD User Schema
  6. Select the SSL enable check box if the selected Active Directory is SSL enabled. Selecting the check box indicates that the specified domain is secured. It is mandatory to specify the port number.
  7. Click Next. The IRC Administrator screen is displayed.

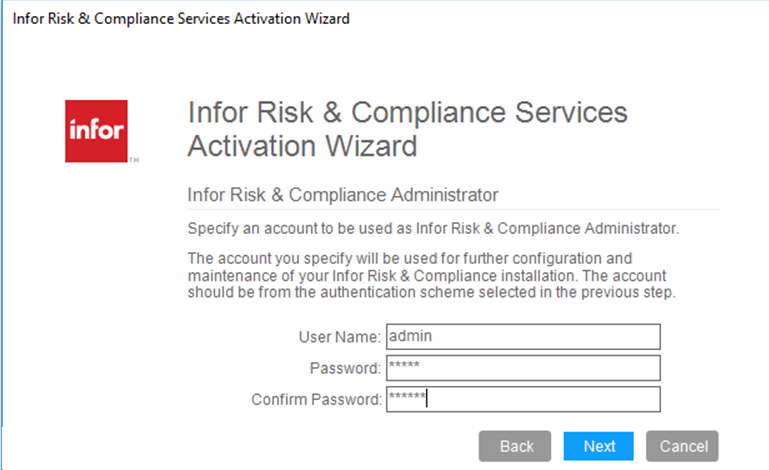
    Provide the account credentials (user name and password) to be used by the IRC Administrator. A profile is created for this account and added to the database when IRC Services are activated. The specified accounts have pre-assigned privileges as an Administrator.

    Caution: 
    The account specified must be in the domain specified on the Authentication Scheme screen.
  8. Click Next. The system displays 
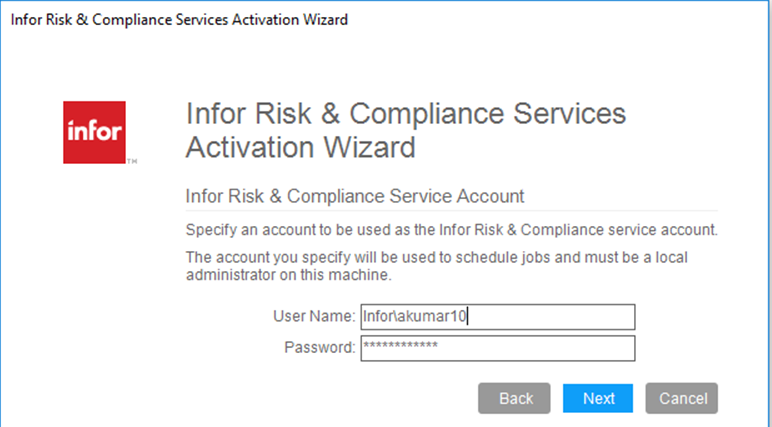
the IRC Service Account screen.

  9. Provide the account credentials (user name and password) to be used for scheduling jobs, updating information through adapters, and viewing reports.
    Note: The account details provided must not be a personal account.

    In a distributed scenario, if the local machine account is specified for IRC services, select the SQL Authentication mode to create or access the IRC database.

    Caution: 
    The account specified must have pre-assigned privileges as the Local Administrator.
  10. Click Next. The wizard displays the Database Creation - Step 1 screen.

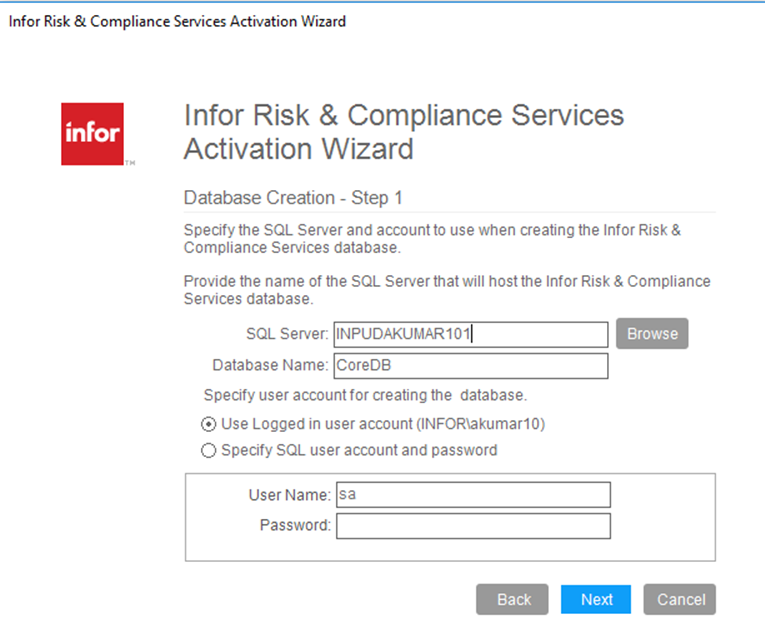
    IRC maintains its own SQL Server database for purposes of management and analysis.

  11. On the Database Creation - Step 1 screen, provide the name of the SQL Server that will host the IRC database. Ensure that only the server name is entered and not the Fully Qualified Name (FQN).
    Note: If your environment is SQL cluster enabled, you must specify the SQL Listener name in the SQL Server field. For the SQL Listener name, contact your SQL Administrator.
  12. Specify the account that will be used to create the IRC database and which IRC Services components will use to read and write information to the database.
    Note: 
    • The account details provided must not be a personal account.
    • Ensure that the SQL Server Browse service is enabled on the Database server. If it is not, the SQL server will not be able to connect to the database server and an error message will be displayed.
    • The IRC Services account and SQL Server Services account must have full control permissions on the folder [Install Path]\Core\bcp.
  13. Click Next. The Database Creation - Step 2 screen is displayed. Provide the Database Directory name, Database Log Directory name, and the Database File Group Directory name.
  14. Provide the name of the database.
  15. Select one of these options:
    • Use Logged in user account: Select this option to use the credentials of the currently logged in account. If you select this option, the User Name and Password fields are disabled.
    • Specify SQL user account and password: Select this option to specify credentials of a different account. Provide the user name and password.
      Note: The account details provided must not be a personal account.
    Caution: 
    The user account specified must have a SQL server login with the SysAdmin server role. This account is for one time use only and credentials are not stored.
  16. Click Next. The Database 
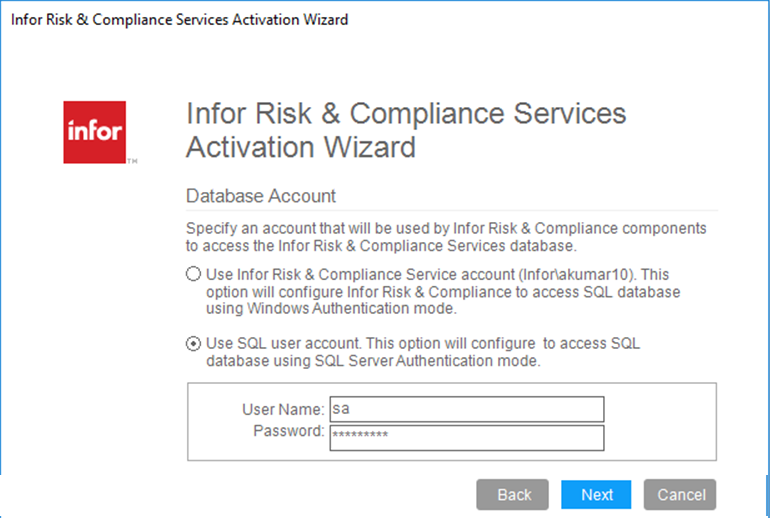
Account screen is displayed.

  17. Select the account that will access the IRC database.
    Note: The account details provided must not be a personal account.
    Caution: 
    If you opt to use Windows Authentication, then after activation you need to manually set the data source on the report server as follows:

    Go to the report server URL (the report server used during activation).

    1. Click IRC_<database_name>.
    2. Click IRC
    3. Click the Show Details button.
    4. Click the DataSources link.
    5. Click the CoreDB link.
    6. Enter the password and click Apply.
  18. Click Next. The MSSSRS Details screen is displayed.

    This screen is used to enter details required for reporting using Microsoft SQL Server Reporting Service (MSSSRS).

    Note: If the MSSSRS server is configured to use SSL, the SSL certificate common name must be same as the MSSSRS server name.
  19. Select the Enable Microsoft SQL Reporting Service (MSSSRS) Support check box.
    Note: If the Enable Microsoft SQL Reporting Service (MSSSRS) Support check box is not selected and you opt to publish the reports at a later date, you need to run the utility: PublishInsightMSSSRSReports.exe as follows:
    • For IRC reports, run the utility from [Install Path] > BRPublisher > bin.
    • For Insight reports, run the utility from [Install Path > Adapter > Tmonitor > bin.
    If the reporting server is on a server other than the application server, follow the steps mentioned in the section SQL Reporting Server Requirements.
  20. Provide the MSSSRS server name with the port number on which the report server has been configured.
    Note: If your environment is SQL cluster enabled, you must specify the SQL Listener name in the MSSSRS server with Port Number field. For the SQL Listener name, contact your SQL Administrator.
  21. Provide the name of the report server virtual directory.
  22. Provide the name of the report manager virtual directory.
  23. Provide the company name. A folder with this name will be created on the report server to upload reports.
  24. In the Report Server Database information panel, provide the SQL server name and the Database name in their respective fields.
    Note: If your environment is SQL cluster enabled, you must specify the SQL Listener name in the SQL Server Name field. For the SQL Listener name, contact your System Administrator.

    To locate the SQL server name and the Database name:

    1. Go to Microsoft SQL Server 2008 R2/ > Microsoft SQL Server 2012/ Microsoft SQL Server 2014/ Microsoft SQL Server 2016 > Microsoft SQL Server 2017 > Microsoft SQL Server 2019 > Configuration Tools > Reporting Service Configuration.
    2. Go to Database.
    3. Copy the values of SQL Server Name and Database Name from the Current Report Server Database section.
  25. Select the Use SSL Connection when connecting to MSSSRS check box if you installed MSSSRS on a machine that is SSL enabled.
    Note: If the report server is on a server other than the application server, the following screen is displayed:

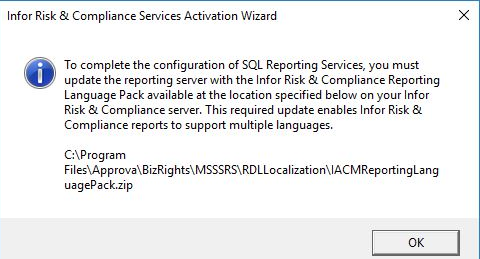
    In this case, take the following steps.

    1. Click OK.
    2. Before activation, copy and extract the .zip file mentioned above to [Microsoft SQL Server Install Path] > Reporting Services > ReportServer > bin on the reporting server. This will place the Approva.SSRS.ResourcesEx.dll file in the bin directory.
  26. ClickNext.

    The activation screen has the necessary information to begin activation. The Activation Tasks section lists the operations that are performed during activation.

  27. Click Next to begin activation.
  28. Click Next after the tasks are activated. The final screen of the activation wizard is displayed.
    Note: If any of the activation tasks fail, the system displays an error message and the entire activation fails.
  29. Click Finish to exit the wizard.
    Note: In case of problems during activation, refer to the Troubleshooting in this document.