Authenticating Certification Manager
Select this option to use Certification Manager credentials to sign into the application. When users connect to the application from Infor OS, the Certification Manager sign-in screen is displayed.
- In this case, you need to create a Super User account for Certification Manager. Provide the user name and password for this account in their respective fields. This Super User account is used to sign into Certification Manager for the first time, to create new users and to import users through CSV files.
- Depending on the authentication scheme selected, provide the Active Directory, IRC Server or Super User Account credentials.
-
Select the
Use Single Sign On (SSO)
check-box to integrate Certification Manager with an external authentication
provider and enable single sign-on. External authentication providers have a
mechanism to authenticate users and send information required by applications
to support single sign-on. These providers send the authenticated user ID via a
standard HTTP header. Certification Manager supports single sign-on by
accepting the HTTP header and automatically signs-in the user if the user
exists and has the necessary privileges to sign into Certification Manager. To
enable Use Single Sign On, provide the following information:
- In the field SSO Header, provide the standard HTTP header that your external authentication provider is configured to send to the authenticated user ID. For example, HTTP_CM_USER.
- In the field logoff URL, provide the URL that your external authentication provider requires to complete the sign out. Certification Manager directs the user to this URL after completing its own sign out activity.
-
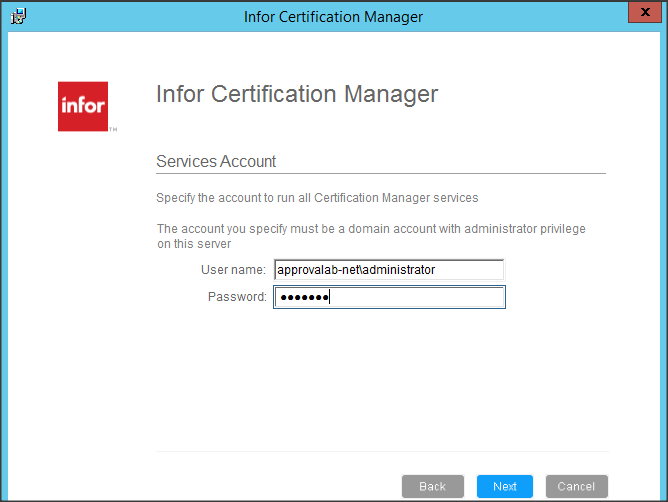
Click
Next. The screen to
specify the Services Account is displayed.
-
Specify the user name and password. This account should be a
domain account and must have administrator privileges on the installation
server. If credentials are invalid, an error message is displayed.
Note:
- The account details provided must not be a personal account.
- The domain account must be directly assigned to the Administrator group on the Certification Manager server. If the domain account is assigned indirectly through a domain group, the installation wizard displays an error message.
-
Click
Next. The screen to
specify the Database Creation and Database Connection accounts is displayed.
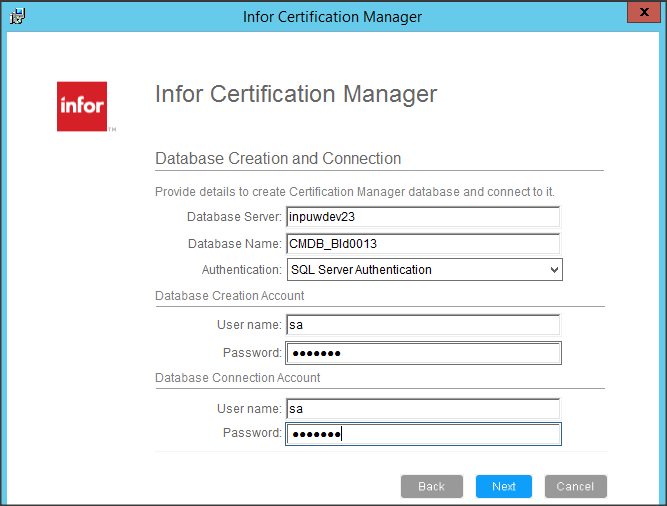
- In the Database Server field, specify the name of the server hosting the Certification Manager database. The Database Name field is populated automatically. Both these fields are editable.
-
Provide the credentials to create the Database
Creation Account and the Database
Connection Account in their respective fields. For this, select the
required authentication from the Authentication drop-down list. You have the following options:
- Windows Authentication: If you select this option, the Database Creation Account and the Database Connection Account fields are not editable. The Certification Manager Service Account is used as the Database Creation and Database Connection Account. This service account requires the privileges mentioned in the section SQL server permissions.
- SQL Server Authentication: Select this option to use the SQL server sign-in name and password to access the database server. Provide the credentials to create the Database Creation Account and the Database Connection Account fields. These fields are editable. If the details provided are invalid, an error message is displayed.
Note: Ensure that the Database Connection Account is a valid login account on the SQL database server hosting the Certification Manager database. -
Click Next. The Database
Creation and Connection - Step 2 screen is displayed.

- Provide the Database Directory and the Database Log Directory name.
- Click Next. The screen to define the Report Server is displayed.
- Provide the details required for reports that use Microsoft SQL Server Reporting Service (MSSSRS). The Certification Manager Service Account with the Content Manager SRS role is required to publish reports.
-
Keep the Publish reports to Report
Server check-box selected and provide the URL of the server where you
want to publish Certification Manager reports. Provide the name of the report server
virtual directory and the report manager virtual directory in the respective fields.
Note: If the Publish Reports to Report Server check-box is not selected during install, you need to run the Publishing reports utility to publish reports.Note: When Database Server and Report Server are different, the Report Server must be manually added as a linked server on the Database Server. You must configure the linked server before installing and activating IRC. The account used for linking must be the same account used for DB creation, that is, the sysadmin account
- Click Next. The screen to start installation is displayed.
- Click Install to start the installation.
- When installation is complete, click Finish.